
Clean Up and Manage Key Departments in the System
Please follow this article step by step so you can understand the things I am looking at. Eventually, I want you to be in the habit of looking at them without me reminding you so that I am no longer needed. Once everyone is asked to correct things enough it will be a habit to not make the mistake. I don’t want you guys doing the corrections. I want you to use the reports to know what needs to be corrected and then go to your departments and make the staff correct. That is how any organized business will run smoothly. You don’t do all the work but you know what does need to be done and you know when someone is not doing it so you make them fix their own situation. If you feel you need onsite training for the team let us know. Some companies do this annually to continue evolving their organization. Each time we focus on features they don’t yet use, or features they are having issues with, as well as possible adjustments to their operation or software.
REMINDER:
- Make sure you have gone to System Tools – Help – scroll to the bottom and click on Departments and Duties in System. This is your guide to everything EZ Process Pro. It will also help you know if you have your business organized incorrectly or less efficiently. Print it out and work as a team to assign 1 person and 1 backup to each job except sales. ALL the jobs on this list must be done for EZ to operate efficiently.
- Please let’s work together to keep this on track. Also, the system is NOT a record-keeping tool which is how it is treated in some cases. You are not doing the work JUST to have a fast way to look up info. It is a process organizing and company management tool. If you use it right, you will grow and KEEP more of the profit. Work less hard for more $$. That’s what we all want ;)
- My suggestion is to divide yourselves into to management of separate departments that follow how the system is outlined Sales /Financing, Ordering / Receiving, Shipping, and Accounting /Human Resources. This will minimize the time it requires you to manage your teams. Once you are cleaned up it should take 5-10 mins a day total to review the reports and ensure everyone is doing their jobs properly.
ORDERING / RECEIVING DEPARTMENT MANAGER
Ordering Department: This person will make sure that whoever is on the daily duties overseeing ordering and receiving products is keeping their orders up to date, confirming them received, and entering estimated dates of arrival. You will not be doing the job but will be monitoring their work. (this is 1 report)
Daily Activities:
Items for PO
The first place to check daily will be Main Menu > Ordering- Items for PO – Select All Under step 1 and then Display BOTH Items for Stock and Customer Sales (this list is supposed to be emptied or as close to empty as possible). Nothing should sit on this list for a long time and operations should be able to trust that EVERYTHING on this list is ok to order meaning it is paid for to the requirement limit for ordering, or funds accounted for meaning it’s approved for finance you have ALL the required documents as well as signatures. Otherwise, it does not belong on this list and you will need to figure out why it is there.
Often people call sales finance deals when they are not 100% approved. This should not be done. If a customer still owes you info, then a balance should be left on the sale so that the operations do not accidentally order the product and you have the customer in an automated report to follow up on.
Sales on there have Estimated Dates of Delivery that have passed.
- All sales that don’t want their stuff EVER need to be canceled if there is a deposit and they are showing finance the balance you can have a manager refund the $ to store credit and void the sale OR you can remove the finance from the sale so it stops telling us to order the goods and then it will become a layaway. Some of these might be 100% finance deals that don’t want to take their stuff so they too need to be voided as mentioned above.
- If it is still an active sale and the Date under Estimated Date of Delivery is past or close and they are not taking the items, please fix the estimated date of delivery. This date should always be accurate and NEVER in the past. (again this is the salesperson or delivery department that needs to correct not you)
- If the estimated delivery date is coming in the next day or so it needs to be added to a PO (Operations must decide based on the manufacturer how far out they need to order the items)
- If the customer does not want the delivery for a while those are sales that a sales manager may want to call and get them to take their stuff sooner so you guys can make the $$ if they are finance deals
NOTE: This is one of your assigned reports to check daily to make sure no dates are older than the current date of today. If they are you need to get your department to correct
Purchase Orders
The second place to check will be Main Menu > Ordering > Purchase Orders > Non-Received Purchase Orders
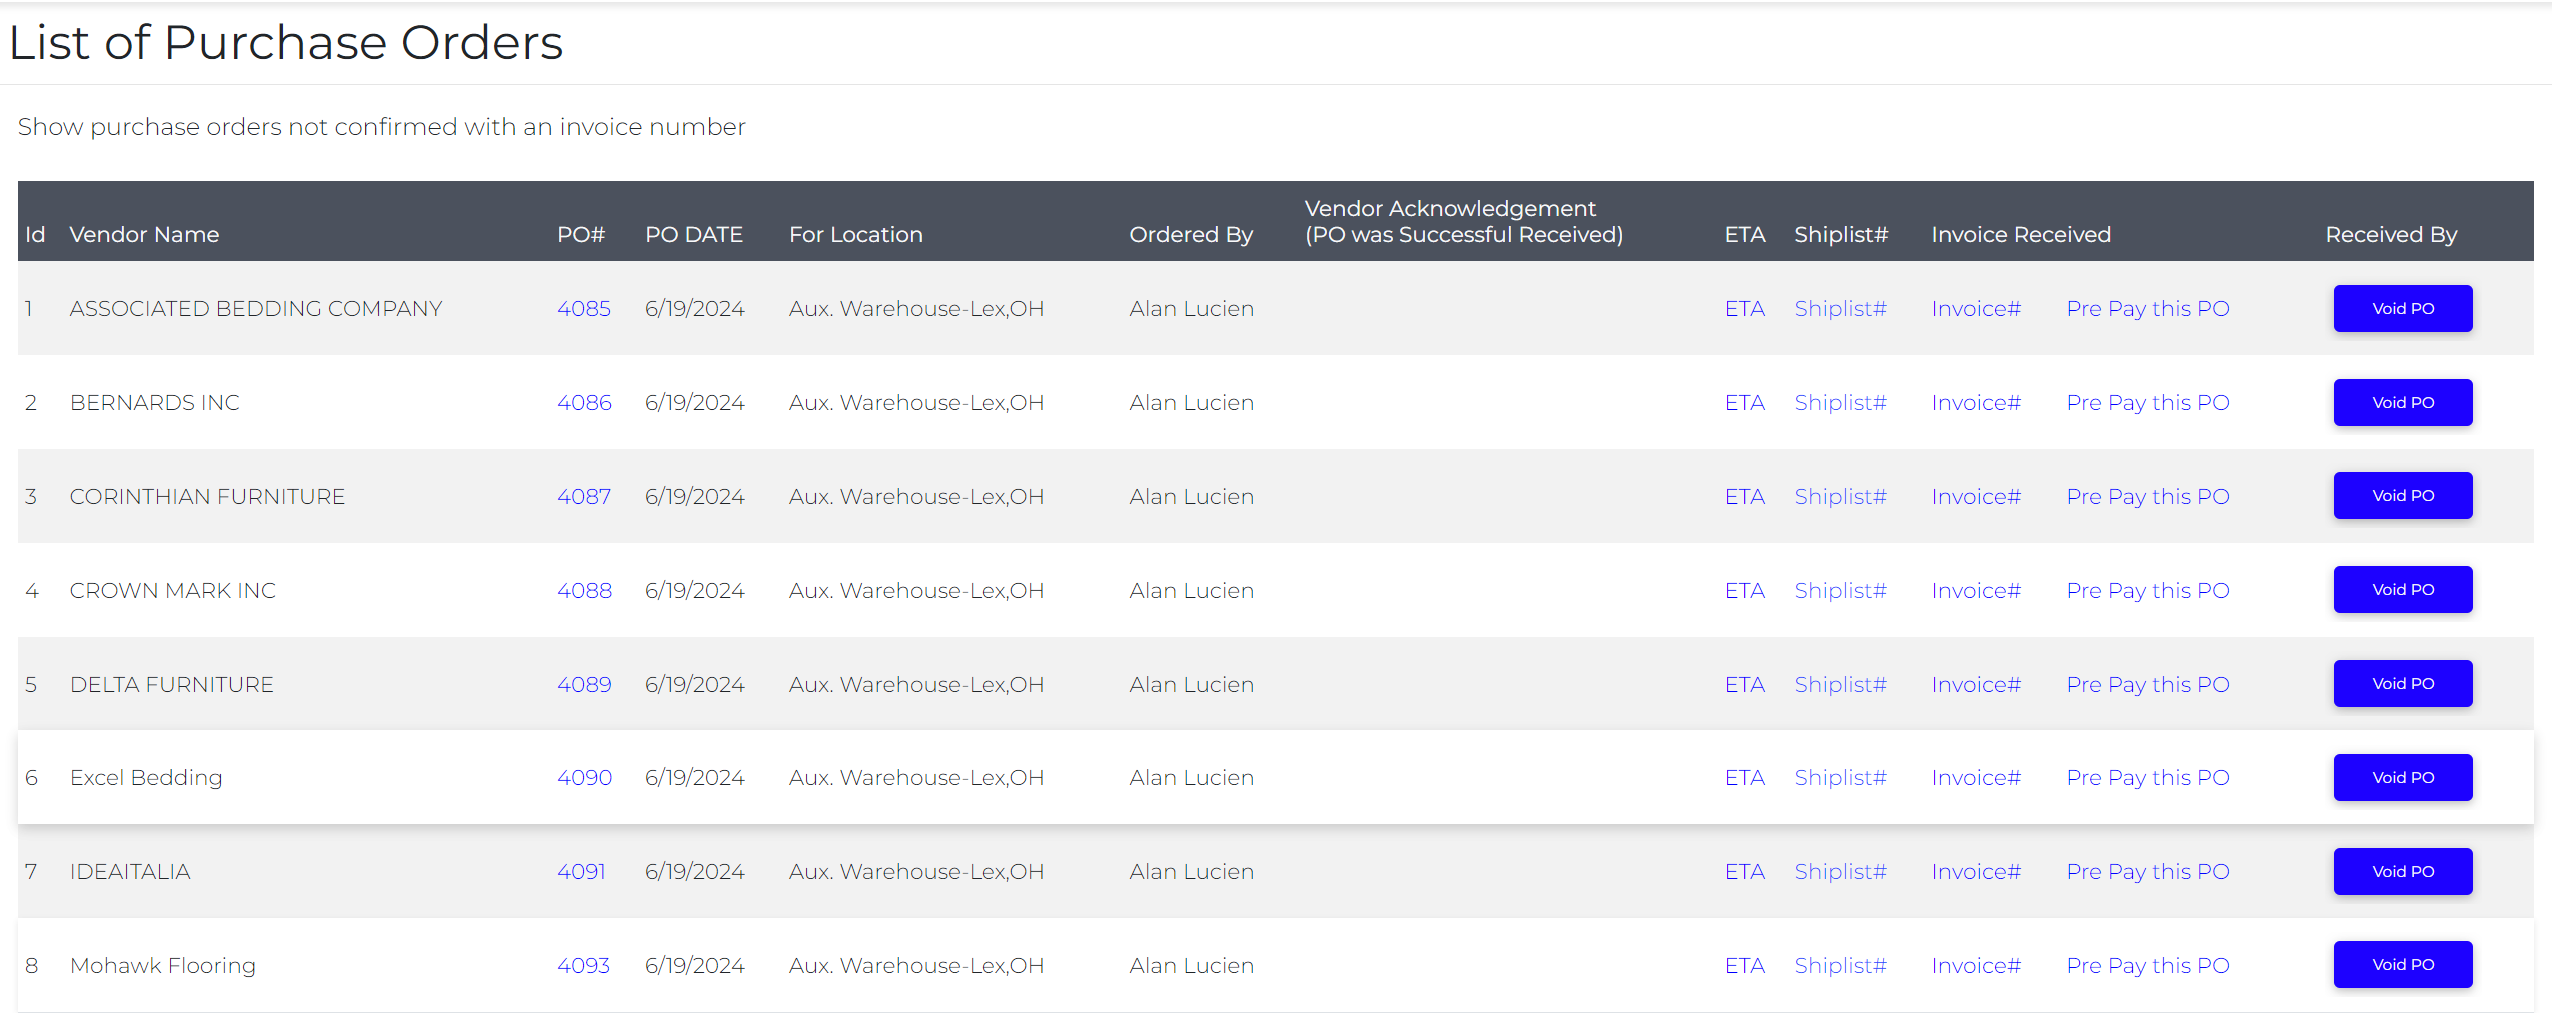
- The ETA was supposed to be put in on every order. They need to click on the ETA and fill it in. If anything changes about the ETA they need to update it. EVEN IF IT IS ORDERED TODAY AND COMING TODAY OR TOMORROW. This affects other areas in the system. The ETA can and should be changed according to updates so that it always stays accurate.
- Look at the PO date. Unless it is coming in from overseas and is still on order (which you would know by the ETA then anything that has a PO date older than 2 weeks should not be there. Did you receive it and someone forgot to check it in which will screw up inventory? If it is local and older than a week it should not be there.
NOTE: This is the other report you need to check daily to make sure that EVERY PO has an ETA and that no PO is sitting for a long time from the PO Date.
Weekly Activities:
As the Ordering / Receiving Department Manager the first place you will want to check weekly will be the Inventory Management Reports to access them you will need to navigate to Main Menu > Management > Reports > Supervisor Reports > Inventory Movement Reports.
For a walkthrough of the report please see our article How to use the Inventory Movement Report
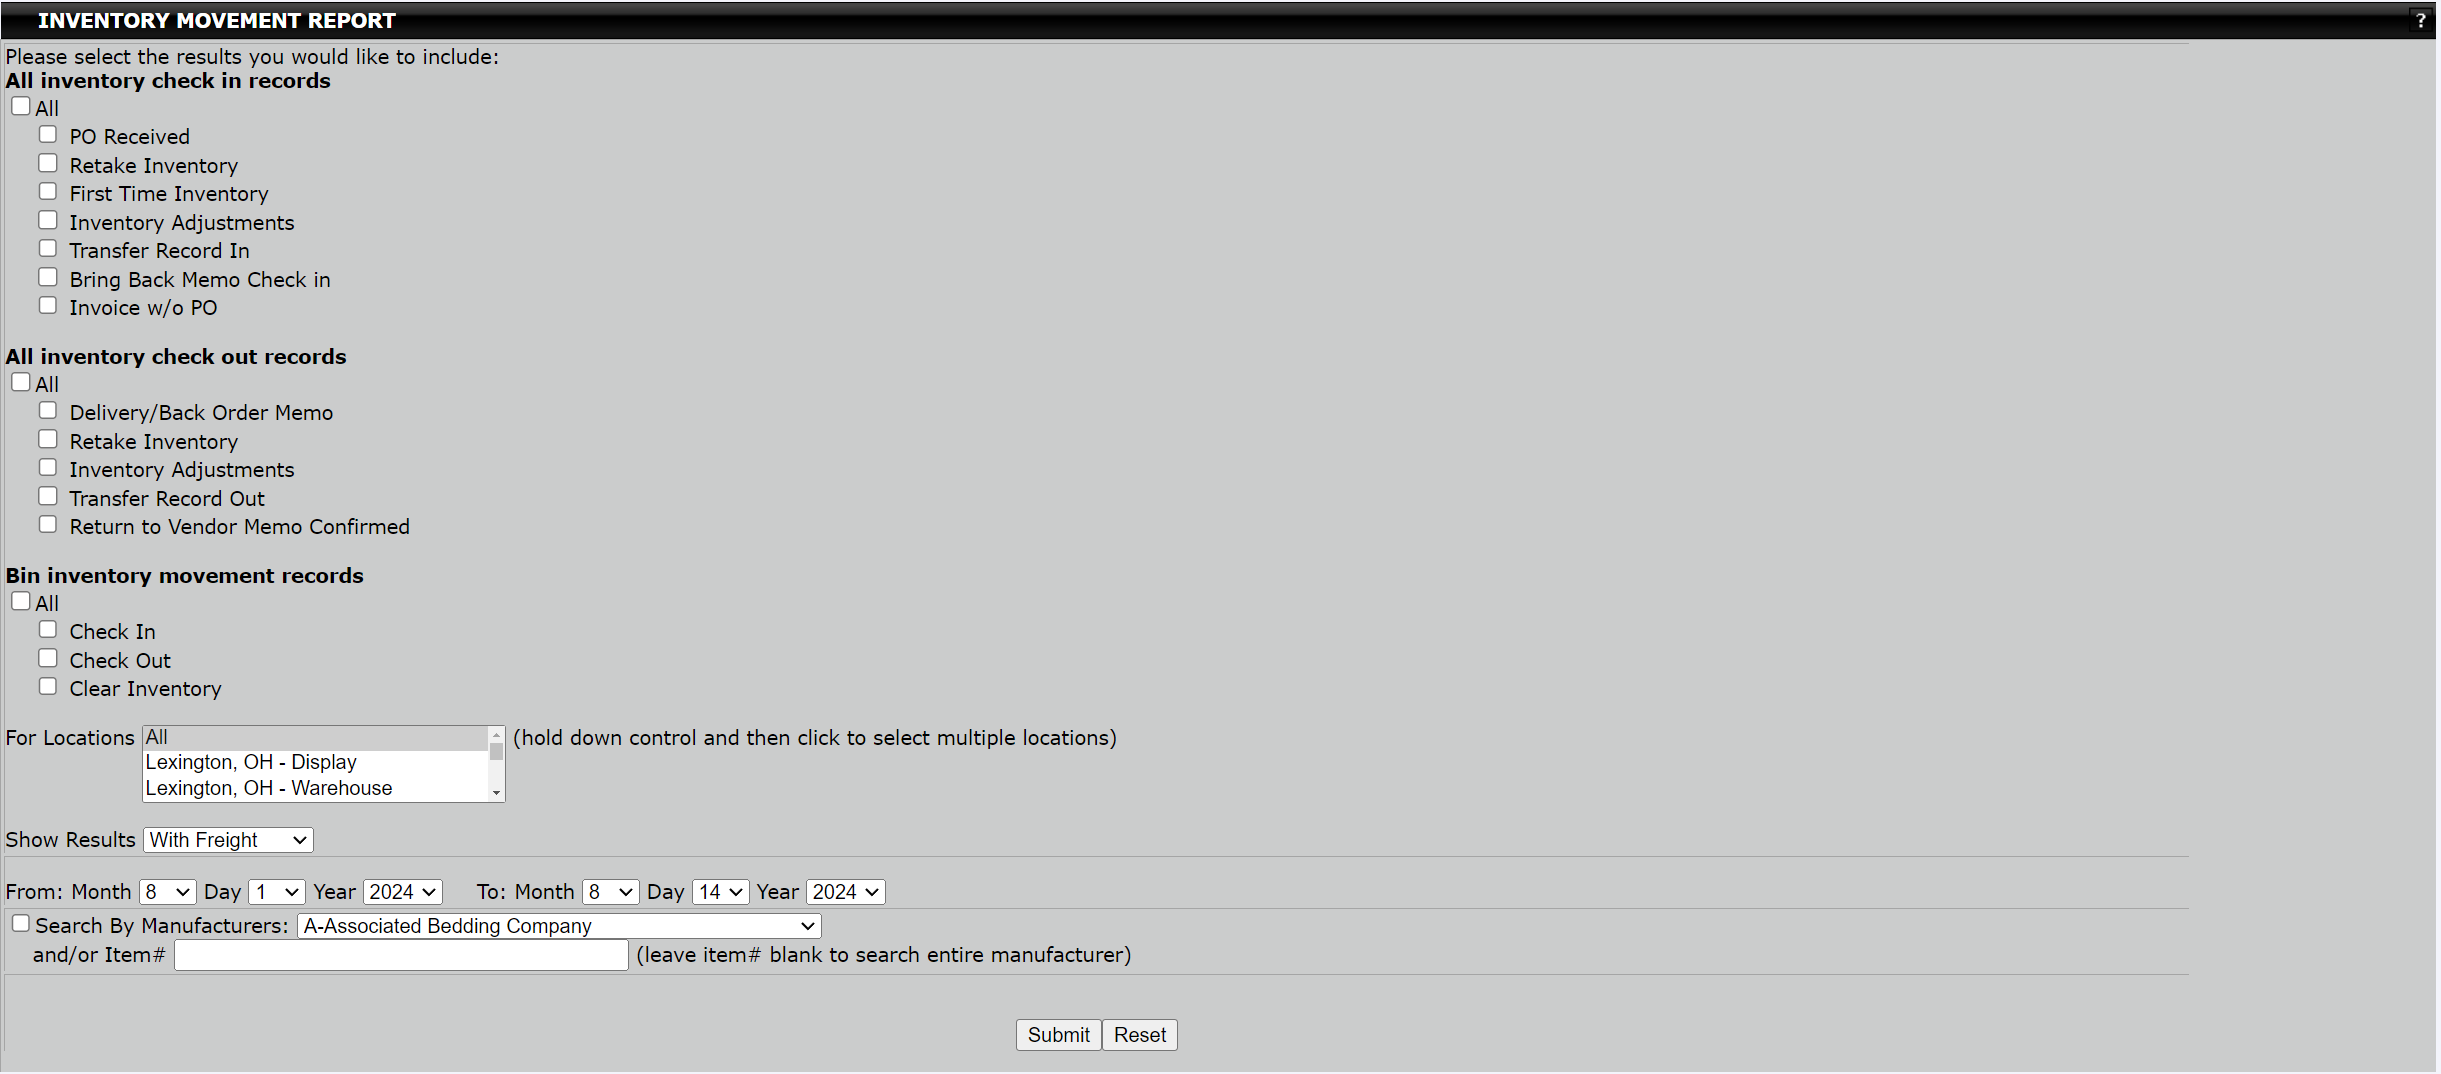
You will check this report weekly when you pull the report pull it for the entire week. It should look like below when you pull it.
The purpose of running this once a week is to look at the costs to see if anything looks out of place or outright incorrect. This will show you everything received into the inventory and everything that left the inventory.
If you have performed a Retake Inventory you should never see anything that says adjustment or inventory adjustment
The second item you should be looking for is to correct items that have a $0 cost associated with them. To correct them you must navigate to Main Menu > Management – Adjustment- Correct Active Items with $0 cost and it will show you all the items entered in incorrectly. In one place so you don’t have to look them up by manufacturer anymore. There should not be anything in this report.

Here you will want to select All from the Manufacturer dropdown
If anything on here does not have a cost, it needs to be corrected as soon possible:

SALES AND FINANCE DEPARTMENT MANAGER
Make sure you are confirmed paid on all deals and that there are no pending partially delivered deals and no deals that may have expired or not yet delivered. You will not be doing the confirming of Payments but you will be monitoring one report. You will also be monitoring the credit check report to make sure notes have been made on everything.
Daily:
If you do financing through a 3rd party or InHouse Financing you will want to check on the status of credit checks that have been recently run. To do you you must navigate to Main Menu > Management > Finance Department > View all Credit Checks
Make sure notes are being made on every credit check. These notes must be made at the point of processing to let you know what is going on with these sales and figure out if someone has a chance of being sold if the salesperson reaches out or if a different approach is necessary. Maybe you can figure out how to sell them more, or IH finance some if the sale is large enough. This is for monitoring and a habit everyone touching credit must do if they have chosen to pull credit before processing a finance deal.

Continuing on with daily duties if you do financing through a 3rd party or in-house. You will want to check the status of unconfied receivables. To do so you must navigate to Main Menu > Management > Finance Department > View Reports > By Unconfirmed Receivables (pull from the beginning of the system to the current date)
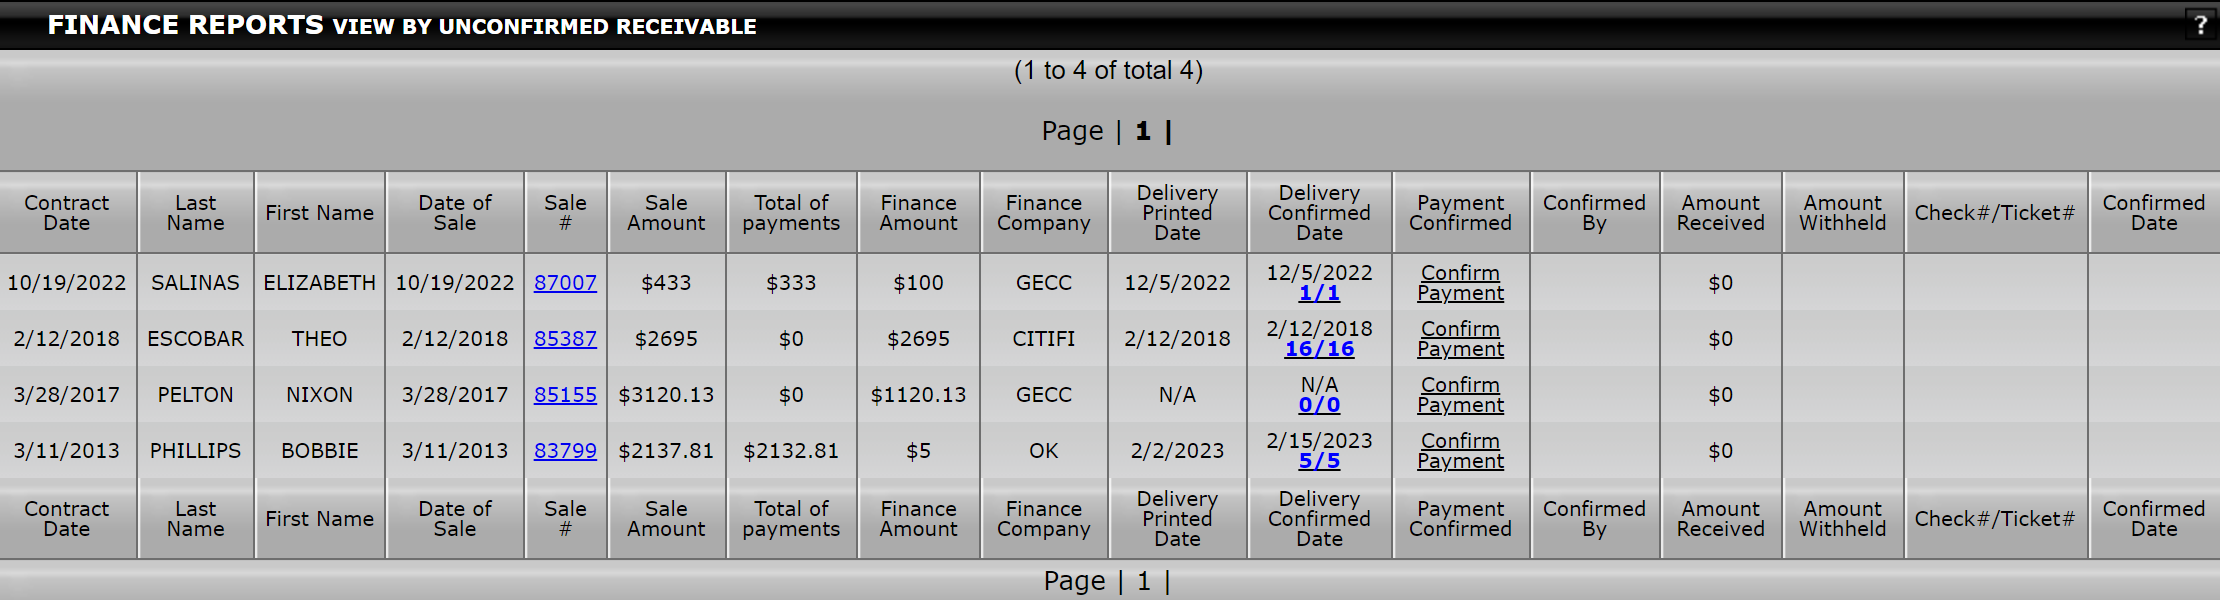
It is recommended that someone run this report at minimum four times a week. They will pull the online bank statement and confirm payment on those you have been funded on.
- You are looking for the column that says Delivery Confirmed Date. If it is still in this report and the confirmed date is older than a week then there is an issue and you need to follow up with the credit department and or the person confirming.
- It is important that this stays up to date and never gets behind again. It affects the accounting side of the system. Once you get the money in real life, the system revenue and supervisor reports need to show that money came in as well. The way that happens is the Confirm Payment.
Weekly:
If you are using financing through a 3rd party or in-house financing you will want to run the following reports to ensure that sales are being addressed.
Partially Delivered Sales: To access the report you will need to navigate to Main Menu > Management > Finance Department> View Reports > Partially Delivered Sales

Not Delivered Sales: To access this report you will have to navigate to Main Menu > Management > Finance Department > View Reports > Not 100% Delivered Sales
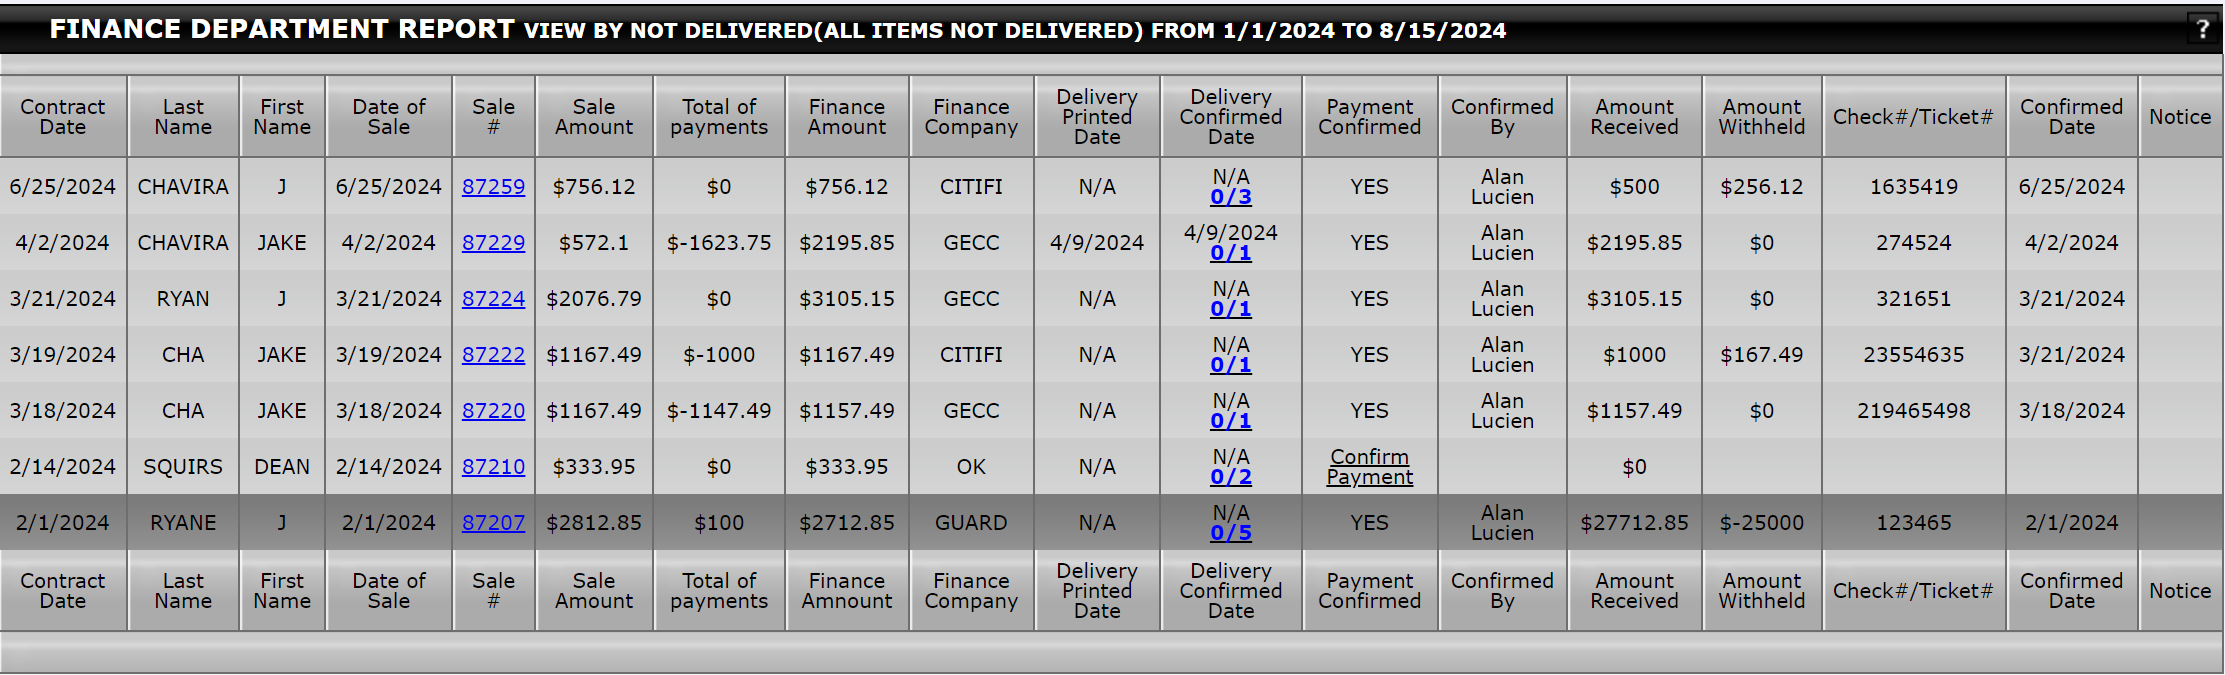
What you are looking for:
- They also need to start filling in the Notice box when confirming a payment to explain why the amount withheld is what it is. (For example, they would type 24 months with no interest).
- Sales that have a Date of Sale older than 3 months but not confirmed paid by finance. So, what you want to see is the Payment Confirmed column saying YES for older sales or we need to either void the sale or remove the financing so we don’t accidentally deliver things that the delivery expired.
- You are looking for sales that Payment Confirmed says YES but the Delivery Confirmed Date says NA (this means we funded and paid on the deal but never delivered anything and can get in trouble)
- You are looking for a Delivery Confirmed Date showing a partial delivery. We have been paid for it but the customer still needs products.
- You are looking at Amount Withheld Hold you are just spot-checking to see if any of the amounts withheld are larger than normal or seem off. This means the company is losing money or someone made a mistake which affects financials.
Managing Sales
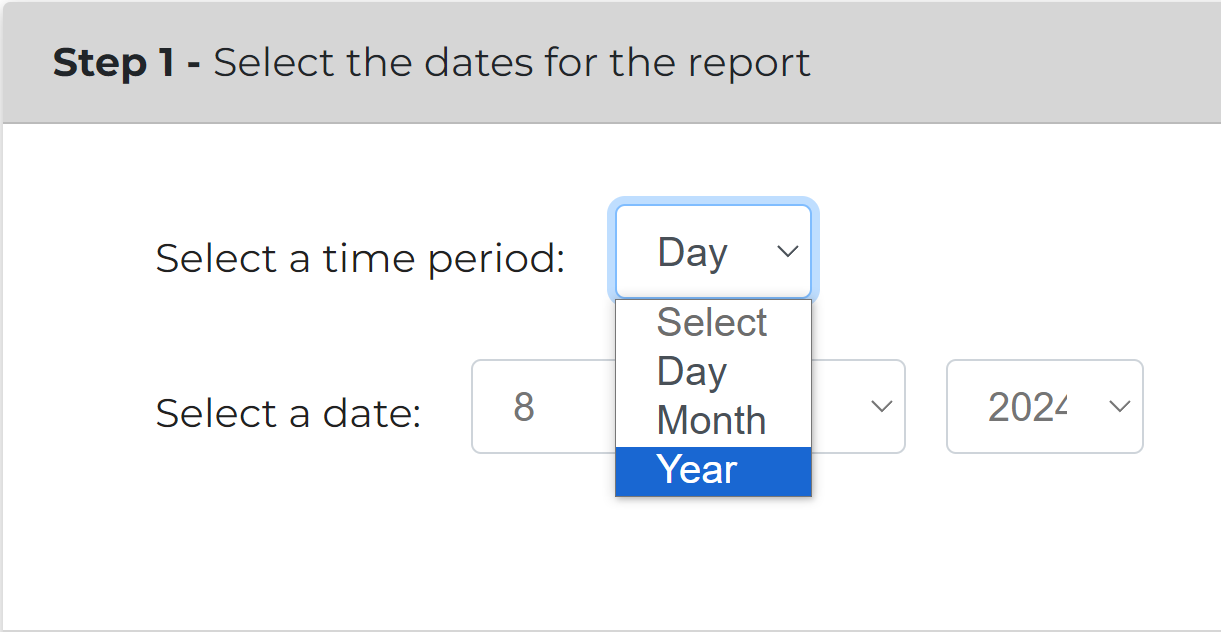
It is recommended that the Text Sales Report is run on a weekly basis. To access this report you will need to navigate to Main Menu > Management > Reports > Text Sales Report. Once here select Year from the dropdown under Step 1.
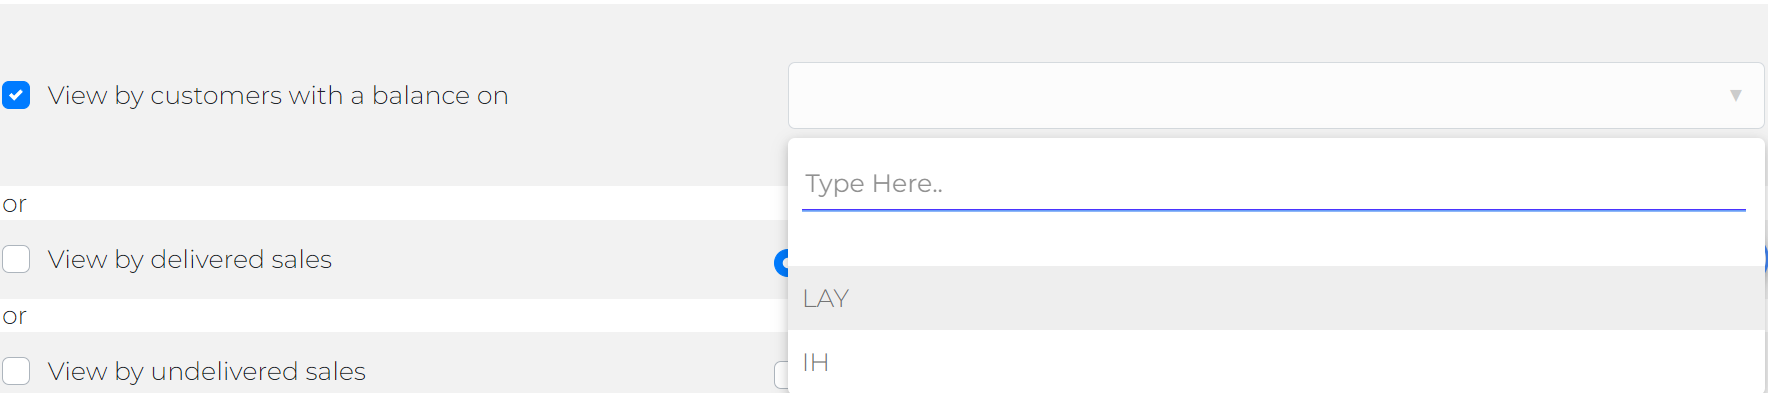
You will then skip over steps 2, 3, and 4. For step 5 you can select any options that you wish to see displayed on the report however the main objective for running the report is in step 6 select where you must select Customers with A Balance on LAY or IH.
Once run the report will then take you to a new window as seen below:

Here you will want to choose the option Customer with a balance greater than (put $0 in the box)
The staff should be calling these people to make payments and or person in the finance department should be working to get their final approval. The staff can access their own sales under Main Menu > Sales > Personal Area > My Clients with a Balance on Layaway or My Clients with a Balance on IH.
There is a notes column where they should place any notes that will then be visible under the notes column in this report. This is also the report that all sales that are not 100% approved for finance should be on. This way you can go straight down the list. You can try to convince the true layaways to finance and convince the finance deals that you are waiting on things from (such as a deposit or driver's license).
Using the Text Sales Report to view deliveries that have been confirmed:
It is suggested that you run the Text Sales Report on a weekly or even daily basis. To access the report navigate to Main Menu > Management> Reports > Sales Reports > Text Sales Report.
Under Step 1 you can choose either to select the date range you wish to run the report for or one of the preset ranges(Daily, Month, Year), skip steps 2, 3, and 4.
In step 5 you do not need to just go to the right of the View Delivered and check Use all Items with Confirmed Delivered Date (then click search). This report is how you monitor your income from a sales perspective “delivered sales for a certain time period” It will allow you to analyze sales staff, profit, etc.
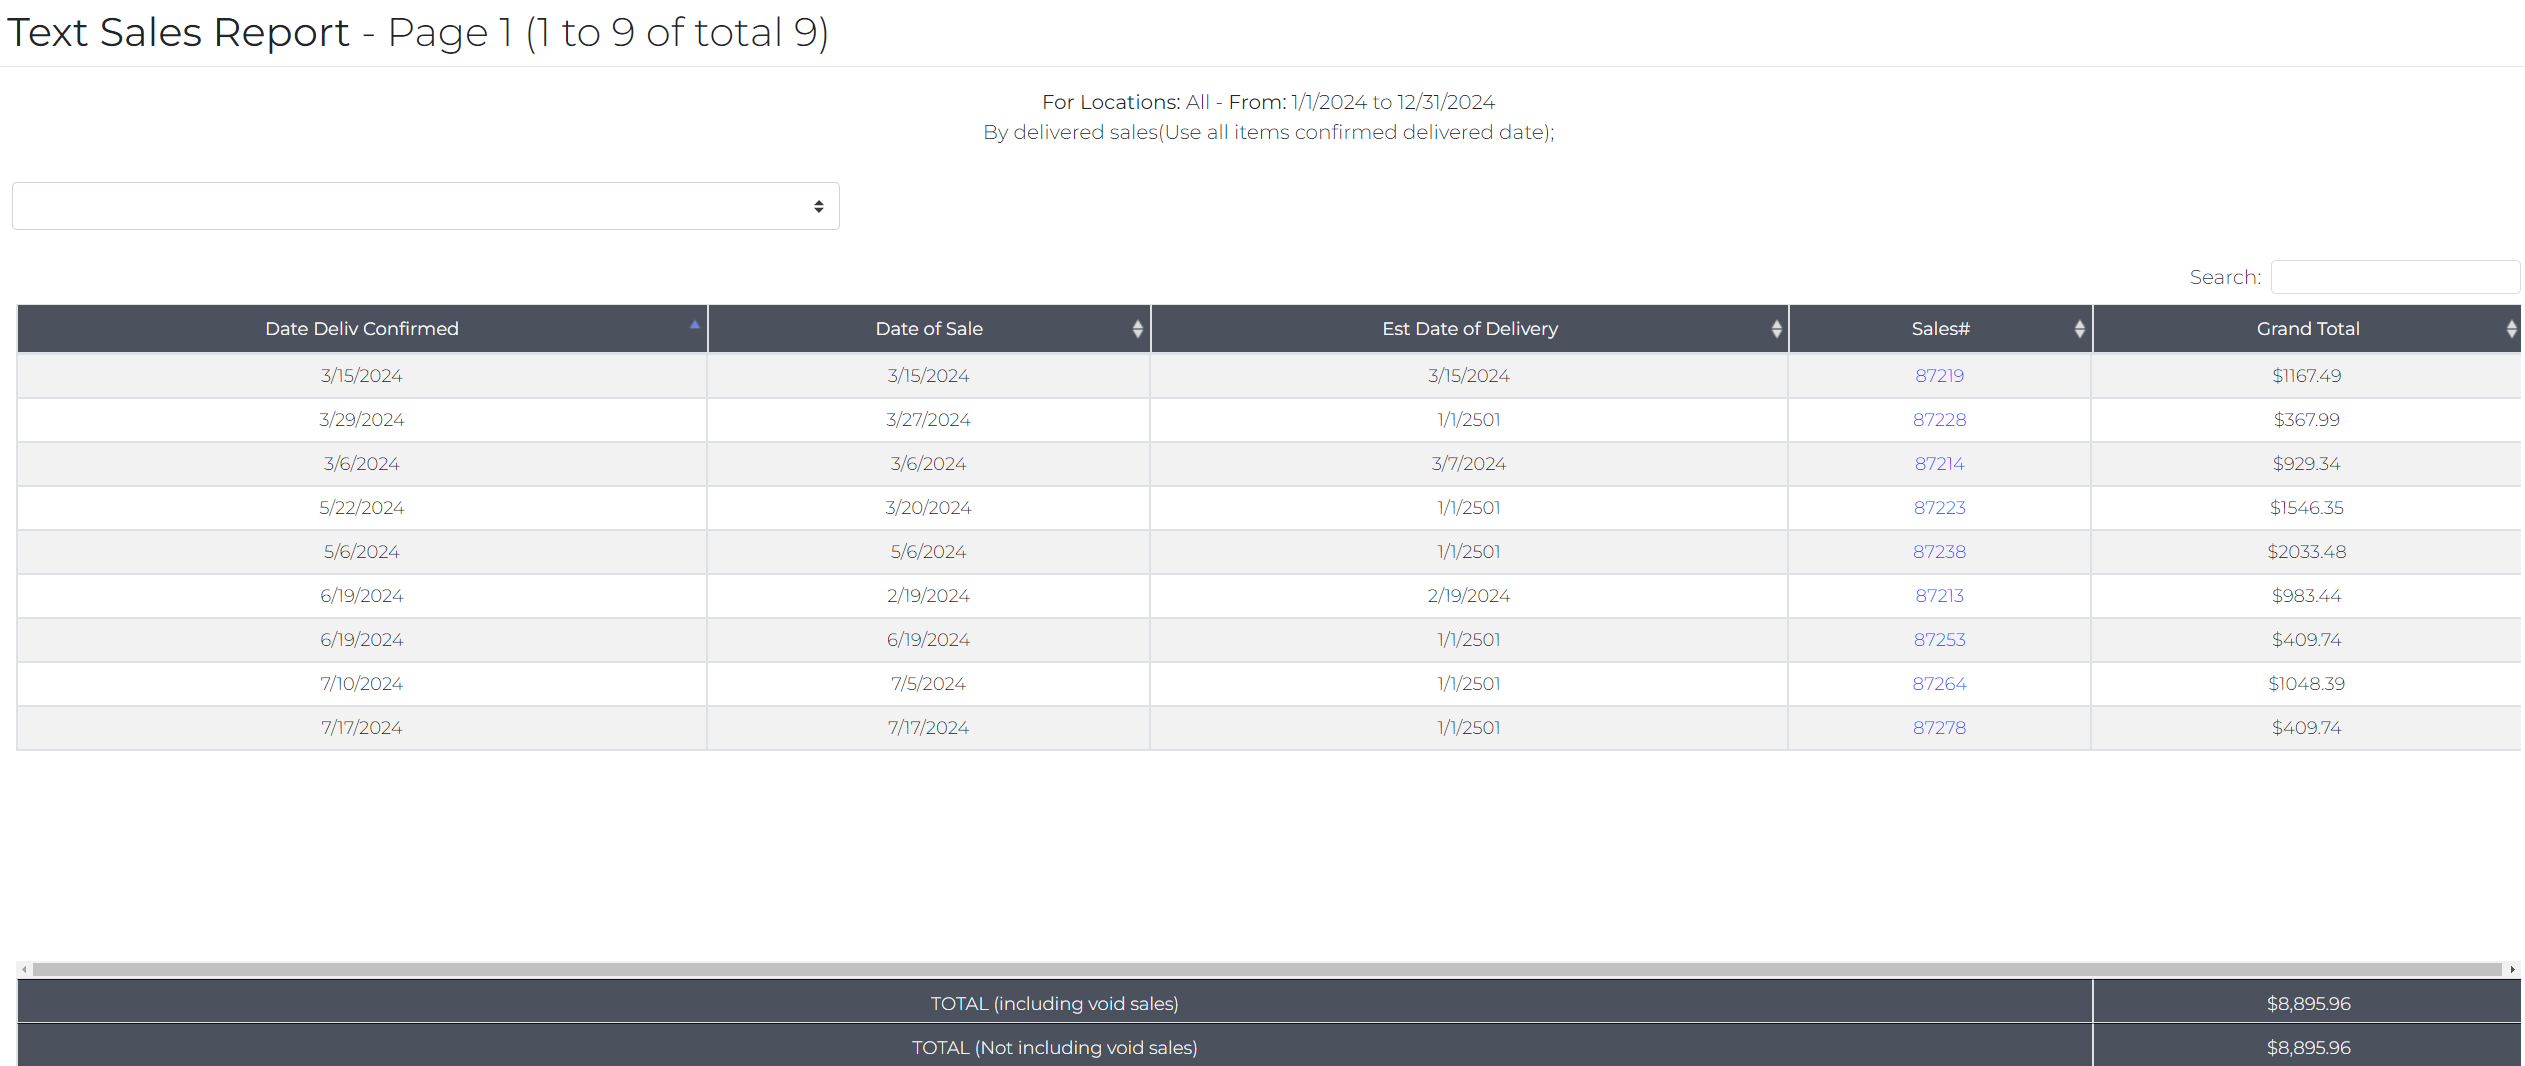
When the report comes up there is a drop menu in the top left corner (the one that says average gross margin) Click thru drop menu: Total Sales (W/O Void) Average Gross Margin (W/O void); Total Profit (W/O Void)
SHIPPING DEPARTMENT MANAGER
Making sure all deliveries are being confirmed promptly (same to next day) and that nothing is slipping through the cracks (this is 1 Report). You will also be checking the inventory movement report to make sure nothing looks fishy (1 report)
DAILY
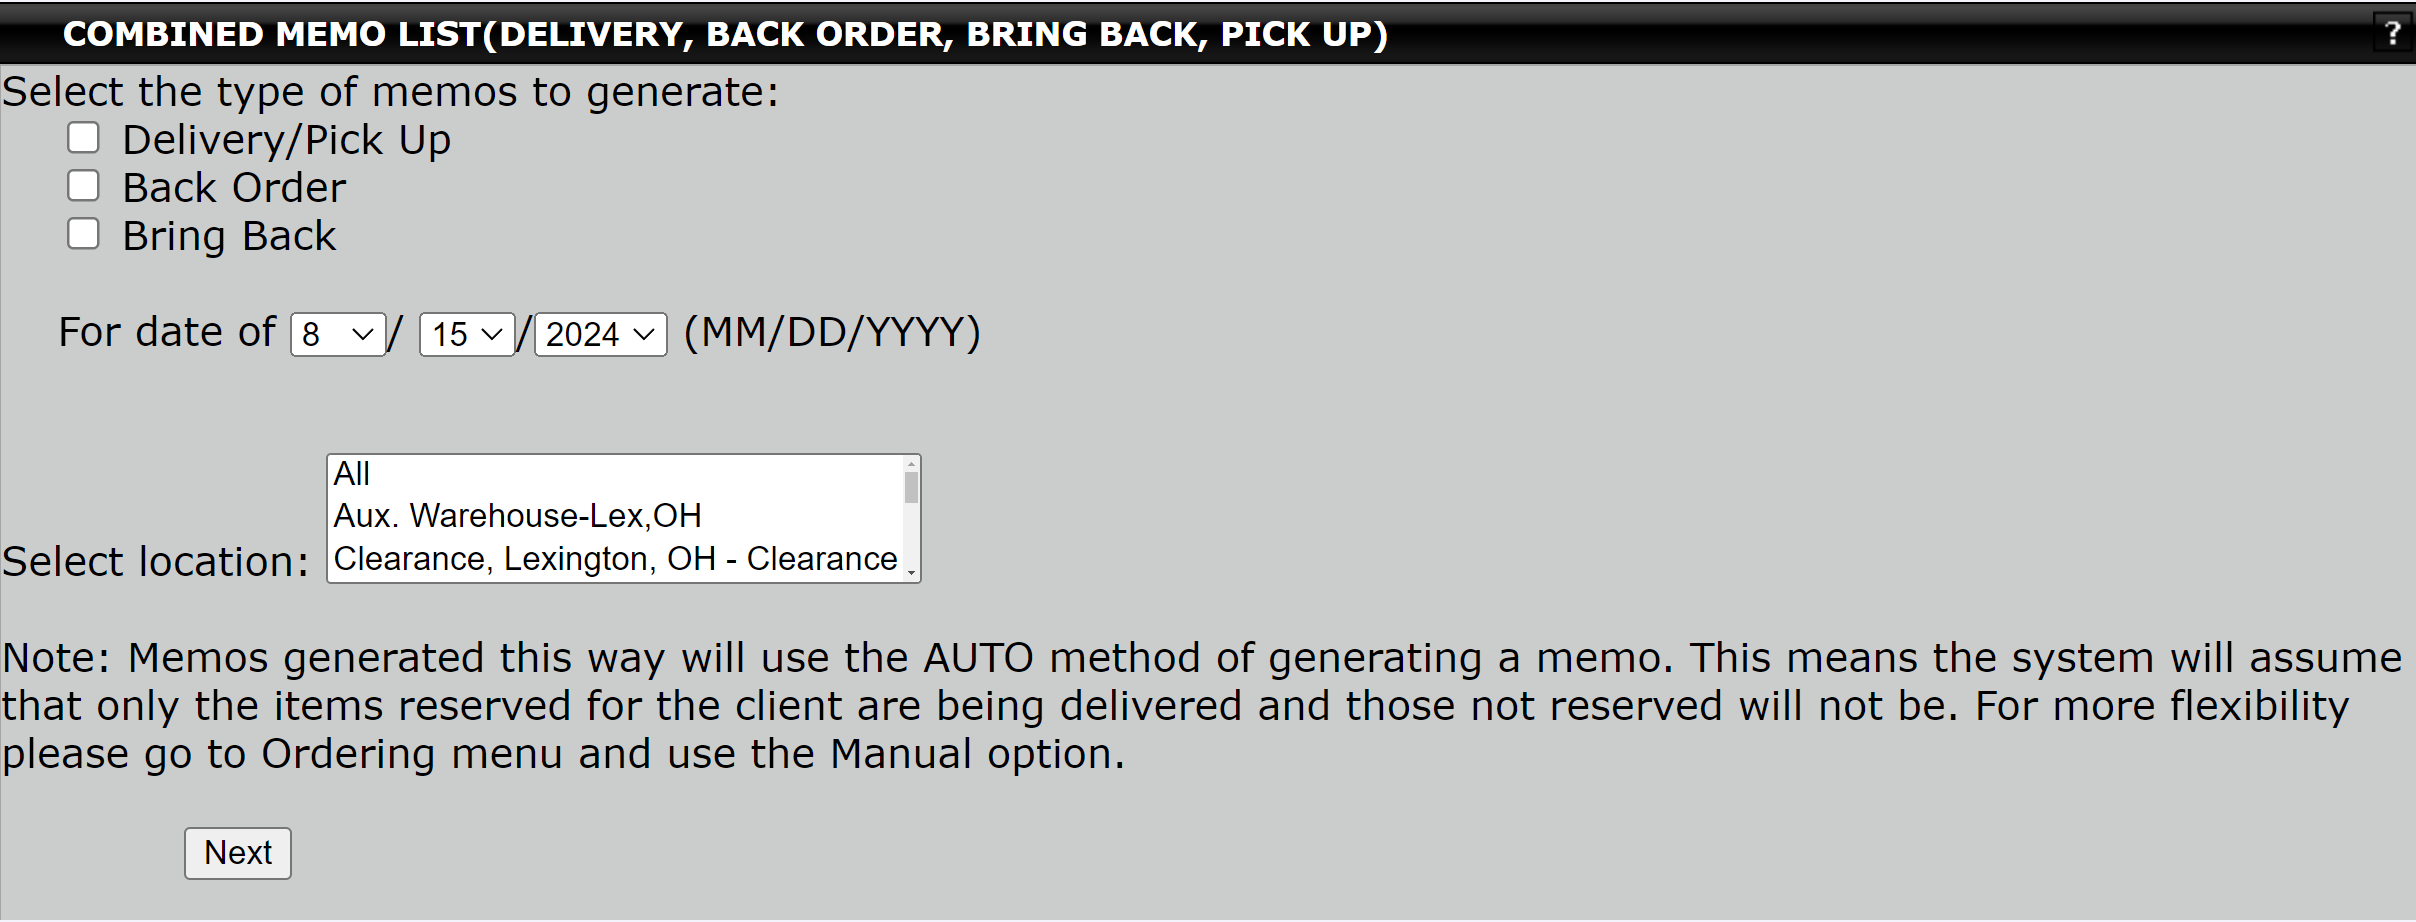
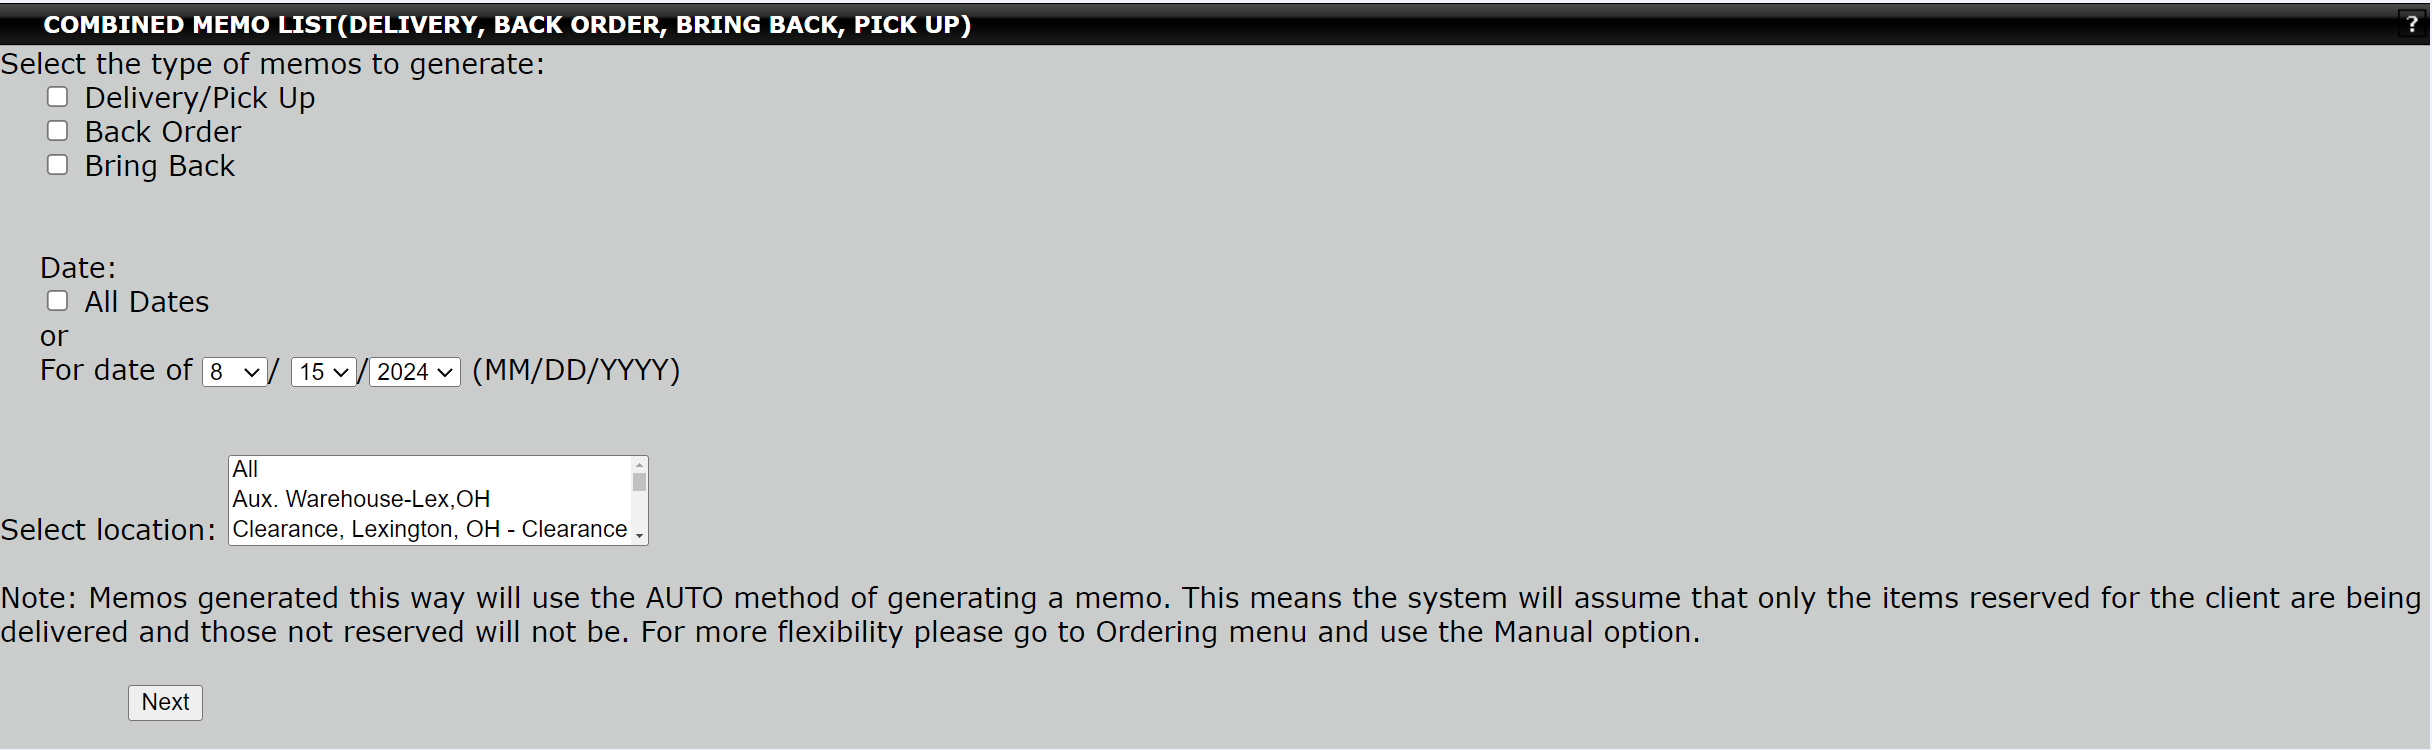
To efficiently manage the shipping department it is important to run the check Delivery, Pickup, and Backorder memos.
To do so you must navigate to Main Memo > Shipping > Print Memo > Print All Shipping Memos. Here you will have the option to select which memo, date, and location(s) you want to search by.
- This report needs to be 100% to ensure that the inventory has been. If you have sales that have already been delivered but didn’t generate the delivery then they need to get them off this list by generating and confirming the delivery
- If there are sales with an Estimated Delivery Date older than today (or the current day) then they need to edit the delivery date

You can then select which sales you would like to print the memo for by placing a checkmark next to the sale, entering the Driver, Manager Approval (password), and clicking Submit.
After you have checked memos that need to be printed and printed those that are ready to be Delivered, Picked Up, or Back Ordered. To do this you must navigate to Main Menu > Shipping > Confirm Memo > Confirm All Shipping Memos.
Here you will have the option to select which memo, date, and location(s) you want to search by.
The first time you run this report we suggest that you run it for All Dates to ensure that all dates. This will ensure that you catch up on any memos that need to be confirmed.
We suggest that you run both of these reports daily to ensure that there are never any printed memos that have not been confirmed that are more than one day old
Each day, all the memos from the day before need to be confirmed, or if they did not happen then the memos need to be confirmed that nothing got delivered, brought back, or transferred. That clears the product and puts it back in the correct inventory, therefore, keeping it accurate. Although it will be back in inventory it will not be available because it is still reserved for the client. You need your system to match real life and if an item is brought back to the warehouse then the system needs to see it.
While the ordering team will be looking at this as well it is important to check the Items for PO. To access this part of the software you will need to navigate to Main Menu > Ordering > Items for PO.

From this page under step 1 select All and Display Both Items for Stock and Customer Sales and then Submit to ruin the report.
- You are looking for sales that have an Estimate Date of Delivery older than the current date.
- For example: If the sale has an estimated date of delivery that has already passed this should be looked into, also if you are seeing estimated delivery dates months or years in the orders should be looked into.
- You should be placing the items on a PO as the system says we need them. If there are items on here we don’t need, you need to find out why you don’t need them.
- For example, if the customer is not fully approved for financing, the sale should be updated to remove the financing. The person who initially applied for the financing should be informed that financing should never be mentioned until it is 100% approved. Until then, it should be treated as a layaway
Weekly
As the shipping department manager, we must check the Inventory Movement Report every week. To access the report navigate to Main Menu > Management > Reports > Supervisor Reports > Inventory Movement Reports.
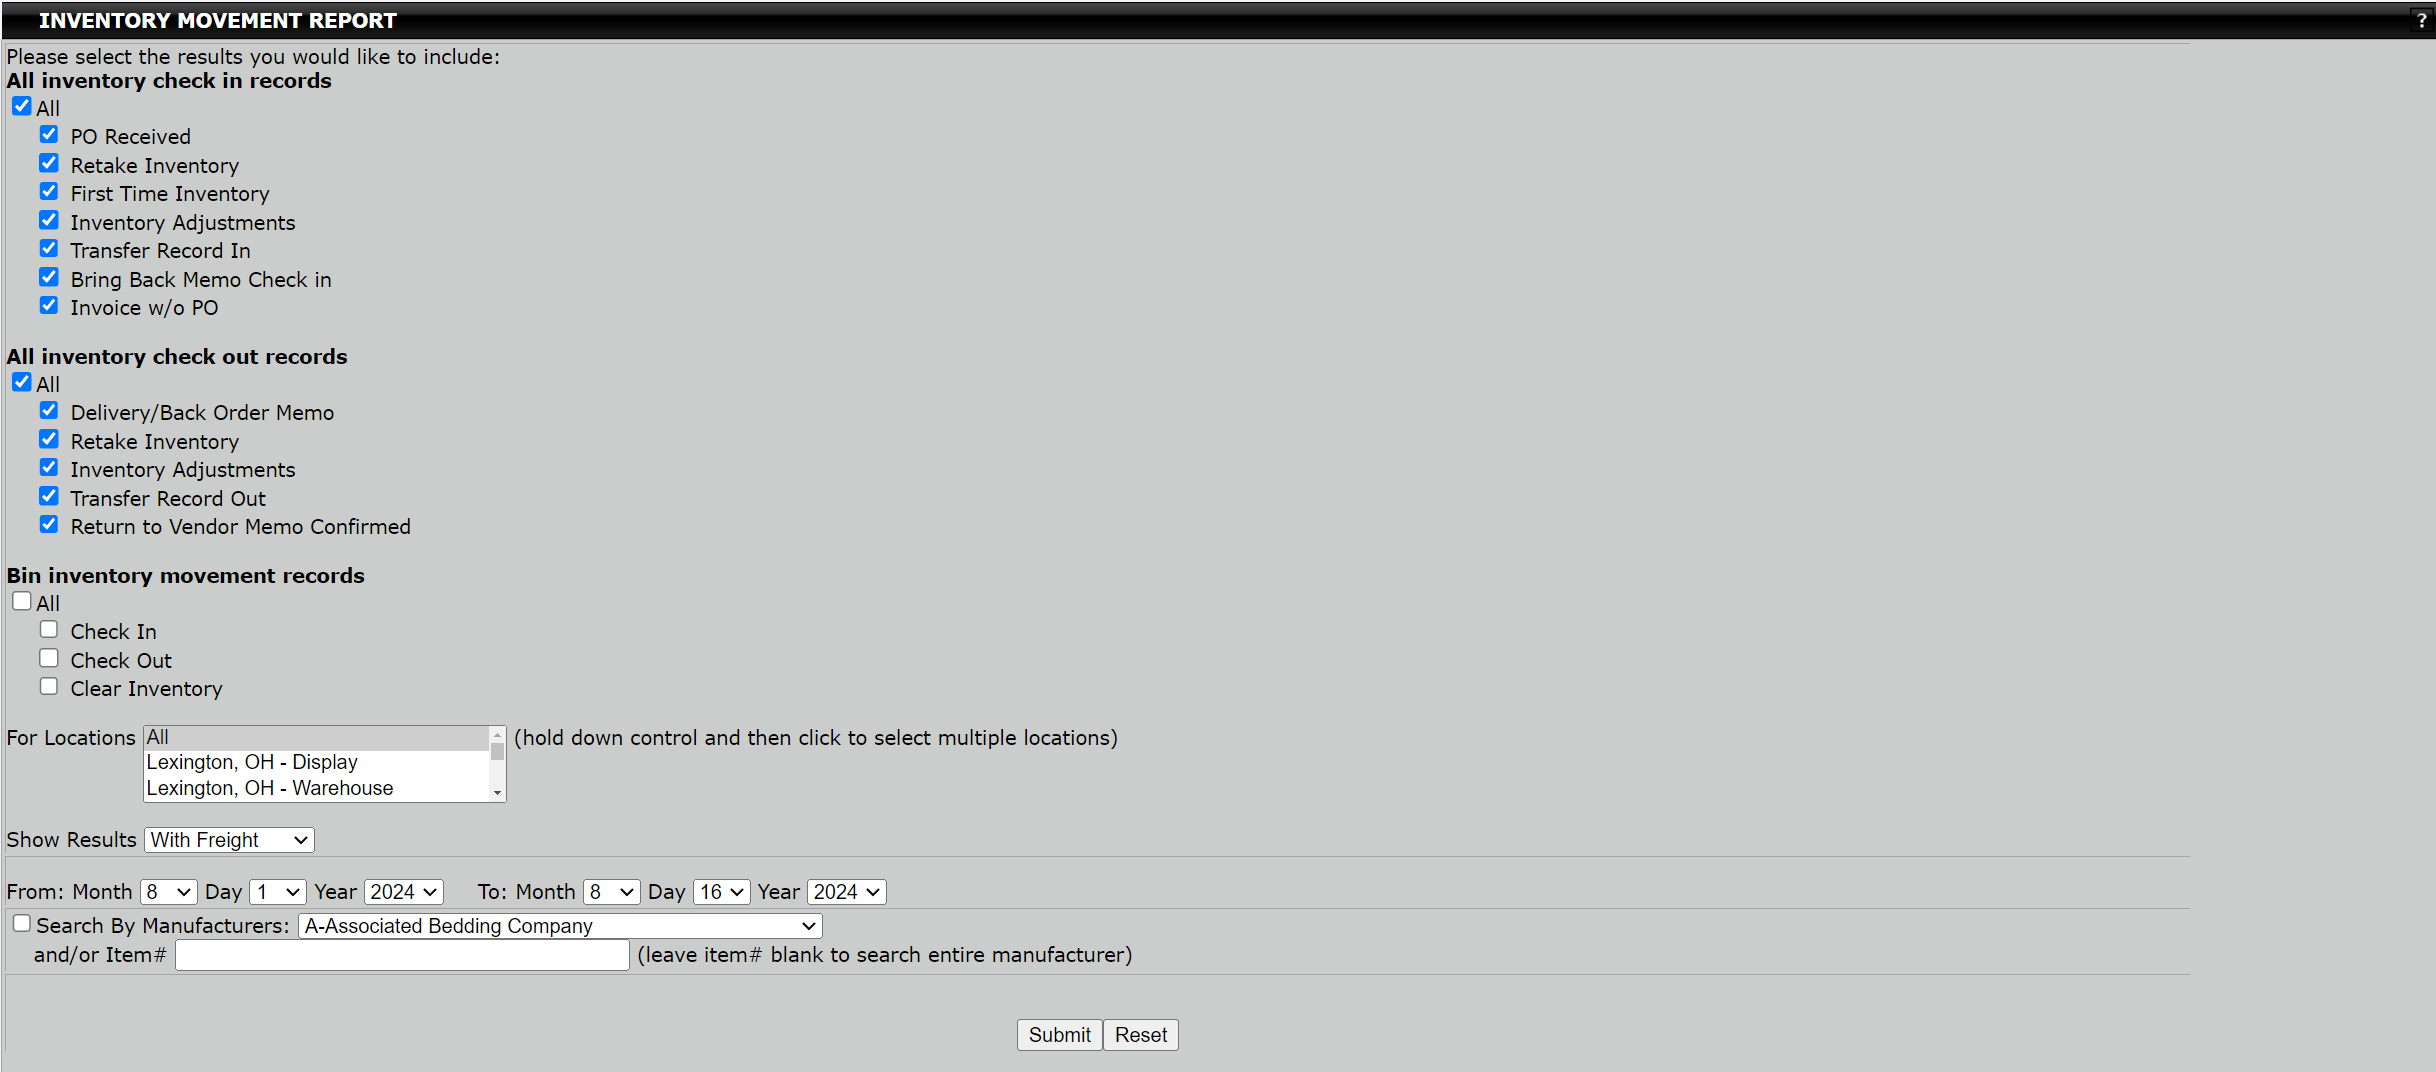
The purpose of running this report is to see the costs to see if anything looks weird or wrong. This will show you everything received into inventory and everything that has left inventory
Please note that if you have recently done a retake inventory you should never see anything that says adjustments or inventory adjustments.
Human Resources / Accounting Manager
All accounting setup and maintenance (if you need any help our support # is 713-568-1331 They have step-by-step instructions available or can assist you by phone)
Before using EZ Process Pro for accounting you must first complete the steps below:
- Accounts Payable Categories:
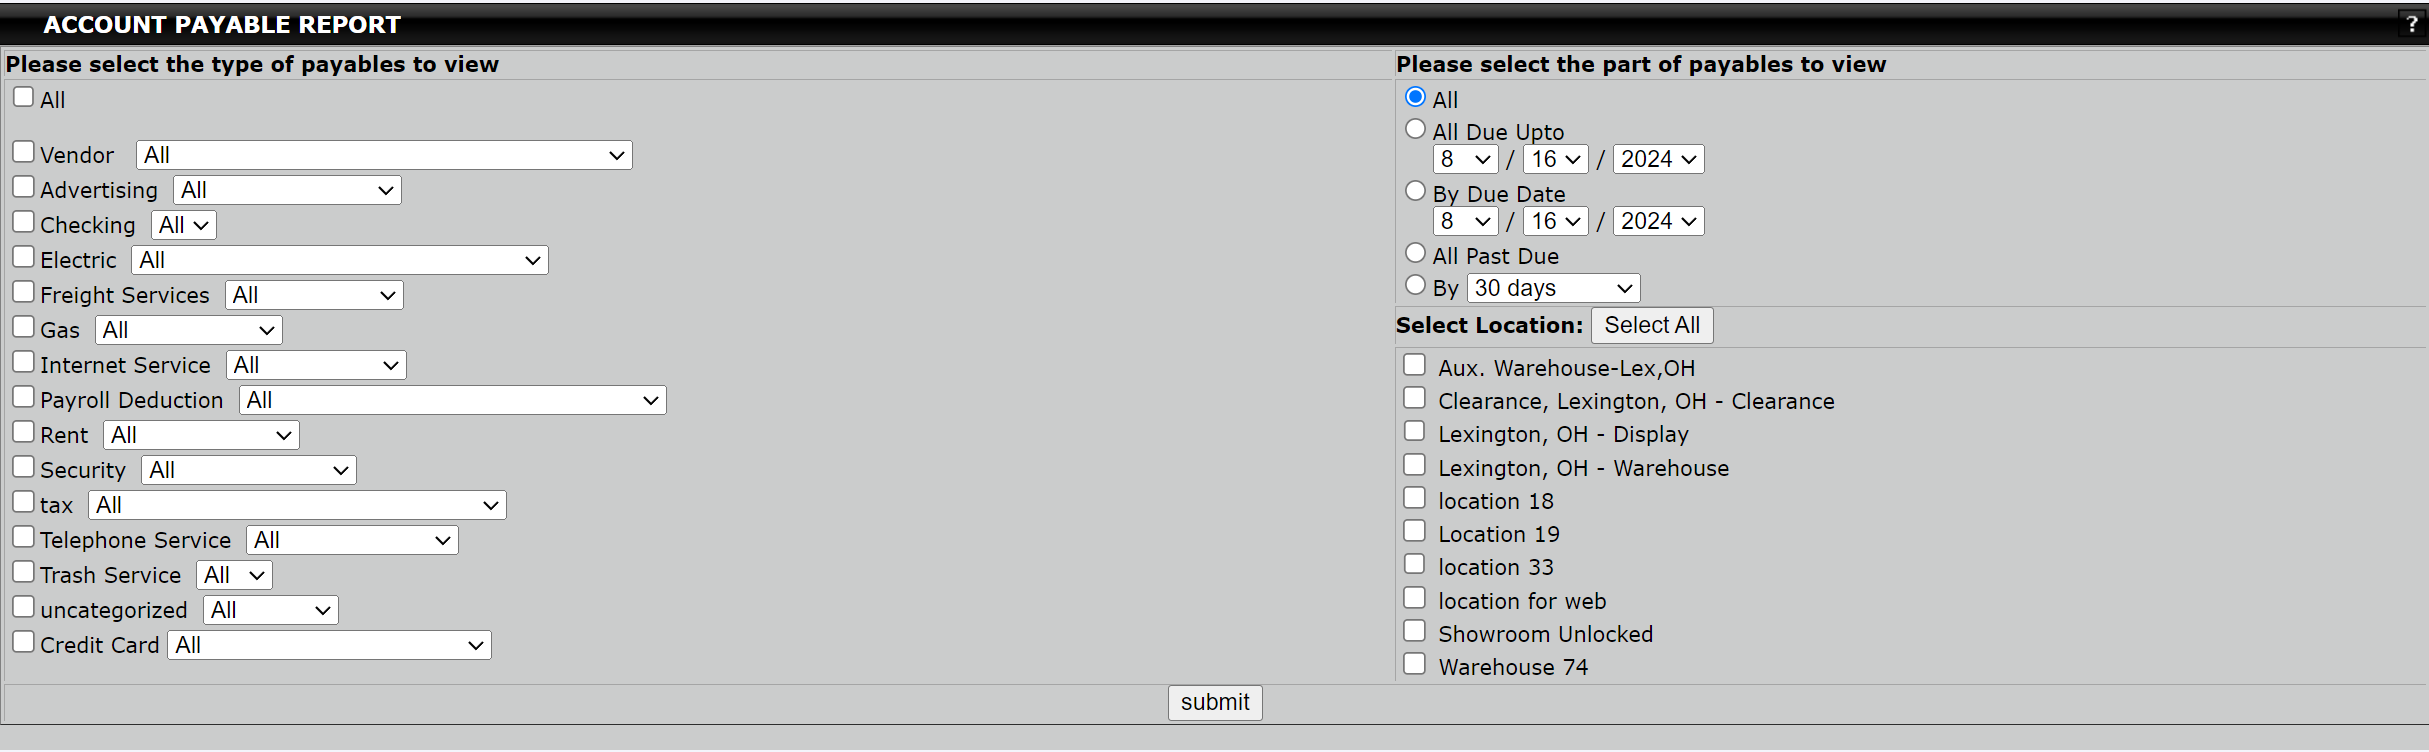
- You will need to add any categories for payable accounts by going to Main Menu > Management > Reports > Financial Reports > Accounts Payable Report > Add/Edit Category (any expense category not already covered needs to be added). To see what is already in the software go to Main Menu > Management > Reports > Financial Reports > Expense Report (look at the query page and it will show you the existing categories.
- Accounts Payable Accounts:
- Next, you must add your accounts to do so go to Main Menu > Management > Reports > Financial Reports > Accounts Payable Report > Add/Edit Account (any account that you pay on other than product vendors) need to be added here. To see what already exists go to Main Menu > Management- Reports > Financial Reports > Accounts Payable Report > Edit Account and see what is in the drop menu. Deactivate any that are wrong, edit any that have mistakes, and add any that are missing
- Add any credit card accounts you have to the system
- Setup real bank account to start live ASAP
- Make sure your vendors have all been added and are correct. To do so please see our article How to Add/Edit a Vendor
- Enter any unpaid operations bills such as electricity, advertising, etc. These will need to be added as payables. This does not include “product vendors” Go to Management- Support- Financial Reports- Accounts Payable Report- Enter Invoice.
This is not intended for product vendors rather this is for bills
DAILY
Record Deposits in Bank Ledger:
To do so you must navigate to Main Menu > Management > Reports > Supervisor Reports > Text Sales Report If all the deposits go to the same account for all locations, then pull the report to include all locations
The numbers at the bottom should match what you deposited to your bank account that day (but double-check)
1. The Total Credit Card should be checked against your online batch with Vantiv (they provided you a website to match the system report to the online report) You will then add to the bank ledger the MC/ Visa deposit as 1 line, the Amex Deposit in another. You want to mirror as closely as possible how they deposit
2. The Finance company Direct Deposit is supposed to be the clients that were charged through Synchrony etc. Those that the funding has been authorized with a tracking number. However, you guys are choosing to wait till you see the deposit so you may not use this number and just go off the bank account to record in the EZ Process Pro bank ledger (just for the finance company direct deposit)
3. Total Deposit: this should match the deposit slip that you bring to the bank. If it does not only record in the EZ Process Pro bank ledger what you deposited to the bank
Once a week
The first thing you will want to do is Pay off All existing payables. Go to Main Menu > Management > Reports > Financial Reports > Accounts Payable Report > View Payables.
The report will look like this: Click on the # of Open Invoices and choose to pay any that have already been paid. If you know you have not paid some then don’t pay them because we will want to do that to correspond with when you really do pay them.
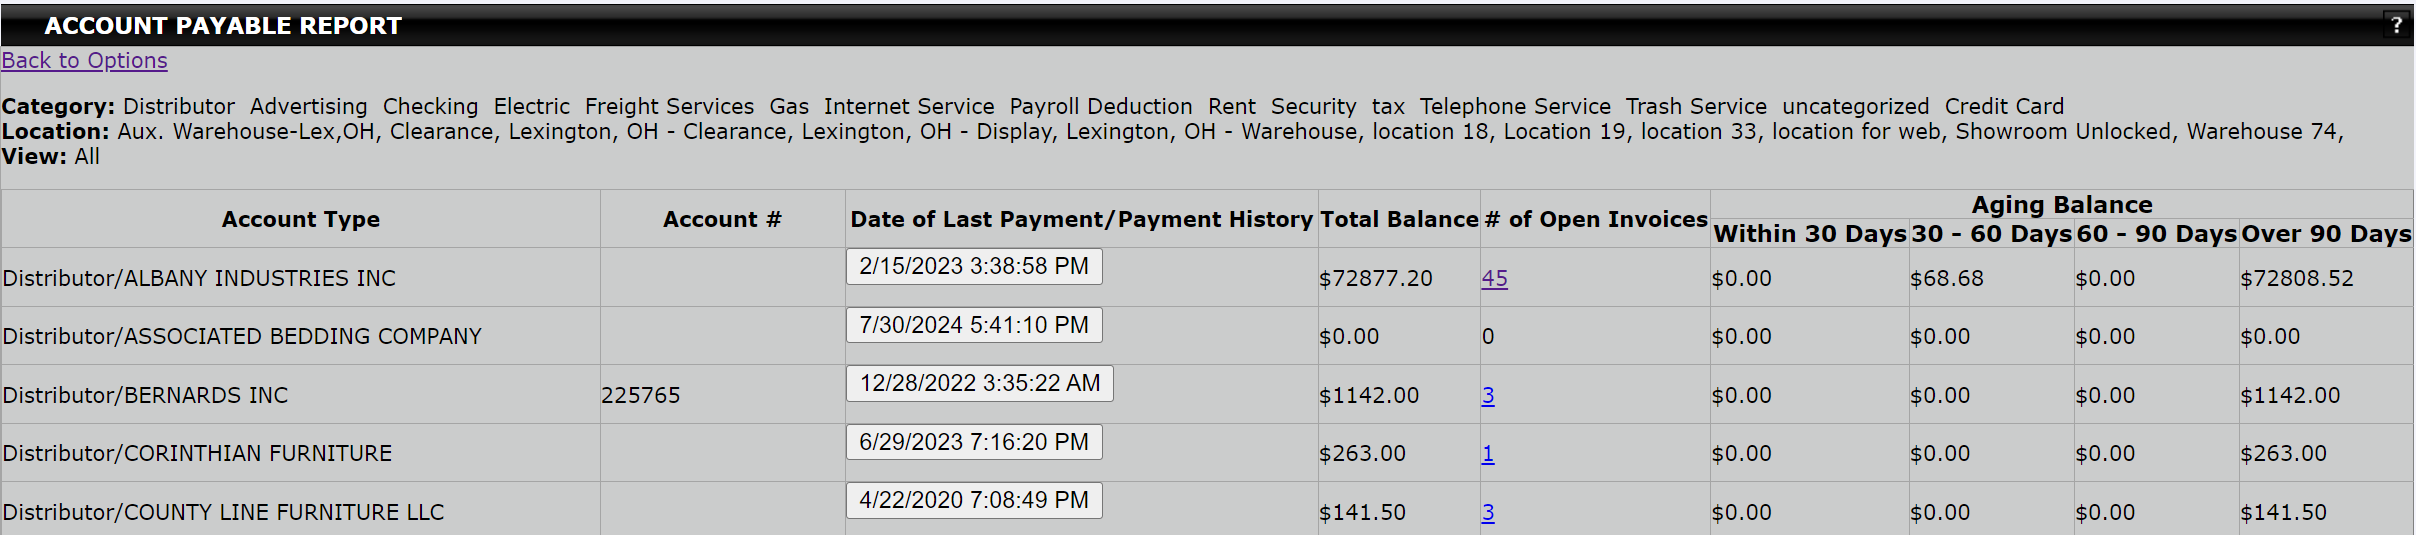
This is what it looks like when you click on the # of Invoices. It does not matter to get caught up if you record the payment exactly how it happened.
Enter regular bills:
- Go to Main Menu > Management > Financial Reports > Accounts Payable Report Management > Enter Invoice (non-Vendor)
Please remember this is not for Vendor Invoices
Pay Bills:
- Go to Main Menu > Management > Financial Reports > Accounts Payable Report Management > View Payables.
Make sure that you are pulling this to include all payables to ensure that nothing is missed.
Reconcile bank account, clear transactions, and record additional fees and debits
- Go to Main Menu > Management > Financial Reports > Bank Ledger > View/Edit Bank Ledger (at the very bottom you will add credit and debits).
- Rule of thumb: never check the box that says post-credits to revenue in your situation these are just deposits from sales in the system that already went to revenue. For debits, you will check post to expense and choose the expense account to use.