
This section focuses on setting up everything in Part IV of your System Settings. These are the settings found on Page 1 on the lower right part of the page
Below, each section is broken down with a description of how it works and what settings need to be configured.
Helpful Tip: Settings do NOT automatically save as you fill them out. You will need to click "Submit Part IV" for the settings to save, or they will be lost when you close the page.
Accepted Payment Forms

The first section in Part IV is your accepted forms of payment section. These include cash, checks, credit cards, and more. These are the forms of payment that will show up as options when you make a sale.
Make sure not to edit the default forms of payment, as this can interfere with EZ Process Pro's ability to report on payment properly.
How to enter a new payment method: To enter a new payment form, click Add New and it will open up the below options in a new window.

Before you start accepting credit cards, you will want to enter in the % rate that each card charges you. Since every company has a different rate depending on the type of transaction you are doing and whether the transaction was manual or swipe, these rates are used for record purposes only and will not affect any of your financial reports. Fill out the below fields:
Name: Enter the name of the payment type.
Estimated Swipe Rate*: Enter the estimated swipe rate (the % that is withheld from your deposits on average)
Estimated Type Rate*: Enter the estimated type rate.
When you are done, click Add to save the new form of payment, then Close.
How to Deactivate or edit a payment method: Once you have a payment type added, you can deactivate it by clicking the Deactivate button or edit it by clicking the name. When you deactivate a payment type, it will not allow that form to be accepted as payment.
Service Charge for Inactive Layaways

In EZ Process Pro, if you have the option selected to Turn on ability to auto draft reoccurring payments for Layaway & In House Finance Term enabled (you can read more about this setting in System Settings Part I), this setting can add on service fees to the automatic payments.
If you have any additional questions regarding the use of these options or anything else please contact our support team
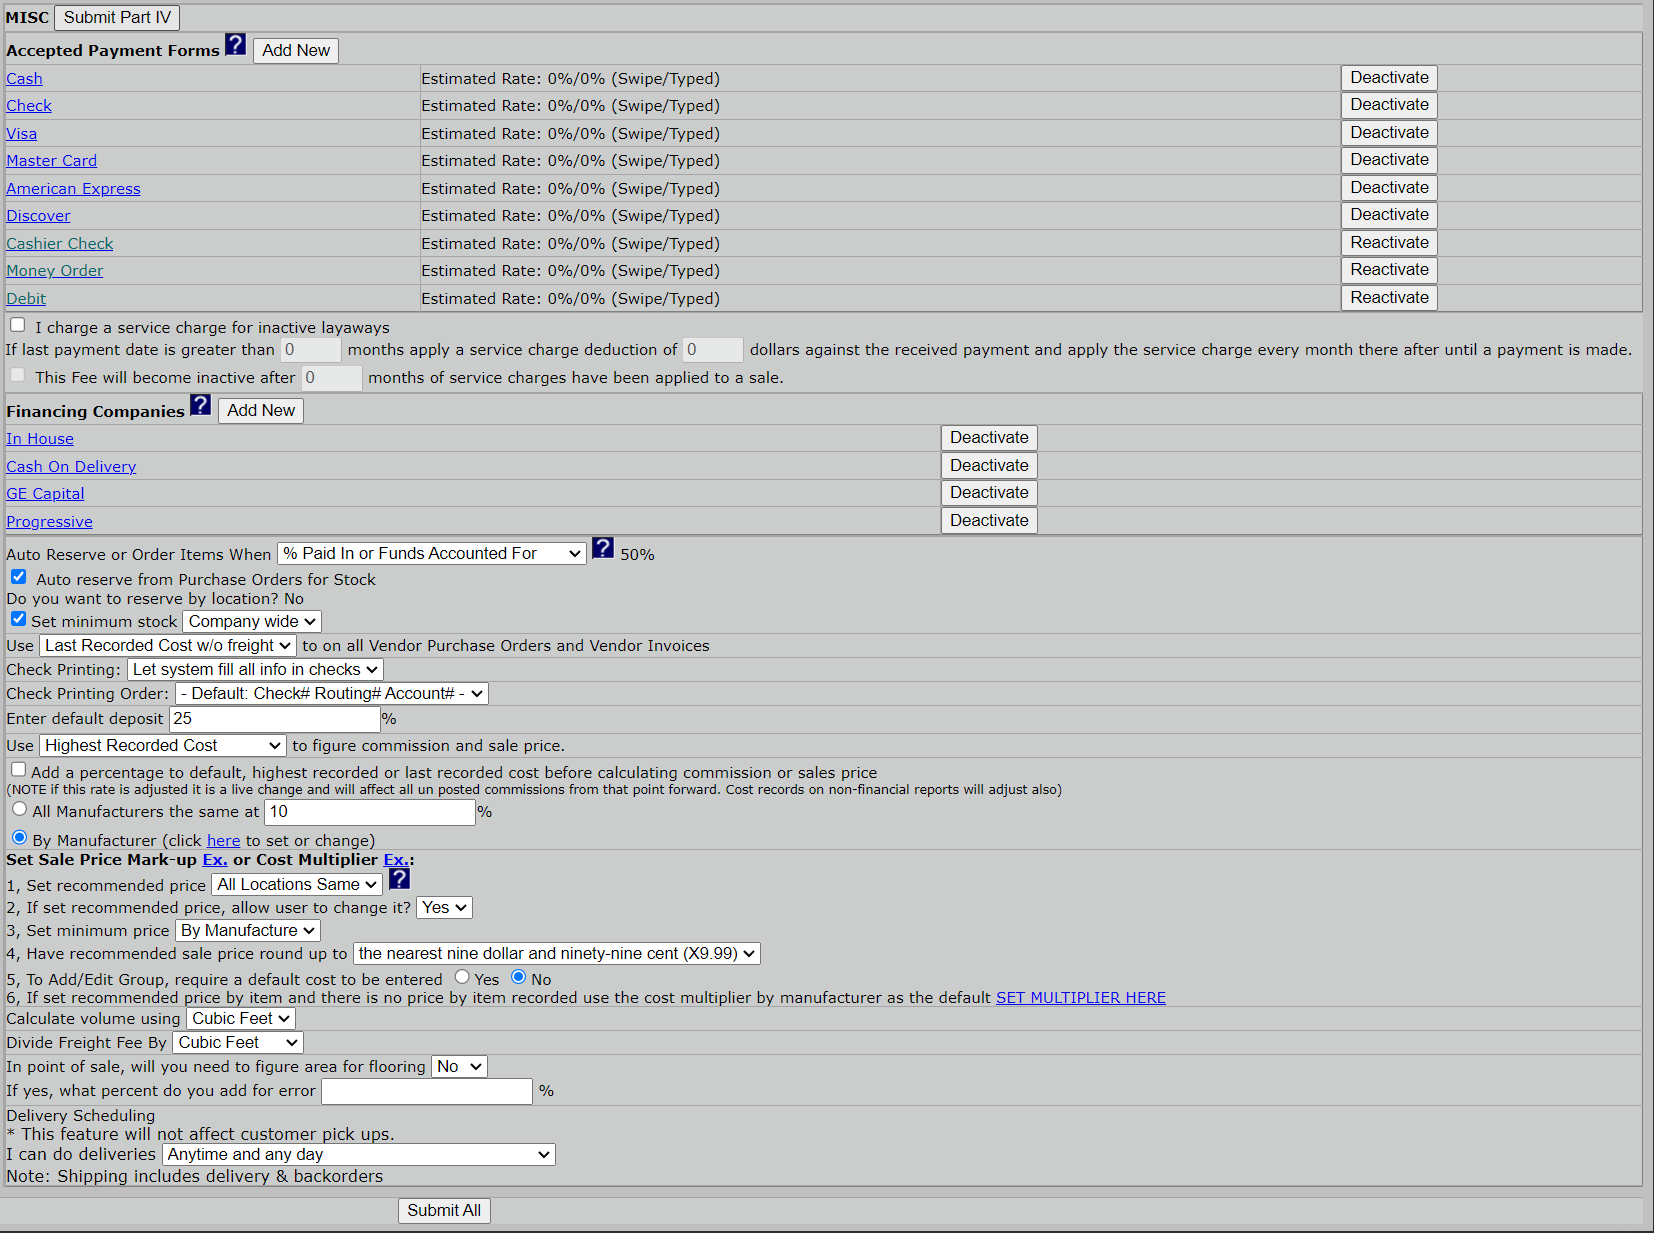
Financing Companies
Next, you will come to the financing section. You may have several financing options set up already, such as In House and Cash On Delivery (which are both described in further detail below). If you choose to use any preset financing options, you will need to make sure to activate and configure them. You can also use this section to set up external financing companies such as GECC, Beneficial, or American General.
- Cash On Delivery, or COD, is a method of accounting for funds. Once a delivery has been printed these funds will show in your receivables report. If the funds have not been confirmed "Received" by the time the delivery has been confirmed "Completed" then the system will consider the funds past due on your receivables report.
- In House Financing is another method of accounting for funds that can prove to be very profitable through the use of your EZ Process Pro system. In House comes preset, but will need to be configured according to these steps.
Ho to add a new financing option: To set up a financing option, click the Add New button, once selected a new tab will open to the following screen.

For an external financing option, enter the finance company Name by typing in the exact official name of the finance company. The Abbreviation should be filled in using a minimal number of recognizable letters. The abbreviations will be used on most reports and paperwork involving finance companies.
Then, fill out the contact information for the financing company. Make sure all the information is 100% accurate to avoid the need for future updates. By entering the proper information, if you are a national client of many of the larger finance companies, you can request direct submission of credit applications to that company through your EZ Process Pro System. If you would like to request the direct submission feature please contact Tech Support at EZ Process Pro (713) 568-1331*.
If you are setting up In House financing, you will need to follow the additional steps listed here. Otherwise, once you have completed this form, click "Add" and then click "Close ."
Auto Reserve

In this section, you need to select at what point in the life of a sale you would like the system to automatically check inventory for the items purchased by your client. If any of the items are in stock, the system will reserve them for that particular client. However, if the items are not in stock the system will add the items to a list of items that need to be ordered (Items for PO).
First, choose the point where you want to Auto Reserve or Order Items. Your options include:
- Account paid to 0 or funds account for: When the Account is paid to 0 balance or the funds are accounted for by other means such as Financing or COD
- At point of sale: This means immediately upon completion of a sales receipt, regardless of whether the sale is layaway, cash, or financing.
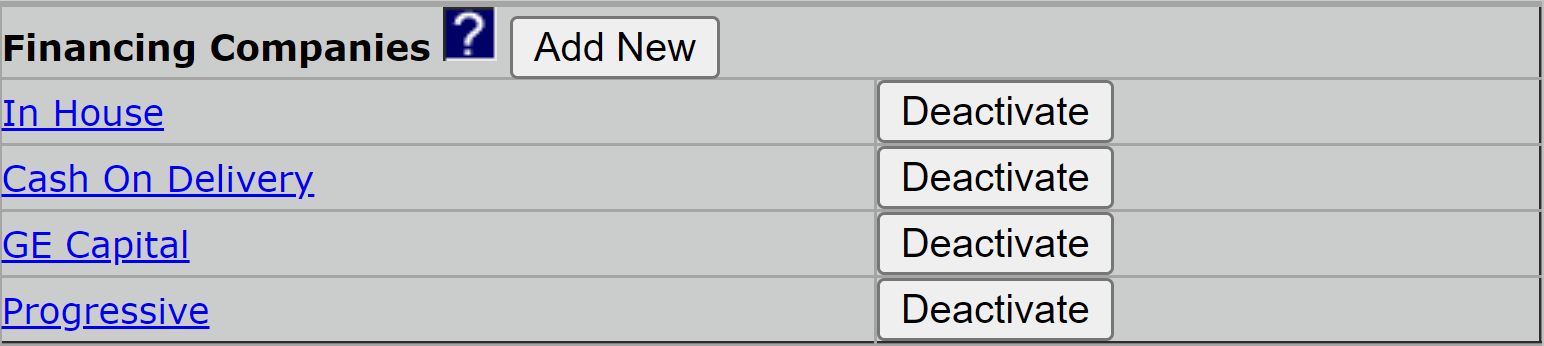
- % Paid In or Funds Accounted For: When a certain percent is paid in. If you select this option, a new window will open to ask you to choose the percentage that needs to be paid.

- Never: The system will not auto-reserve any items. They will need to be manually reserved.
Once you have set up when items will be reserved you have the option to auto-reserve from Purchase Orders for Stock.
- This informs the system that if an item is not currently in your inventory but is on order, it can automatically reserve the incoming stock for your sale. If you enable this option, the reservation will occur automatically. Otherwise, you will need to reserve the items manually.
Reserve By location: This setting allows your team to choose at the time of sale which location they want to reserve the item/s from. If they choose none, it automatically goes to Items for PO. This setting is disabled by default and it is recommended your team receive in-depth training before using this feature to avoid inventory issues.
This option can be turned off via the System Settings Page 1 however if you would like to turn this option please contact our support team. Once this option has been enabled please see our article How to Setup Reserve by Location
Set minimum stock: If you choose to enable this, you will get to choose between the below options:
- Company-wide: The total amount of stock available in all locations at your company.
- By location: The amount of stock available at an individual location.
Cost On All Vendor Purchase Orders and Vendor Invoices
![]()
Here, you can choose whether you will use the Default Cost or Last Recorded Cost w/o freight on all Vendor Purchase Orders or Vendor Invoices.
- Default Cost: If enabled the system will take the default cost entered under the add/edit group when placing purchase orders.
- Last Recorded Cost w/o freight: This option will take the last recorded cost from the vendor for each item and use this as the cost of items when placing purchase orders.
Check Printing

EZ Process Pro allows you to print checks directly through the system. In this area, you can decide whether you want to enable check printing, and how the checks print if you do want it.
- Check Printing: Here you have two options.
- I don't want check printing: disables check printing in your system.
- Let the system fill all info in checks: allows printing to happen in the system.
If you choose to let the system fill all info in checks, you will now choose the Check Printing Order you want.

When buying pre-printed checks, we recommend using Versa check, which has the check at the top half, stub in the middle, and the mailing address at the bottom to fold and fit in a windowed envelope. When printing on these checks, make sure it is a MICR or laser printer.
Enter Default Deposit
![]()
Enter your default deposit amount. This feature was designed to assist your staff in closing more cash paid in full deals, or at least collecting larger deposits. We all know that if you give a buyer the option they will always commit to as little down as possible. But if you instead ask for all funds upfront and wait for them to offer less than the full amount, then their offer will tend to be greater than if your sales rep said We require 15% down.
With this statement in mind, most companies set their default deposit to 100%. However, it is simply a tool to help your company's representatives push their clients in the right direction. The user can always change the deposit amount during the checkout process of the sale.
Figure Commission and Sale Price

This is where you will set what cost you want to use to calculate the Commission and Sale Price. Each option is explained below.
- Default Cost: This will use the default cost entered under the group section
- Highest Recorded Cost: This setting takes the highest cost that has been recorded when receiving the item
- Last Recorded Cost + Freight: This option looks at your most recent PO and uses the cost with freight to calculate the commission
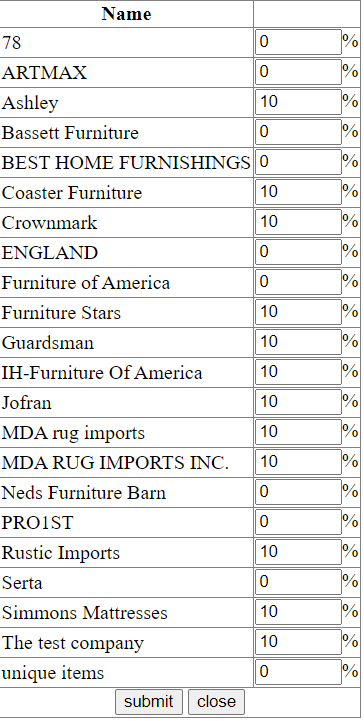
Add a percentage to default, highest recorded or last recorded cost before calculating commission or sales price: If this is selected you will then need to choose if you would like to add a default percentage for all manufacturers or individuals.
- If you choose to set the percentage by manufacturer you must use the link (click here to set changes). Once selected you will be directed to the following page to set each percentage and save by clicking on submit.

Set Sale Price Mark-up or Cost Multiplier

You now have the opportunity to set your markup or cost multiplier for the items you offer in your system. This means that when a salesperson is entering a sale into the system you can use your EZ Process Pro System to manage your itemized pricing and minimum margins. To do so you will need to complete a three-step process.
Every item in your system will eventually show an individual itemized price during the sale process. If you like to sell in groups and do not want your client to see the price break down we do not recommend setting a recommended sale price. Many companies set this price high to leave a lot of negotiating room. Therefore the client will always feel they are getting a deal.
Step 1: Set Recommended Price
To enter the recommended sales price, you must choose one of the three options from the drop-down menu.
-
- Do Not Set: We recommend selecting this option if you prefer selling in groups and do not want your client to see the price breakdown.
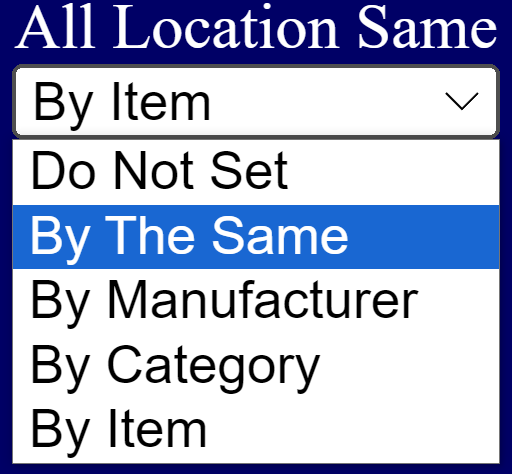
- All Locations Same: All locations are set with the same price. When you choose this option, a new window will open with a dropdown menu like below.
- By Location: The options will be the same as the above options, but you will have the chance to select it for each location as shown below.
In the example below we are setting the system to use the same settings for All Locations Same using the By The Same Setting:
- When All Location Same is selected you will be taken to the window below. Where you can select By The Same
When By The Same is selected you will then be redirected to the following window when you set the Mark-up or Cost Multiplier
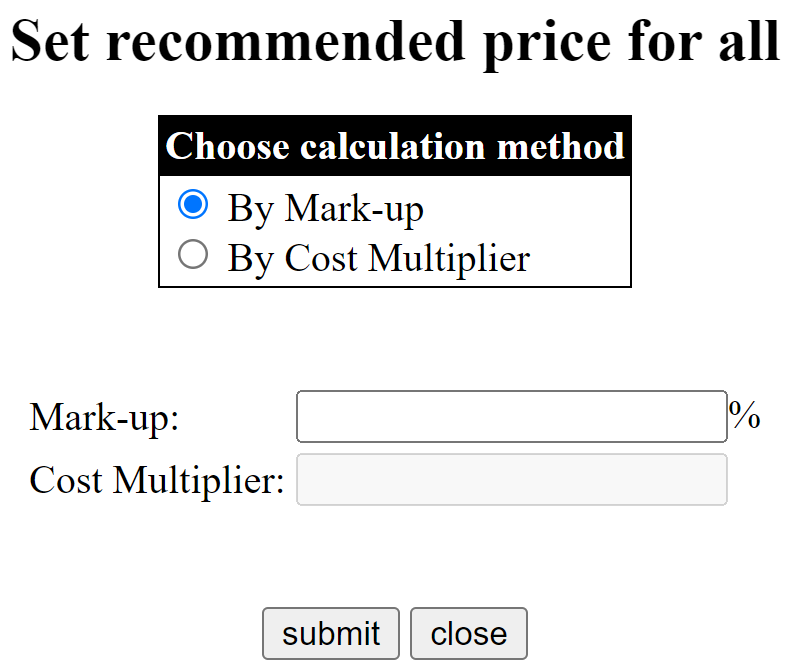
The other options will all have similar windows to By the Same. Please see below for details on each option:
- Do Not Set: This will be the same as this not being set at all.
- By The Same: This will use the cost of the item (including freight if recorded) and mark up every item in your system using the same rates.
- By Manufacturer: Allows you to set the pricing rates for each manufacturer differently. (For example: I know I can get three times the cost of the furniture on Ashley goods, however, I can only ask for two times the cost of Colby products.)
- By Category: Allows you to set the pricing rates for each category differently. (For example, I know I can get three times the cost of the furniture on bedroom goods, however, I can only ask for two times the cost of Living-room furniture.)
- By Item: When you set up your system, choosing this option will add one more field to your Add & Edit Groups area. Each item can be assigned its own sale price. This is commonly used when a dealer likes to play with the look of a price. For example, instead of saying it's $6000, you may enter the price of the item as $5890.
Step 2: If Set Recommended Price, Allow User to Change It
Allows you to select whether you want employees to have the option to change the price at the point of sale. If you do allow employees to change the price, this will not be a permanent change to the price, but simply adjust the price during that specific sale.
Step 3: Set Minimum Price
The setting how the minimum price is set. To enter the recommended minimum price, you must choose one of the four options from the dropdown menu.
- Do Not Set: This will allow users to type whatever they want, either for itemized pieces or the set as a whole.
- By The Same: This will use the cost of the item (including freight if recorded) and set the minimum on every item in your system using the same rates.
- By Manufacturer: This allows you to set the minimum pricing rates for each manufacturer differently. For example: I can't afford to drop below two times the cost of the furniture on Ashley goods, however, I can only ask for only one and 1/2 times the cost of Colby products.
- By Category: This allows you to set the minimum pricing rates for each category differently. For example: I can't afford to drop below two times the cost of the furniture on Bedroom sets, however, I can only ask for only one and 1/2 times the cost of living room products.
If you choose any option other than Do Not Set a new window such as the one shown below will appear, and you will need to enter in the desired minimum gross margin or cost multiplier.
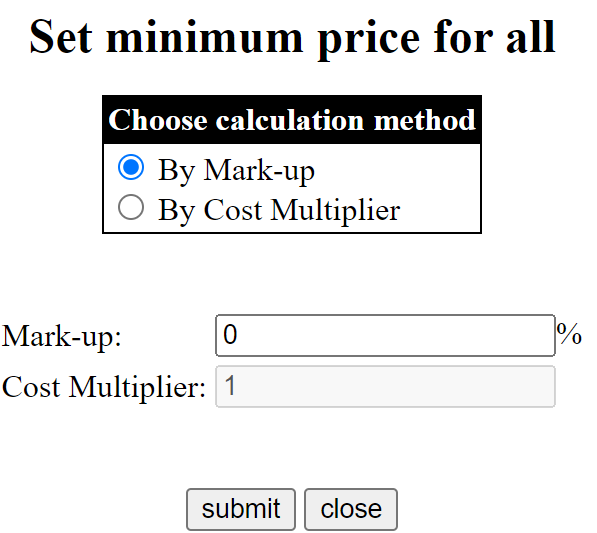
These boxes are easily changed whenever you are going to have a sale or its peak season, and you want to raise your prices. After you have completed this, press Submit and Close.
Step 4: Have Recommended Sale Price Round Up To
This setting chooses whether the price is rounded up. You can add extra revenue and create cleaner-looking prices with this method.
Tip: If you sell any low-cost items like beverages or snacks for a dollar or two each at the counter, you may want to not set the system to round so high that it raises the price of the items significantly.

Step 5: To Add/Edit Group Require a Default Cost to Be Entered
This allows you to decide whether a default cost will be mandatory when adding or editing a group in EZ Process Pro.
Step 6: If Set Recommended Price by Item and There is No Price by Item Recorded Use The Cost Multiplier by Manufacturer as The Default
This is similar to Step 3. If you click the Set Multiplier Here link, a pop up window such as the one shown below will appear. You will need to choose if you are calculating the price by Markup or Cost Multiplier, then enter in the Markup or Cost Multiplier for all manufacturers.

Calculate Volume
![]()
This option will calculate the volume taken up by different products according to a few different settings.
- None: No calculations will be made.
- Cubit Feet: The total amount of cubic feet of a product, based on the Length, Width, and Height (L x W x H: The Length, Width, and Height of a product).
Please note that the dimensions of each item are entered in the add/edit group section of the software
Divide Freight Fee
![]()
You can choose to divide the Freight Fee by two different settings:
- Dollar Amount: The dollar amount of the fee
- Cubic Feet: The cubic feet of the freight being shipped
Area for Flooring

If you choose, you can use the dimensions of the product to calculate the necessary square footage for items. This allows also for an amount of error you want to allow for in your system.
Delivery Scheduling

This allows you to limit the number of deliveries your system can schedule over a set period. As listed, this only affects Delivery, Pickups, and Backorders.
For a detailed walkthrough on this please see our article How to Use Delivery Scheduling