
This section focuses on setting up everything in Part III of your System Settings. These are the settings found on Page 1 on the lower left part of the page, shown below.
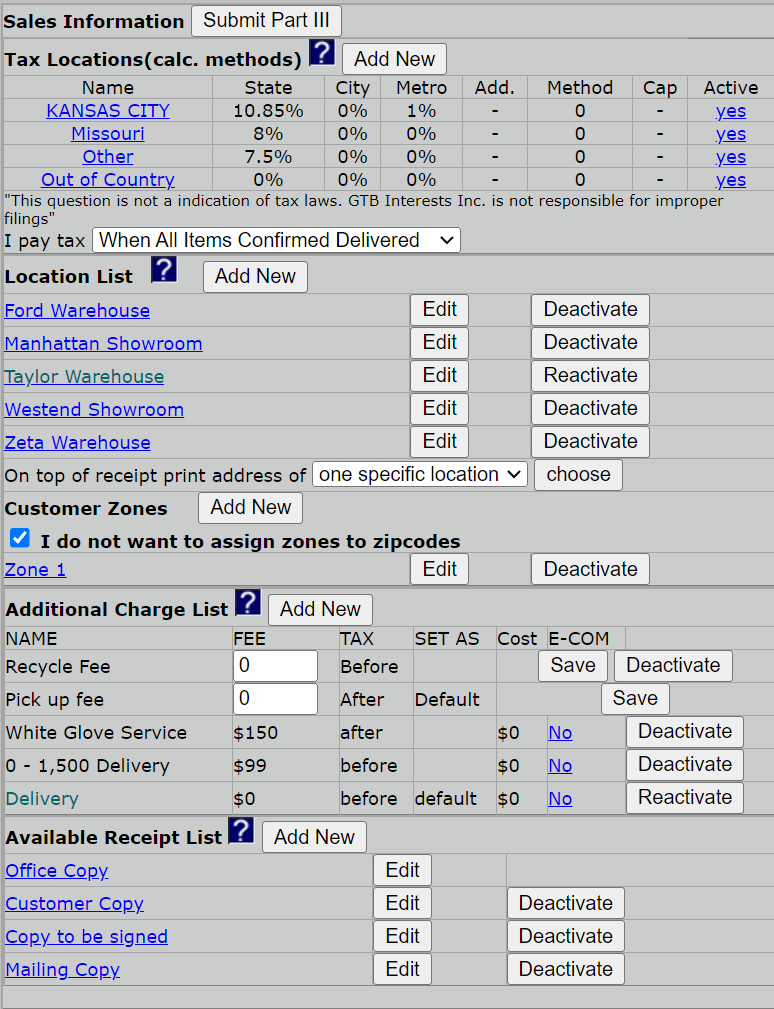
Below, each section is broken down with a description of how it works and what settings need to be configured.
Settings do NOT automatically save as you fill them out. You will need to click "Submit Part III" for the settings to save, or they will be lost when you close the page.
Tax Locations
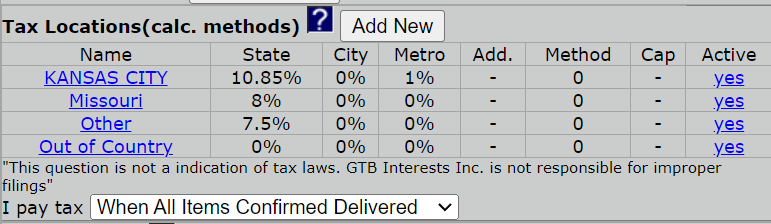
The first field you will see is Tax Locations, listing out the various Taxes your store pays on each sale. To create a new location, click Add New. You will see the below screen open in a new tab.
Once here you will need to fill out each option below that applies to your new tax:
- Name: This is the name of the sales Tax Location
- State Tax Rate: When entering please make sure that this is the correct percentage
- City Tax Rate: When entering please make sure that this is the correct percentage
- Metro Tax Rate: When entering please make sure that this is the correct percentage
- Additional Tax Name: The name of any additional taxes that will be applied
- Additional Tax Rate: When entering please make sure that this is the correct percentage
- Tax Method: Please select the options 0, 1, or 2.
- Tax Cap:
- Tax Method Details:
Example: State=6%, City=1.25%, Metro=0%, and the sale was $100. We would charge $107.25 to the customer.
If this calculation is not correct for your area, change the tax method to "method 2" and view the example. If you have a different method that is not listed please contact an EZ Process Pro tech support Representative and they will be more than happy to get your tax equation entered into the system for you. After you have entered your tax rate, press "Add."

Then you must answer the question I pay tax when? Whichever option you choose is when your tax amount will show up in all of your financial reports. Your options are as follows:
-
At point of sale: When the sale is saved.
-
As funds collected: The amount of tax that has been collected is the only amount that shows up.
-
When funds accounted for paid to 0: When all the funds are collected and the sale has a balance of $0.
-
When all items confirmed delivered: When all items in the sale are confirmed delivered and paid in full.
Editing your Tax locations: You can adjust the tax details by clicking on the tax name that is underlined. Taxes can't be removed, only deactivated & reactivated. EZ Process Pro does this because fully removing a tax and its calculation method will cause an error in any of the previous sales it involves.
How to Deactivate a Tax Location? If the message Active column on the far right shows Yes, that tax rate and method is available to be used. If the message reads No then you are not able to charge tax using that tax rate and method. You can switch from active to non-active or vice-versa by clicking on the word Yes or No
Location List
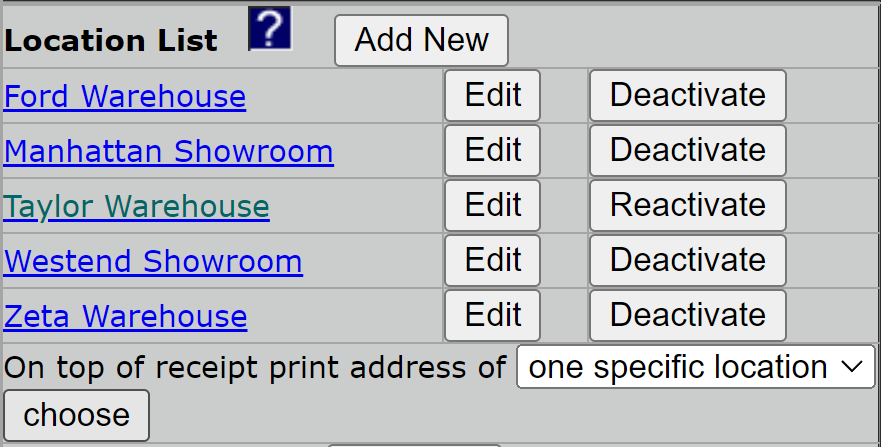
The Location List is where you will set up the locations for your company. These are the warehouses and showrooms that you will be interacting with within your company.
To create a location just click the Add New button, and the following screen will be displayed.
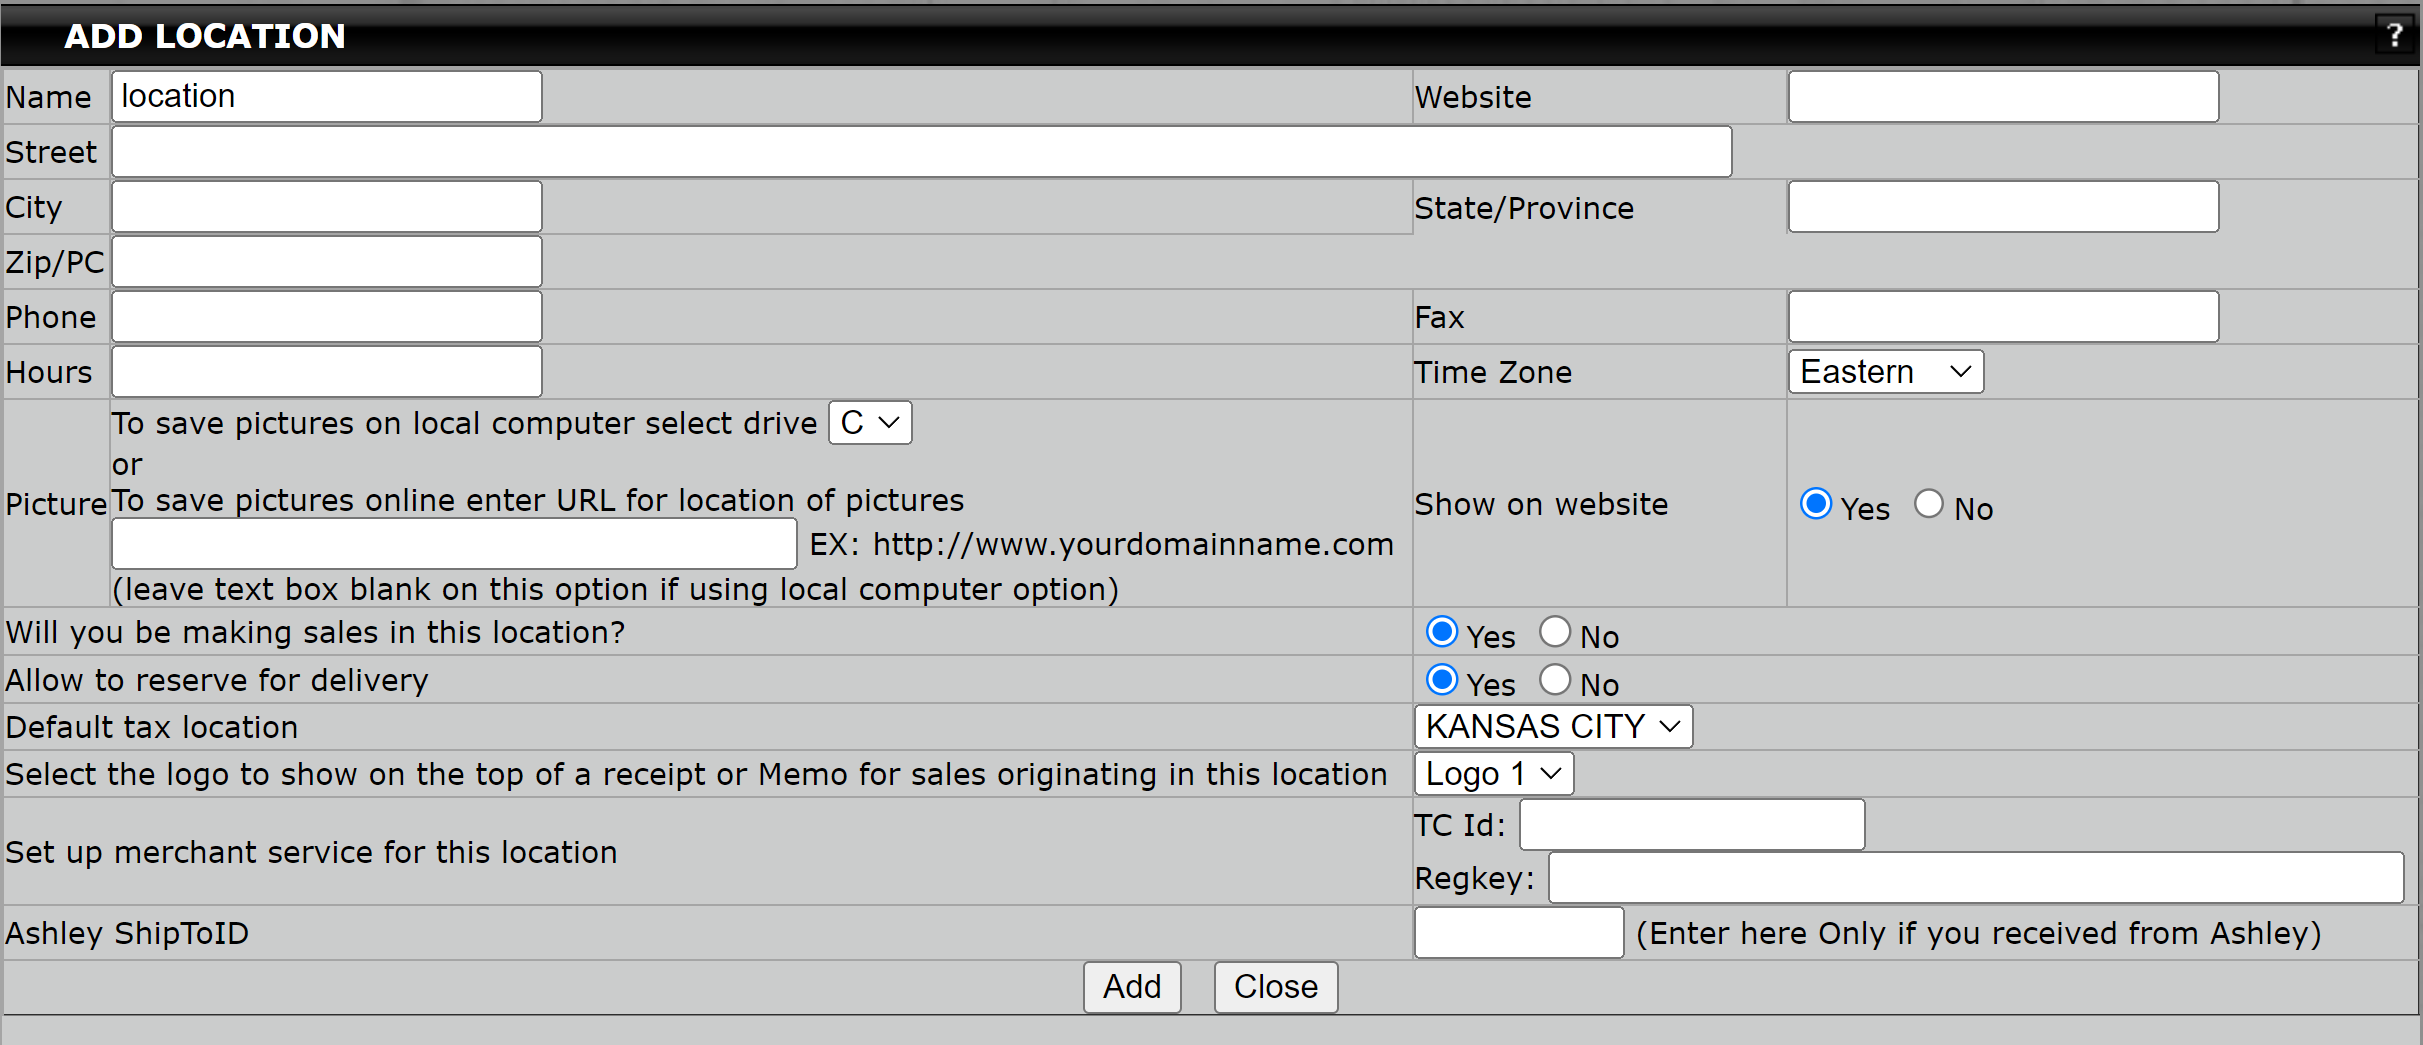
.Some fields are more complex than others, but each field is explained below.
Name: Enter the name you wish to call the location by highlighting the word location and typing in the new name. Examples are "I-45 Showroom", "610 Warehouse", "Container 3". These locations will be used for tracking inventory, sales, revenue, expenses, and much more throughout your system. The information you enter can also be shown at the top of your sales receipts and delivery memos, based on what you specify in the next step of the system settings.
Website*: This is an optional field where you can enter a website for the location
Street: Enter the physical street address of the location.
City: Enter the city of the location.
State/Province: Enter the state of the location.
Zip/PC: Enter the zip code of the location.
Phone: Enter the phone number used for the location.
Fax: Enter the fax number used for the location.
Hours: Enter the hours the location is open (for example 9 am to 3 pm)
Time Zone: Select the time zone the location is in by clicking on the arrow. This will help keep your employee time clock and other time-related records such as when your locations are busiest and what time transactions were made.
Pictures: Enter the URL or file path where the pictures for your items are stored (example: http://www.yourdomainname.com/, C:/ezprocess/images/). These pictures will show when you are browsing through items and groups in both your system catalog and your company website if you choose to host through EZ Process Pro.
Show on website: If you opted to have your website hosted by EZ Process Pro, you can select whether you would like this location to be listed on your website under the contact information. The listing will include a map to the location as well.
Will you be making sales in this location: Here you will choose whether this room acts as a Showroom or Warehouse. If it is a Showroom, you will choose "Yes". If it is a Warehouse, you will choose "No". Depending on the version of EZ Process Pro you purchased, you may have a limited number of sales locations.
Allow to reserve for delivery: This gives you the opportunity to lock down a particular location. When the system looks in inventory for the product that you sold to a particular customer, if found, it will then reserve the merchandise for that customer. Many furniture companies do not want to sell their floor models. If this is the case for your company then you may want to answer "No" to this question when entering your showroom location.
Note: If you have a clearance area in your showroom you may want to enter it as a separate location.
Let's say you do not allow items to be reserved from your showroom, however, a situation arises where you may choose to do so anyway. In this instance, you would transfer the item(s) to an unlocked location such as your warehouse then tell the system to re-check stock for that client product. You can see this process detailed here.
Default tax location: If your Tax Locations are set up, you can set the default tax location by selecting the one you would like to use in the drop box. This means when you make a sale in the system it will automatically use the tax location you selected unless the user chooses another tax location & method.
Select the logo to show on the top of a receipt or Memo for sales originating in this location*: If you have emailed EZ Process Pro your logo or multiple logos, you can now choose which one you want to show on the receipts for this location.
For paycheck users only*:
Ashley ShipToID: This will be an ID given to you by your Ashley rep if you have one.
After you have filled in all necessary items on the page, simply click Submit, and the location will be added to your system.
How to Edit Location Information: At any time in the future, you can either click Edit or the Name of the location to bring up the location's information and change it
How to Deactivate a location: When looking at your Location List you will see a Deactivate option listed to the right of the location name. To deactivate the location you simply need to click Deactivate and that location will become inactive, and no one will be able to use that location again until it is Reactivated.
The system does not allow locations to be deleted completely from the system because doing so will cause an error on previous transactions related to that location.
Please be aware that to deactivate a location all inventory must be removed from the location. Please make sure that no items are set as Damaged, have a pending Transfer Memo, or are reserved for sale.
On top of Receipt Print Address of: select which address(es) you wish to print on the top of your receipts.
- One Specific Location: will allow you to choose one location that will always print on the top of the receipt regardless of the location the user is making the transaction from.
- Its Own Location: will print the location the user is logged in to when making a transaction.
- All Locations: will show all recorded locations on the top of all transactions once you have made your selection click the "choose this" button below the drop box.
Customer Zones

Customer zones are used for when In-House financing accounts go to collections. This allows you to coordinate with your team members to go door to door to connect with customers who are not paying for financed sales.
Additional Charge List
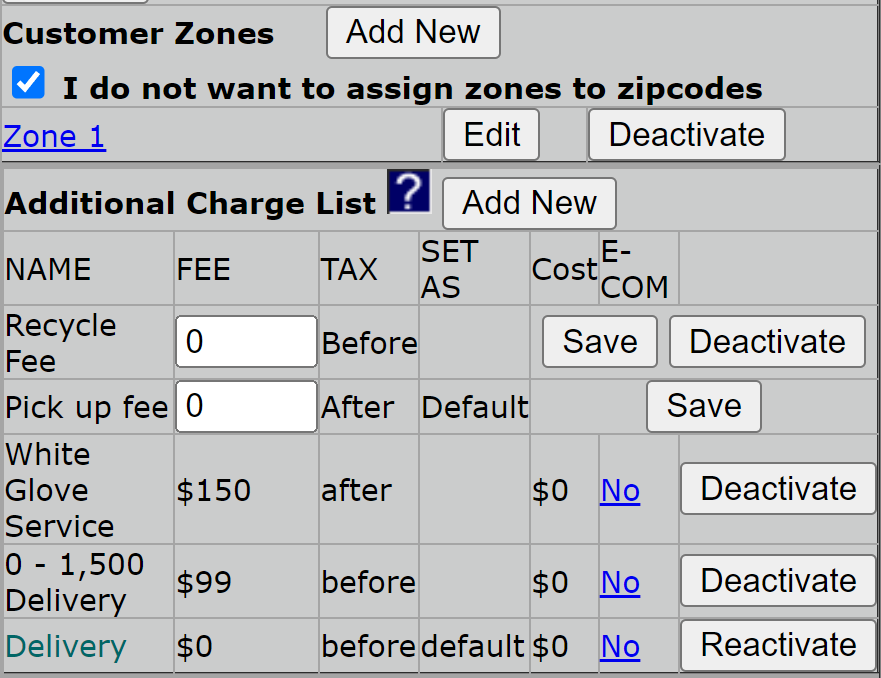
The next area below the location list is your additional charge list. Additional charges are charges you want to charge the customer on top of the items that are already on the receipt. Some examples are delivery, setup, and fabric protection.
To add an additional charge, click on the Add New button. The following screen will be displayed.
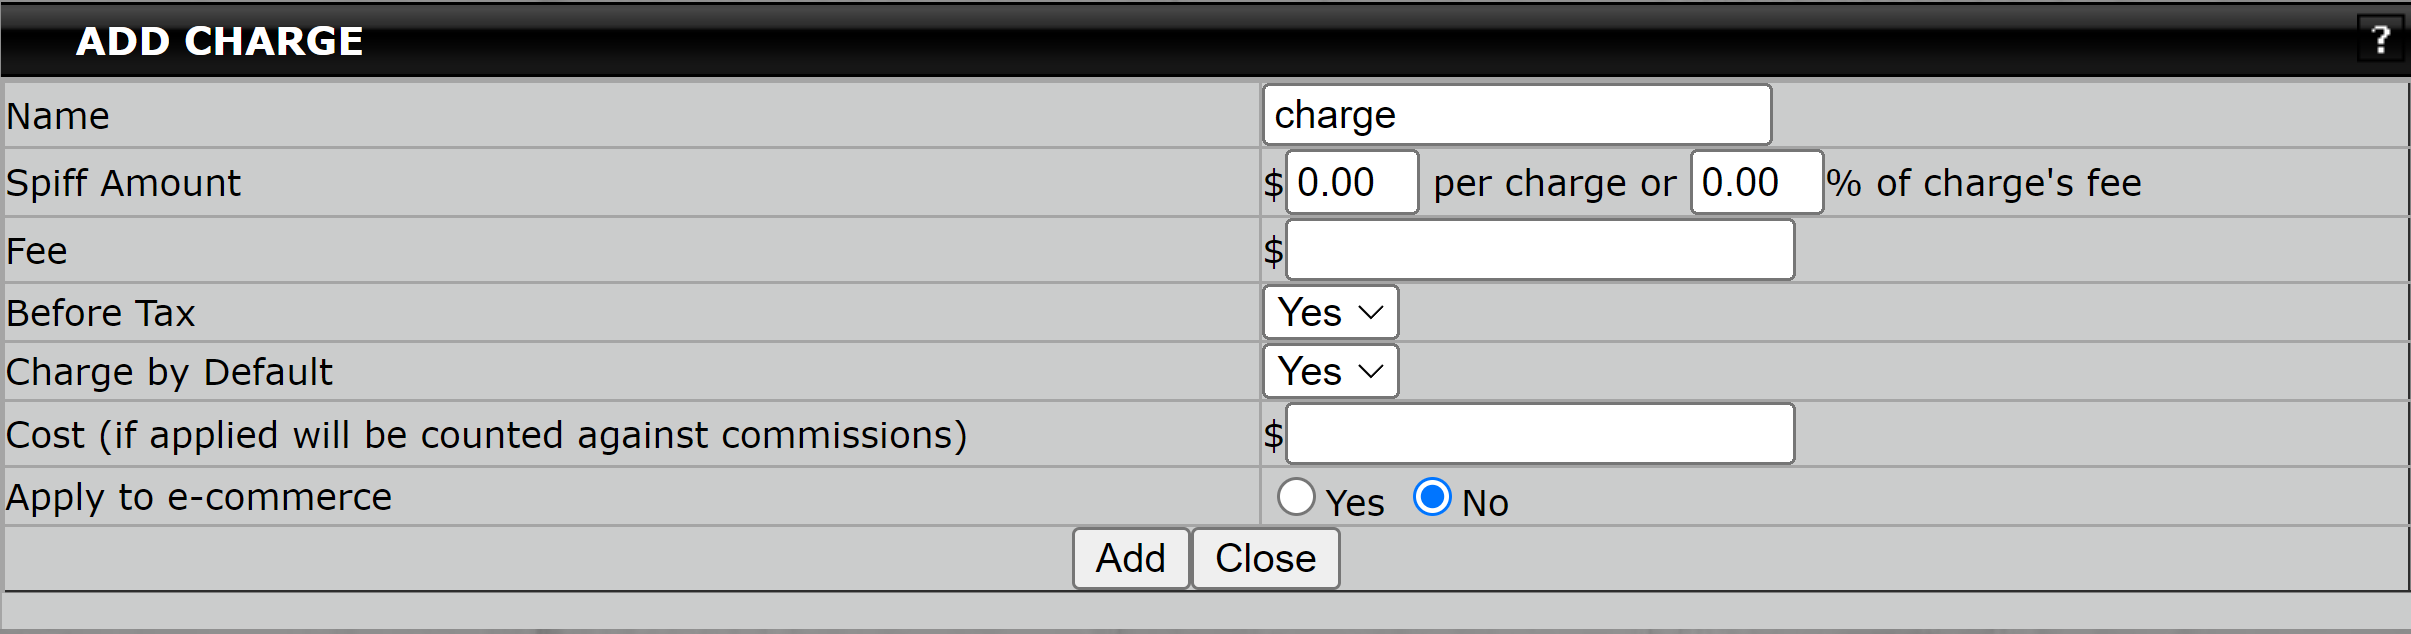
Each field is explained below:
- Name: Enter what you want the charge to be called into the name box by highlighting the word charge and typing in what you want it to be.
- Spiff Amount: If you have chosen to pay spiffs on additional fees you will need to add the precharge amount or percentage here
- Fee: Enter the amount that you want to be added to the customer's receipt if this charge is selected.
- Before Tax: Select "Yes" if you would like the charge to be charged before tax is applied. Select "No" if you would like the charge to be charged to the customer's receipt after tax is applied.
- Charge by Default: A default setting is the way a computer sets something but can be altered with user intervention. You have the option of charging this to a customer by default. This means every receipt that your sales reps. do, this charge will be charged unless the salesperson physically unchecks the box that says to charge for the item.
This feature has proven very successful for charges such as fabric protection, delivery, and set-up fees that are often difficult to get a salesperson to apply or offer to the client. You can increase your profit margin on your sales by using this feature.
- Cost: The cost of the charge is your cost of the given item. You can choose any number you want. The computer needs to know the cost to calculate it into the gross margin, profit, and commissions for the sales.
- Apply to e-commerce: This refers to the website that you may have purchased to directly submit sales to your system. The question is asking if you want this charge to also show up in the checkout process of your web sales.
After you have filled out this screen, press the Add button.
Available Receipt List
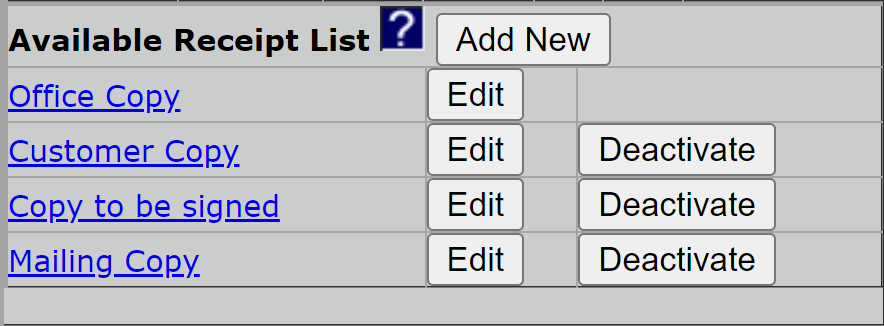
Because this is a computer system and hardware can fail we want you to always have access to your customers and their information. For this reason, we suggest always printing these copies of the receipt and storing them.
Please see below for the list of receipts we suggest you keep a copy of for your records:
- The Office Copy: For sales, payments, refunds, and quotes can be put in numerical order by Receipt # and stored in a binder labeled by the applicable month and year. The same can be done for delivery, backorder, repair, bringback, and transfers.
Some clients even use a scanner so that it can be scanned and saved on their desktop computer using the receipt number as the file name. And then store the copy in a folder on their local computer labeled with the month and year. Doing so will enable you to recreate every event that took place in a time sequence.
- The Customer Copy: Given to the customer.
- The Copy to be Signed: For sales, payments, refunds, and quotes is signed by the customer. Then any form of payment (cash, check, credit card slip, no payment) is folded into the receipt and the receipt with its applicable money is dropped into a safe that has top or side entry without having access to the other receipts and money already inside it. At the end of each day, the safe is emptied by a staff member who has been assigned to the task. Each receipt is opened one at a time and the money enclosed is compared to what the receipt says should be enclosed in the bottom right corner (actual amount collected).
The receipts are then put in numerical order to verify none are missing by comparing them to the supervisor report for sales, payments, refunds, and quotes which list every receipt.
Finally, the signed copy is filed in a customer file. There should be one file per customer with last name, first name, and phone number visible. Every signed copy of sales, payments, refunds, quotes, deliveries, bringbacks, and anything you have done for the customer should be stored in the personal file. By doing this you have one place to go in a hard copy to be able to see exactly what is going on with this customer
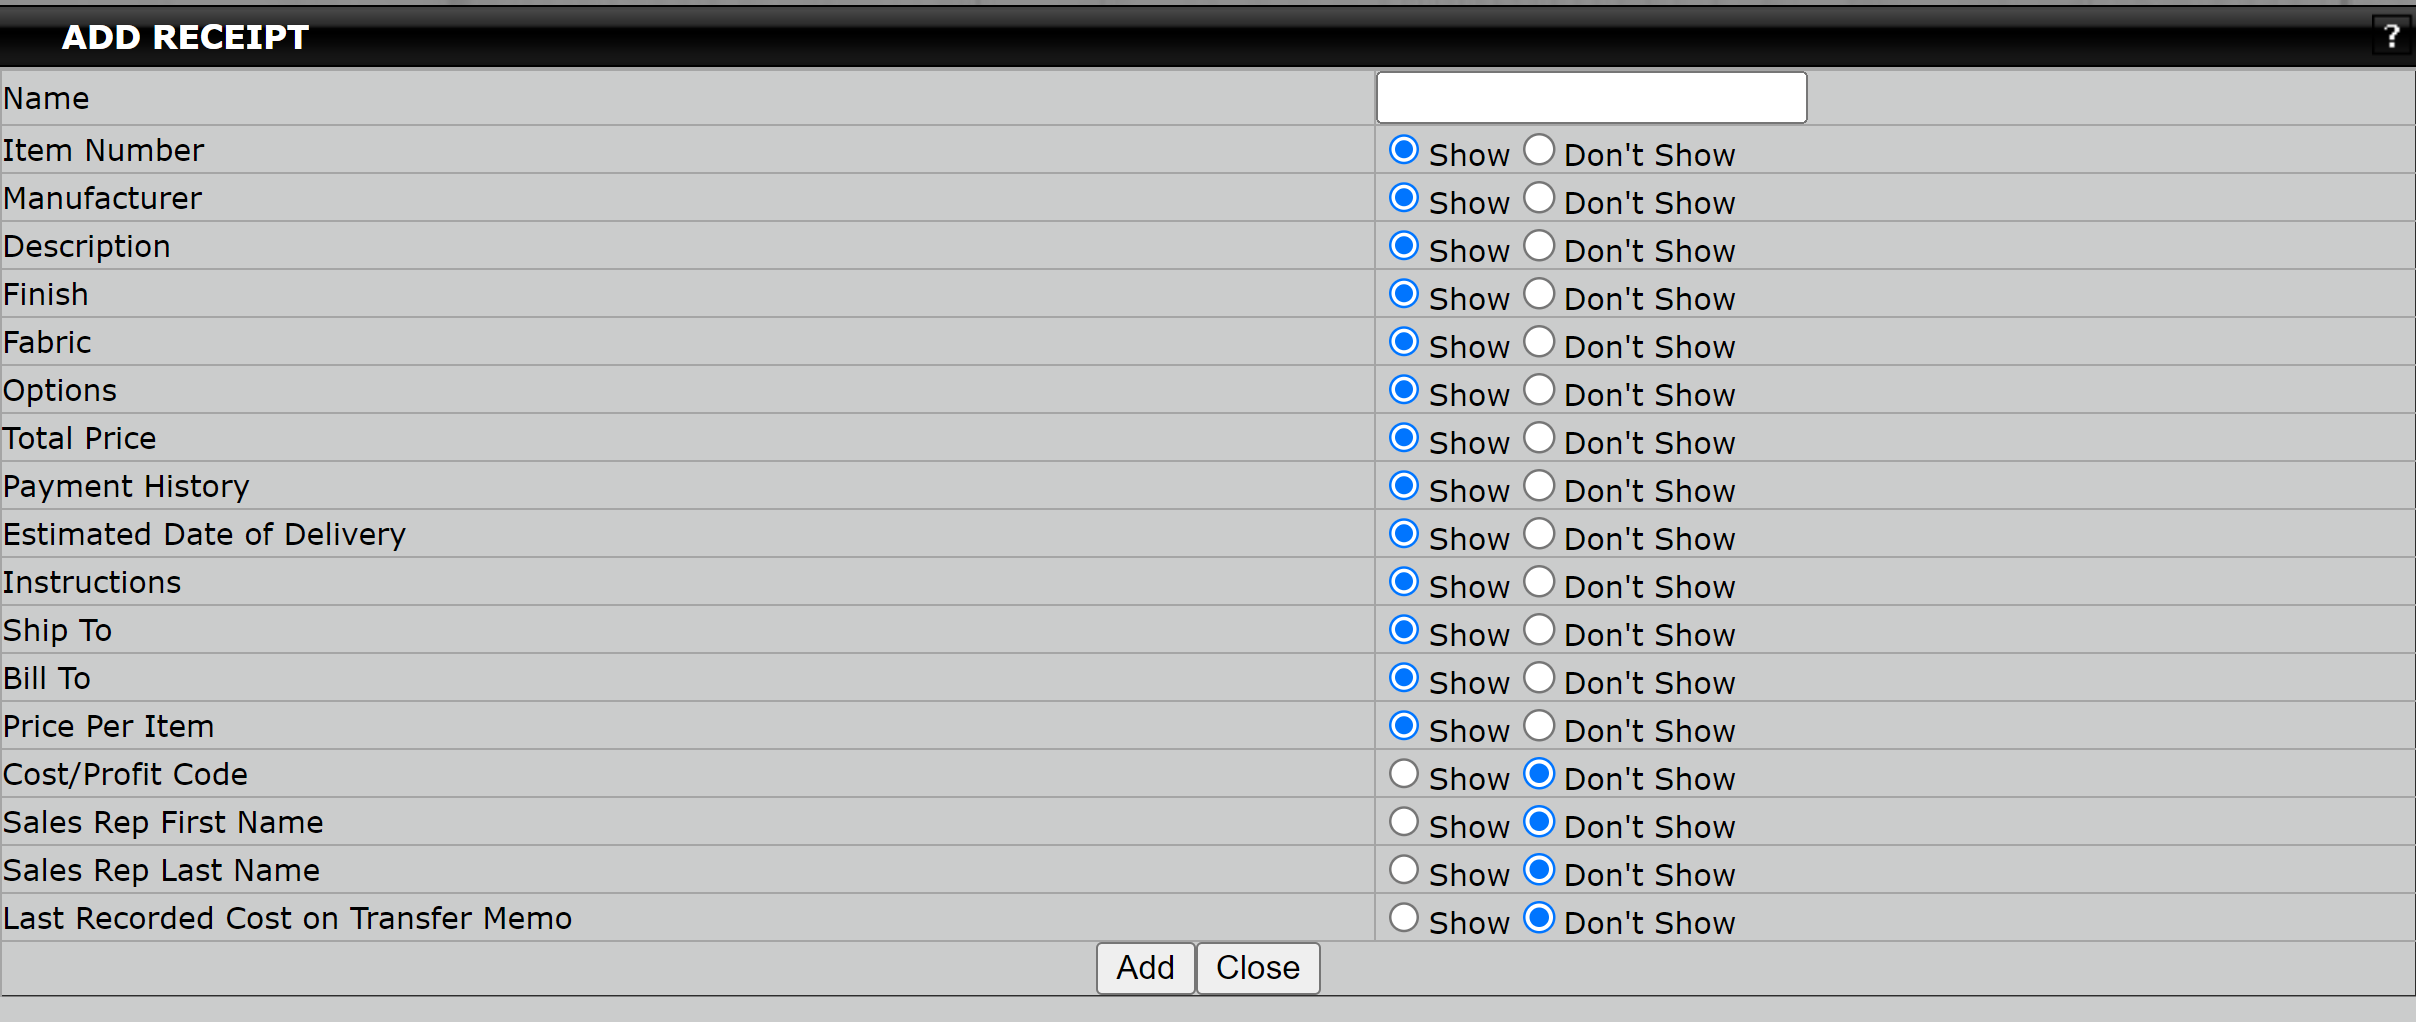
- Name: The system will ask you to name by typing in the new name you desire.
- Item Number: The actual item number of the stock item you are selling.
- Manufacturer: The abbreviation of the manufacturer who provides each item.
- Description: The item description (example: queen headboard).
- Finish: The type of wood (for example: darkwood, cherry, etc) or the colors available for an item.
- Fabric: The type of fabric that was chosen for the item.
- Options: Additional options if any are selected for the chosen item.
- Total Price: Total pricing of items.
- Payment History: The history of payments on a particular sale including the balance and any receivables information like the finance company name or COD.
- Estimated Date of Delivery: The date recorded at the point of sale by the user as an estimate of when the client can or would like to expect their product. This date can be changed and will be updated on every transaction.
- Instructions: Notes are added to a sale during a transaction. These notes are commonly used for delivery instructions or to point out particular details regarding the sale.
- Ship to: Shows who the items/purchases will be shipped to.
- Bill to: Option of showing who the items/purchases will be billed to.
- Price per item: Option of showing each item and its price.
- Cost/ Profit Code: This shows you the cost & profit of the total sale in code.
- Sales Rep First Name: Shows the first name of the sales rep about this sale.
- Sales Rep Last Name: Shows the last name of the sales rep about this sale.
- Last Recorded Cost on Transfer Memo: Will show you your last recorded cost on the transfer memo.
When you are finished click Add on the bottom of the screen and then Close. If you change your mind about a certain copy simply do not push Add and instead click Close only.
You can change the information you wish to allow on a copy by clicking the Edit button next to the particular copy you wish to change. You can also eliminate a copy from the print list by clicking Deactivate next to the copy. You can also Reactivate the copy at any time.
Scroll back up to the top and click "Submit Part III" before continuing.