
Sales Cheatsheet for EZ Process Pro
Quick Reference Steps
- Create a New Sale
- Review Customer's Contact Information
- Add Fees, Make Adjustments, Apply Store Credit, and Take Payment
- Remove any items the customer no longer wants
- Apply a discount to the subtotal before tax
- Add any additional charges or other fees that will be applied to the subtotal before tax
- Select the appropriate Tax Location
- Select whether the sale will be a Pick Up or Delivery
- Add any additional charges or other fees that will be applied to the subtotal after-tax
- Apply Store Credits
- Record your customer's payment
- Finance a Portion or All of the sale
- Set an Estimated Date of Delivery and Have the Manager Approve the Sale
- Add Customer Instructions for Delivery
- Print or Email Receipt
- Take Additional Payments
- Manage Sale
1. Getting Started
- Logging into the POS system
- Whenever you log into the system make sure you select the location you will be making the sale from.

Tip: Only specific locations are set up to allow for sales to be made, so if you do not see the Sales > Make New Sale menu option then you will want to check the location you signed into and make sure that is the correct location you should be in to make a sale. For example, in the illustration above only my two showroom locations allow for me to make sales, so if I were to select “Ford Warehouse” I would not be able to see the Sales > Make New Sale menu option to make a new sale.
2. Search for an Existing Customer (if it’s a new customer proceed to the next step)
- Has the customer been to your store before? They may already be in your system. Here is how you can pull up the existing customers and tie them to the shopping cart that you will build for them.
- Step 1: Find the customer
-
- Go to Sales > Search Customer
-
- Search by Customer’s First Name, Last Name, and/or Phone Number and then click Submit

- You will then see a list of customers that match that search criteria. Click View for the appropriate customer to pull up that customer’s profile.

- Step 2: Create a New Sale for the Existing Customer
-
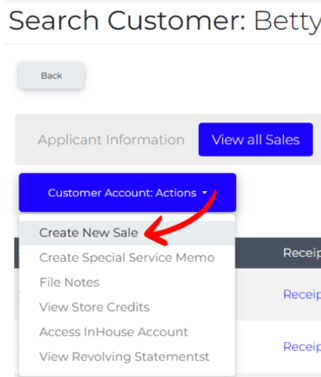
- With the customer’s profile now pulled up you will click View All Sales to pull up a list of the sales for this particular customer
-

-
-
- Now click on the Customer Account: Actions drop-down menu and select Create New Sale
-
-
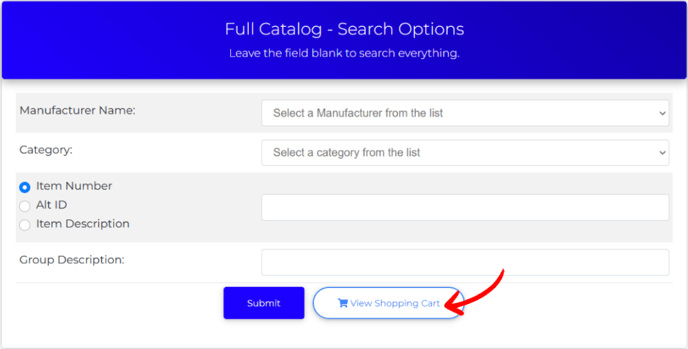
- This will now bring up a page that asks you if you would like to pull up In Stock, Full Catalog, Quick Sale, or Quick Cash Register. After making a selection, whenever you begin filling out the shopping cart, and decide to checkout, the shopping cart will be tied to this customer and all of the customer’s information will be filled in automatically.
Tip: You can select an existing customer either before or after you start adding items to a shopping cart. If would like to build the shopping cart out first and then tie the customer to the shopping cart then you would fill up the shopping cart and then follow all of the steps above and then click on View Shopping Cart > Checkout. All of your customer’s information will then automatically be filled in on the Checkout page.

3. Creating a New Sale
- Let’s now say that the customer has never been to your store before. These steps will walk you through how to create a new sale. The first decision you need to make is do you want the system to only show you items that are in stock and available, or would you like to see all items you have to offer?
- Step 1: Start the New Sale
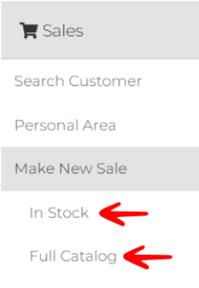
- Go to Sales > Make New Sale
- Now select either In Stock or Full Catalog depending on whether you would like to pick from only a list of items that are in stock and available or if you would prefer to see a list of all items that you carry.
- Step 2: Search for Items to add to the Shopping Cart
-
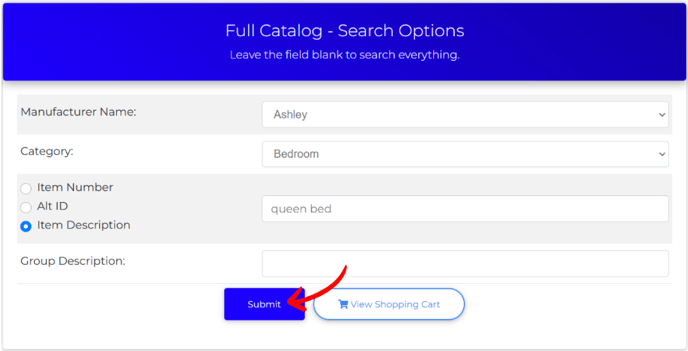
- On this next page, you will search for the items that you are looking for by narrowing down the search by Manufacturer, Category, Item Number, Item Description, Group Description, or by a combination of any of those selections and click Submit
-
-
- You will then see a list of groups that contain the search criteria you searched for. Click on a group and it will pull up a list of items that are in that group.

- Step 3: Add Items to the Shopping Cart (if you would like to add SETs to the shopping carts instead of individual items proceed to the next step, but if you are only adding items go to Step 4)
- On this page, you will see a list of items that make up this Group.
- You will now add the quantity for each of the items that you would like to add to the shopping cart. The subtotal of the items will start to calculate based on the quantity that you enter.
- You will now make adjustments to the price of each item by clicking on the price field and changing it.
- You can record the reason as to why you are making the adjustments in the Additional Notes field.

-
- When you are finished you will click Submit to begin adding the items to the shopping cart.
- When you are finished you will click Submit to begin adding the items to the shopping cart.
- Step 3: Add Sets to the Shopping Cart
- On this page, you will see a drop-down menu that lists each of the sets that were created for this Group.
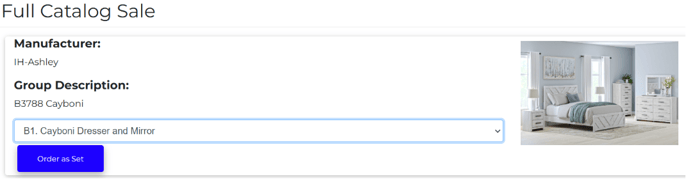
-
- Click on the drop-down menu to select the appropriate SET and then click Order as Set
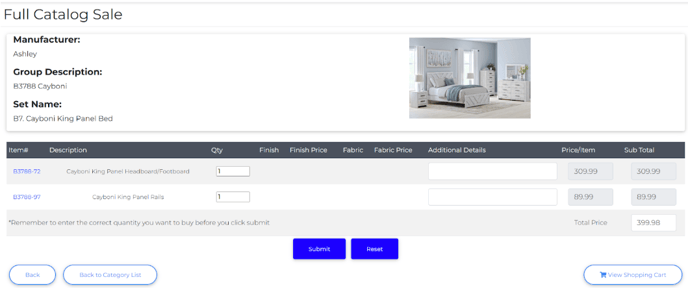
- The system will now list out each of the items in the correct quantities that make up that SET on the following page.
-
- Go ahead and adjust any quantities or prices and then click Submit
- Go ahead and adjust any quantities or prices and then click Submit
- Step 4: Confirm the items you wish to add to the shopping cart are in the correct quantities for the correct prices
- Whether you choose to add items individually or as a set, the system will take you to a page to confirm your entry. This gives you a chance to review all of the items you have added and the price of each of the items.

-
- If you find that the quantities or price of the items are incorrect click the Back button to go back to the previous screen where you can change the quantities or the price of the items
- If the quantities and prices of the items are correct then you will click Add Items to Shopping Cart
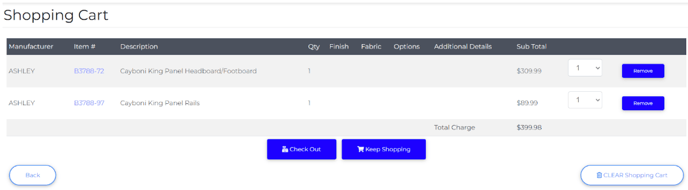
- Step 5: Review Shopping Cart - Add More Items or Proceed to Check Out
- On this next page, you will see your shopping cart.
- You now have 4 options, remove items from your shopping cart, clear your shopping cart, add more items to your shopping cart, or check out.
- To remove an item from your shopping cart you will select the quantity of the item you wish to remove by selecting the quantity drop-down menu next to the remove button. Once you have selected the appropriate quantity you will click Remove.
- To clear your shopping cart you will click the CLEAR Shopping Cart button. This will remove every item from your cart.
- To add more items to the shopping cart you will click Keep Shopping. You will then go back to Step 2 and work through adding more items to the shopping cart.
- To check out you will click Checkout. This will take you to the next Step where we review our customer’s information.
3. Review Customer’s Information
-
- Step 1 - Tie the sale to an existing customer (if the sale is for a new customer proceed to Step 3, if have already tied the sale to an existing customer proceed to Step 2)
- If this sale is for an existing customer that you have not yet selected you will do so now by going to Sales > Search Customer > [Pull Up Existing Customer] > View All Sales > Customer Account Actions > Create New Sale > Full Catalog > View Shopping Cart > Checkout. That will then take you to the customer information screen and all of your existing customer’s information will be populated.
- Step 2 - Review existing customer’s information (if the sale is for a new customer proceed to Step 3)
-
- Whether you chose to create the sale for the existing customer at the beginning of the process or just now tied the sale to the existing customer you will now review all of their contact information with the customer. If there is any information that needs to be updated make those changes at this time and click Save Customer Info. You will then select the “How did you hear about us?” response, check the box for the appropriate salesperson for the sale, select a payment method that will populate by default on the following page, and then click Proceed to Checkout
-
- Step 1 - Tie the sale to an existing customer (if the sale is for a new customer proceed to Step 3, if have already tied the sale to an existing customer proceed to Step 2)
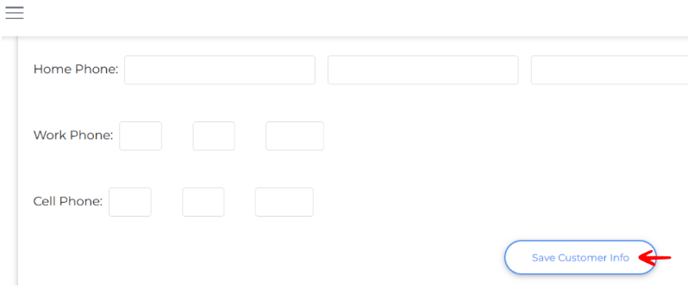
- Step 3 - Enter new customer’s information
-
- On this screen, you will see blank fields asking for name, address, phone number, etc.
- The fields surrounded by a red box are required. Information will need to be entered into these fields in order for you to proceed to the next step.

-
- Enter your customer’s information into those fields now.
- Step 4 - Select the "How did you hear about us?" Response
- At the bottom of the page, you will now select a response for “How did you hear about us?” by clicking on the drop-down menus and making a selection.

- Step 5 - Select the Salesperson for the Sale
- You will then check the checkbox for the salesperson or people who should be associated with this sale. If your system settings allow you to enter a percentage that should be attributed to a Sales Person you will enter that percentage at this time. (Note the numbers you enter for a percent should altogether equal 100%, so if I am dividing a sale between two salespeople, one could get 30% while the other is given 70%, or both could receive 50%.)

-
- You will then select a “Payment Type” that will populate on the next page. This is for the initial deposit you plan to collect from the client. If you aren’t sure just yet you can always select “Cash” and change it later. Make that selection now.

-
- When you are finished click Proceed to Checkout
4. Add Fees, Make Adjustments, Apply Store Credit, and Take Payment
- You will now be taken to a screen that lists your customer’s information and each of the items on the sale.
- Step 1 - Remove any items the customer no longer wants.
- For any line item your customer does not wish to purchase you can click the Remove option and that will remove the line item from the sale.

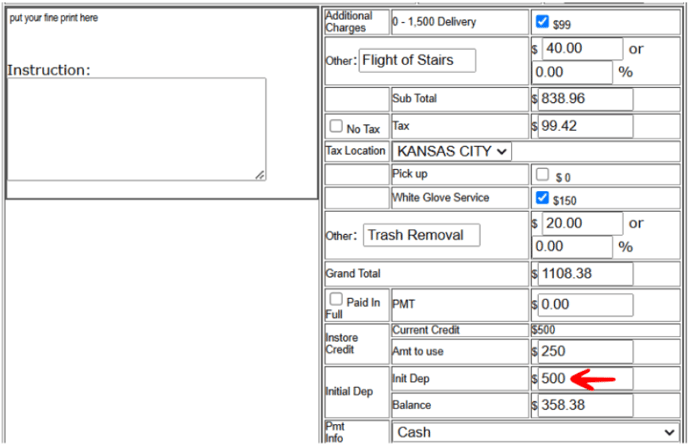
- Step 2 - Apply a discount to the subtotal before tax
- If you need to apply a discount to the subtotal before tax you will now enter that amount as either a dollar value or a percentage within the Adjustment fields right beneath the subtotal. Whatever amount you enter here will automatically apply itself to the subtotal before tax.
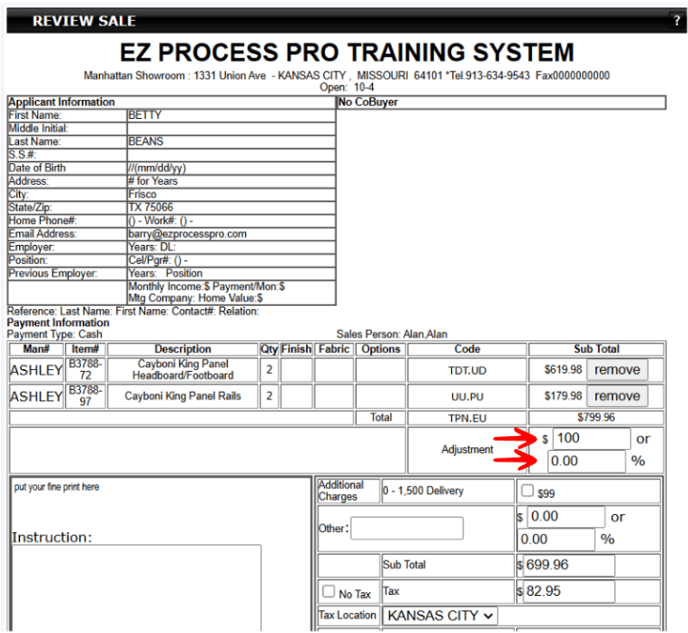
- Step 3 - Add any additional charges or other fees that will be applied to the subtotal before tax
- At this point, you will now select any of the Additional Charges checkboxes to apply your additional charge to the subtotal before tax, or you can write in the name of your fee within the “Other” field and type in the amount you would like to be applied to the subtotal before tax.
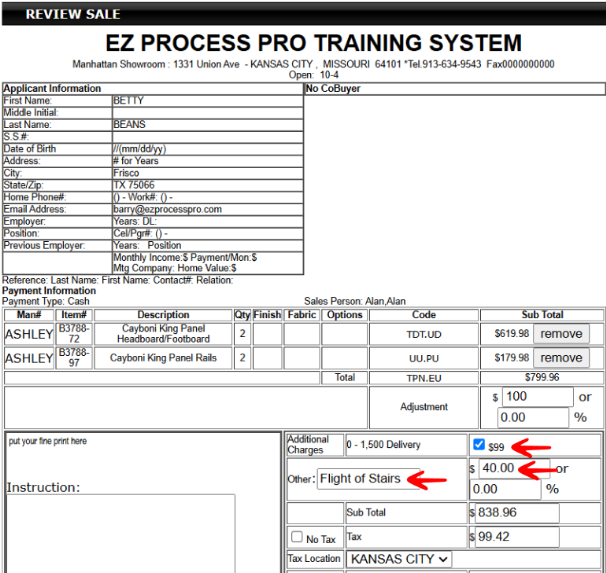
- Step 4 - Select the appropriate tax location
- If you are not going to charge sales tax on this sale you will then select the No Tax checkbox and that will remove the tax from being charged on this sale.
- If you are going to be charging Sales Tax then you need to select the appropriate Tax Location by clicking on the Tax Location drop-down menu and selecting which tax location needs to be applied to the sale. The default tax location set in System Settings will always be what is selected first, so if this is the appropriate tax location you can leave it selected.

- Step 5 - Select whether this sale will be a Pick Up or a Delivery
- If the customer is planning to pick up these items check the Pick Up checkbox beneath tax location.
- If you are going to deliver the items to your customer you will leave the Pick Up checkbox unchecked.
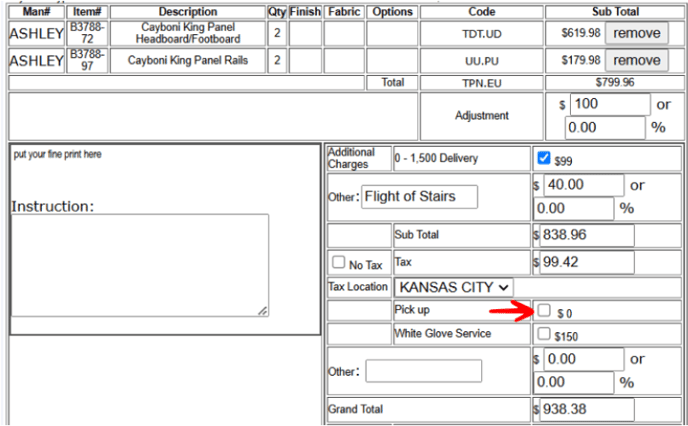
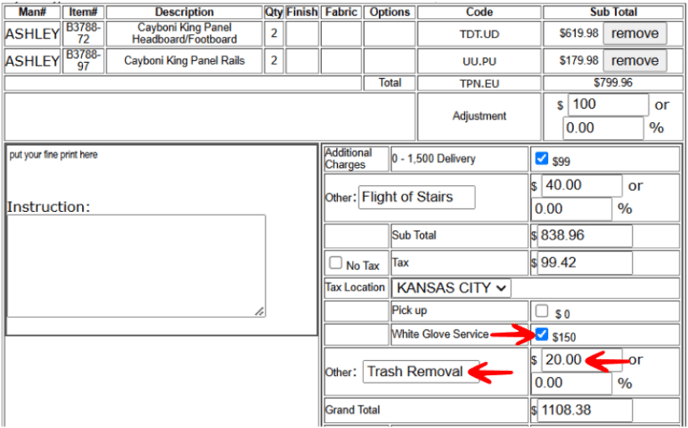
- Step 6 - Add any additional charges or other fees that will be applied to the subtotal after-tax
- You will now select any of the Additional Charges checkboxes to apply your additional charge to the subtotal after tax, or you can write in the name of your fee within the “Other” field and type in the amount you would like to be applied to the subtotal after tax.
- Step 7 - Apply store credits (if the customer doesn’t have any store credits or doesn’t wish to use any proceed to step 8)
- You will see the current credit balance the client has within the “Instore Credit” section listed next to Current Credit.
- If the customer wishes to use their store credit type in the amount within the Amt to use field.

- Step 8 - Record your customer’s payment
- You will now record the amount the customer is paying today within the Init Dep field. (In the example below, the customer is paying $500 in cash today)
-
- You now select the type of payment the customer is making as a deposit by clicking on the Pmt Info drop-down menu and selecting the appropriate option.

5. Finance a Portion or All of the Sale
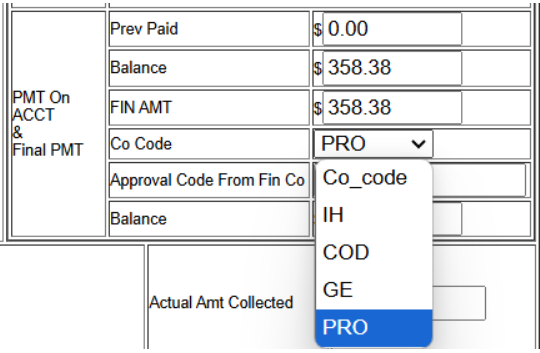
- Step 1 - If you have approval to finance a portion or all of the sale for your customer you will enter the approved financed amount within the FIN AMT field.
- Step 2 - You will then select the appropriate abbreviation for the Financing Company that will be financing the customer that amount by selecting the appropriate option within the Co Code drop-down menu.

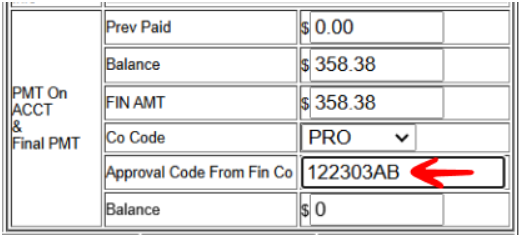
- Step 3 - You will then type in the approval code your received from the financing company within the Approval Code from Fin Co field
6. Set an Estimated Date of Delivery and Have a Manager Approve the Sale
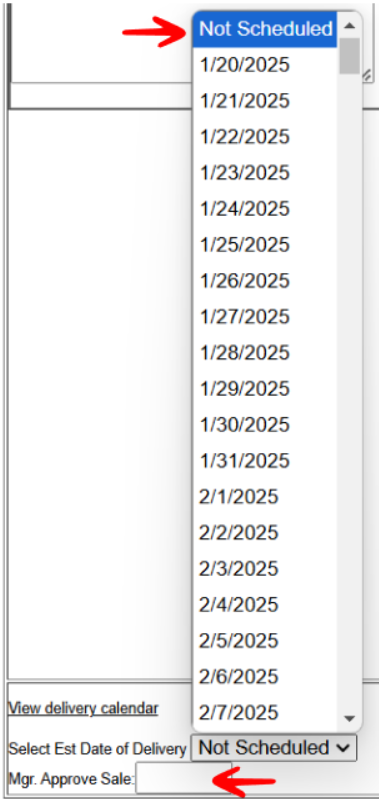
- Step 1 - Click on the Select Est Date of Delivery drop-down menu and select either “Not Scheduled” or a date for the delivery
- Step 2 - After that, you will then need a manager or person who has the permission to approve the sale to enter their password within the Mgr. Approve Sale field.
7. Add Instructions
- Step 1 - If your customer would like to give you delivery instructions you can enter those within the Instructions box at this time.

- Step 2 - When you are finished click Save as Sale (or Save as Quote to save the sale as quote instead)
8. Print or Email Receipts
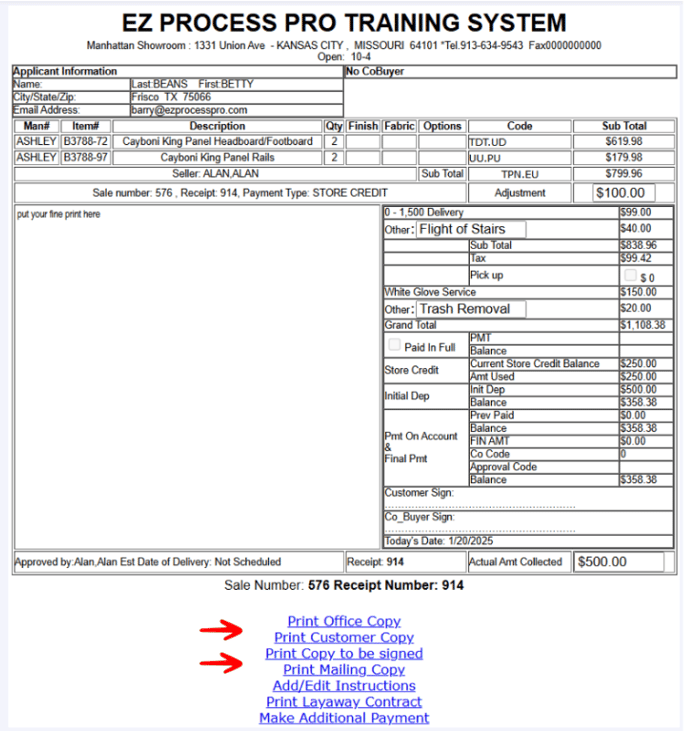
- If you choose to Save as Sale this will take you to the receipt screen. You now have the option to print specific copies of the receipt or email the receipt to the client.
- You will now make those selections now.
9. Take Additional Payments
- If your customer opted to pay half cash and half card, or if you need to take any additional payments at this time select the Make Additional Payment option at the bottom of the screen.
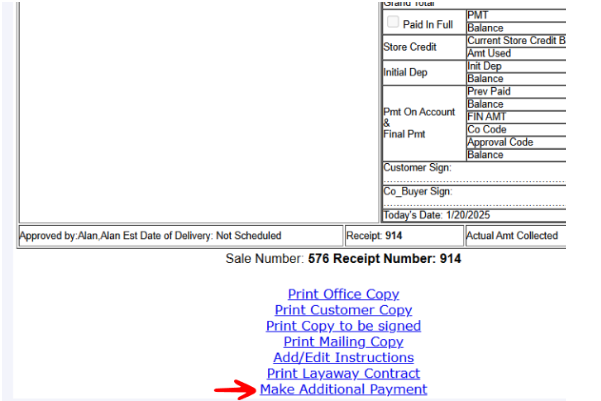
- This will take you to a different screen where you can record an additional payment for this sale.
10. Manage Sale
- If you ever need to check on the status of the sale, give refunds, edit instructions, add or view sales notes, or edit the sale you will go to Sales > Search Customer and then search by either your customer’s information or sale number.
- If you search by your customer’s information you will then select the appropriate person to view a list of all sales. If you search by sale number it will already pull up a list of your customer’s sales.
- Click Select within the “View Sale” column for whichever sale you wish to pull up and manage.
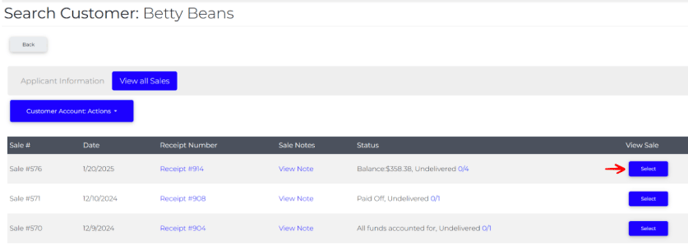
- You will now see the Payment Status, Delivery Status, Sale Notes, and then options to Take Payment/Give Refund, Edit Sale, Edit Delivery/Pick Up Date, Void/ Cancel Sale and more.

11. Give Refunds
- Step 1 - On the page you are currently on, if you click Take Payment / Give Refund
- It will open up a window that looks like this.

-
- Select the Refund option
- Step 2 - You will now enter the refund amount within the Refund Amount field.
- You will select the type of refund (e.g. Cash, Check, Store Credit, etc.) within the Refund Type drop-down menu.
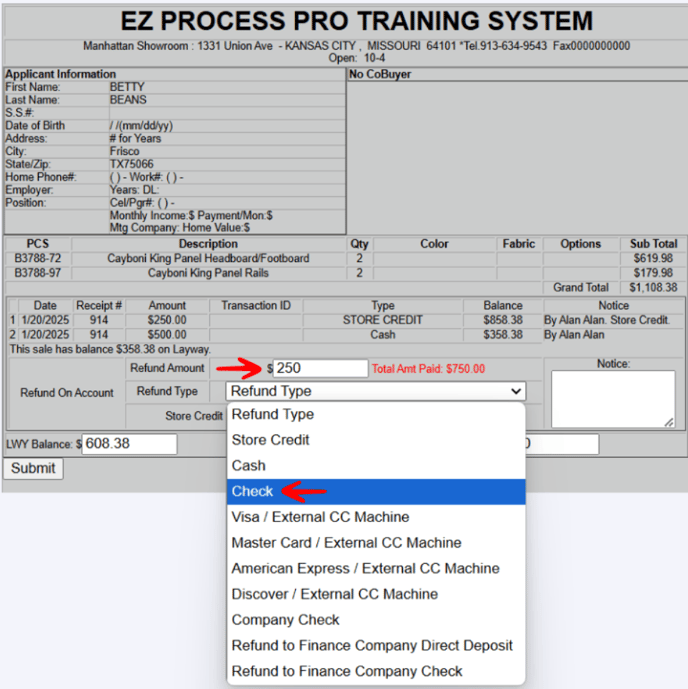
- Step 3 - You will then click the Submit button to give the refund.
12. Notes Section
- You can always finance the sale after it has been saved by selecting Make Additional Payment at the end of the sale, or by following the steps to manage the sale and by selecting Take Payment / Give Refund. On the following page you will select Payment and then for the Payment Type you will select Finance
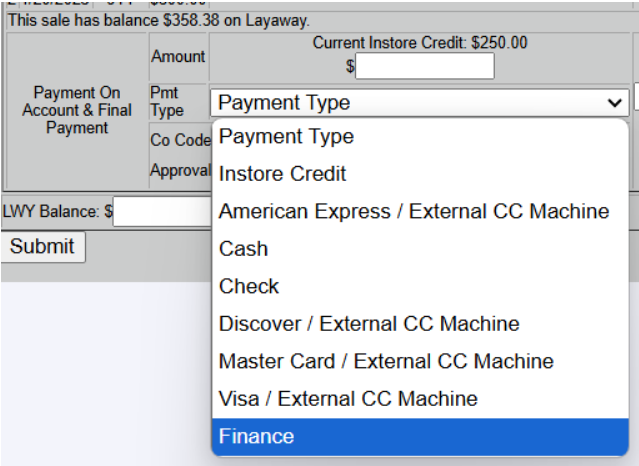
-
- Make sure you enter in the amount being financed within the Amount field. Select “Finance” from the Pmt Type drop-down menu, select the appropriate abbreviation for the financing company within the Co Code drop-down menu, and type in the approval code you received from the financing company within the Approval Code from Fin Co field.
- Click Submit to save.