
When creating Purchase Orders using Items for PO, you will create "rough drafts". Which can be modified as they have not been sent to the vendor yet. In this article, we will discuss how to print those purchase orders.
These are called Unprinted Purchase Orders and can be found by navigating to Main Menu > Ordering > Purchase Orders > Unprinted Purchase Orders.
Once you have navigated to the Unprinted Purchase Orders page you will see a list of all purchase orders that have had items added but haven't been finalized yet by printing them. You'll notice most of the columns (PO Date, Ordered By, Vendor Acknowledgement, ETA, Shiplist #, Invoice Received, and Received By) are blank as the PO has not been printed yet.
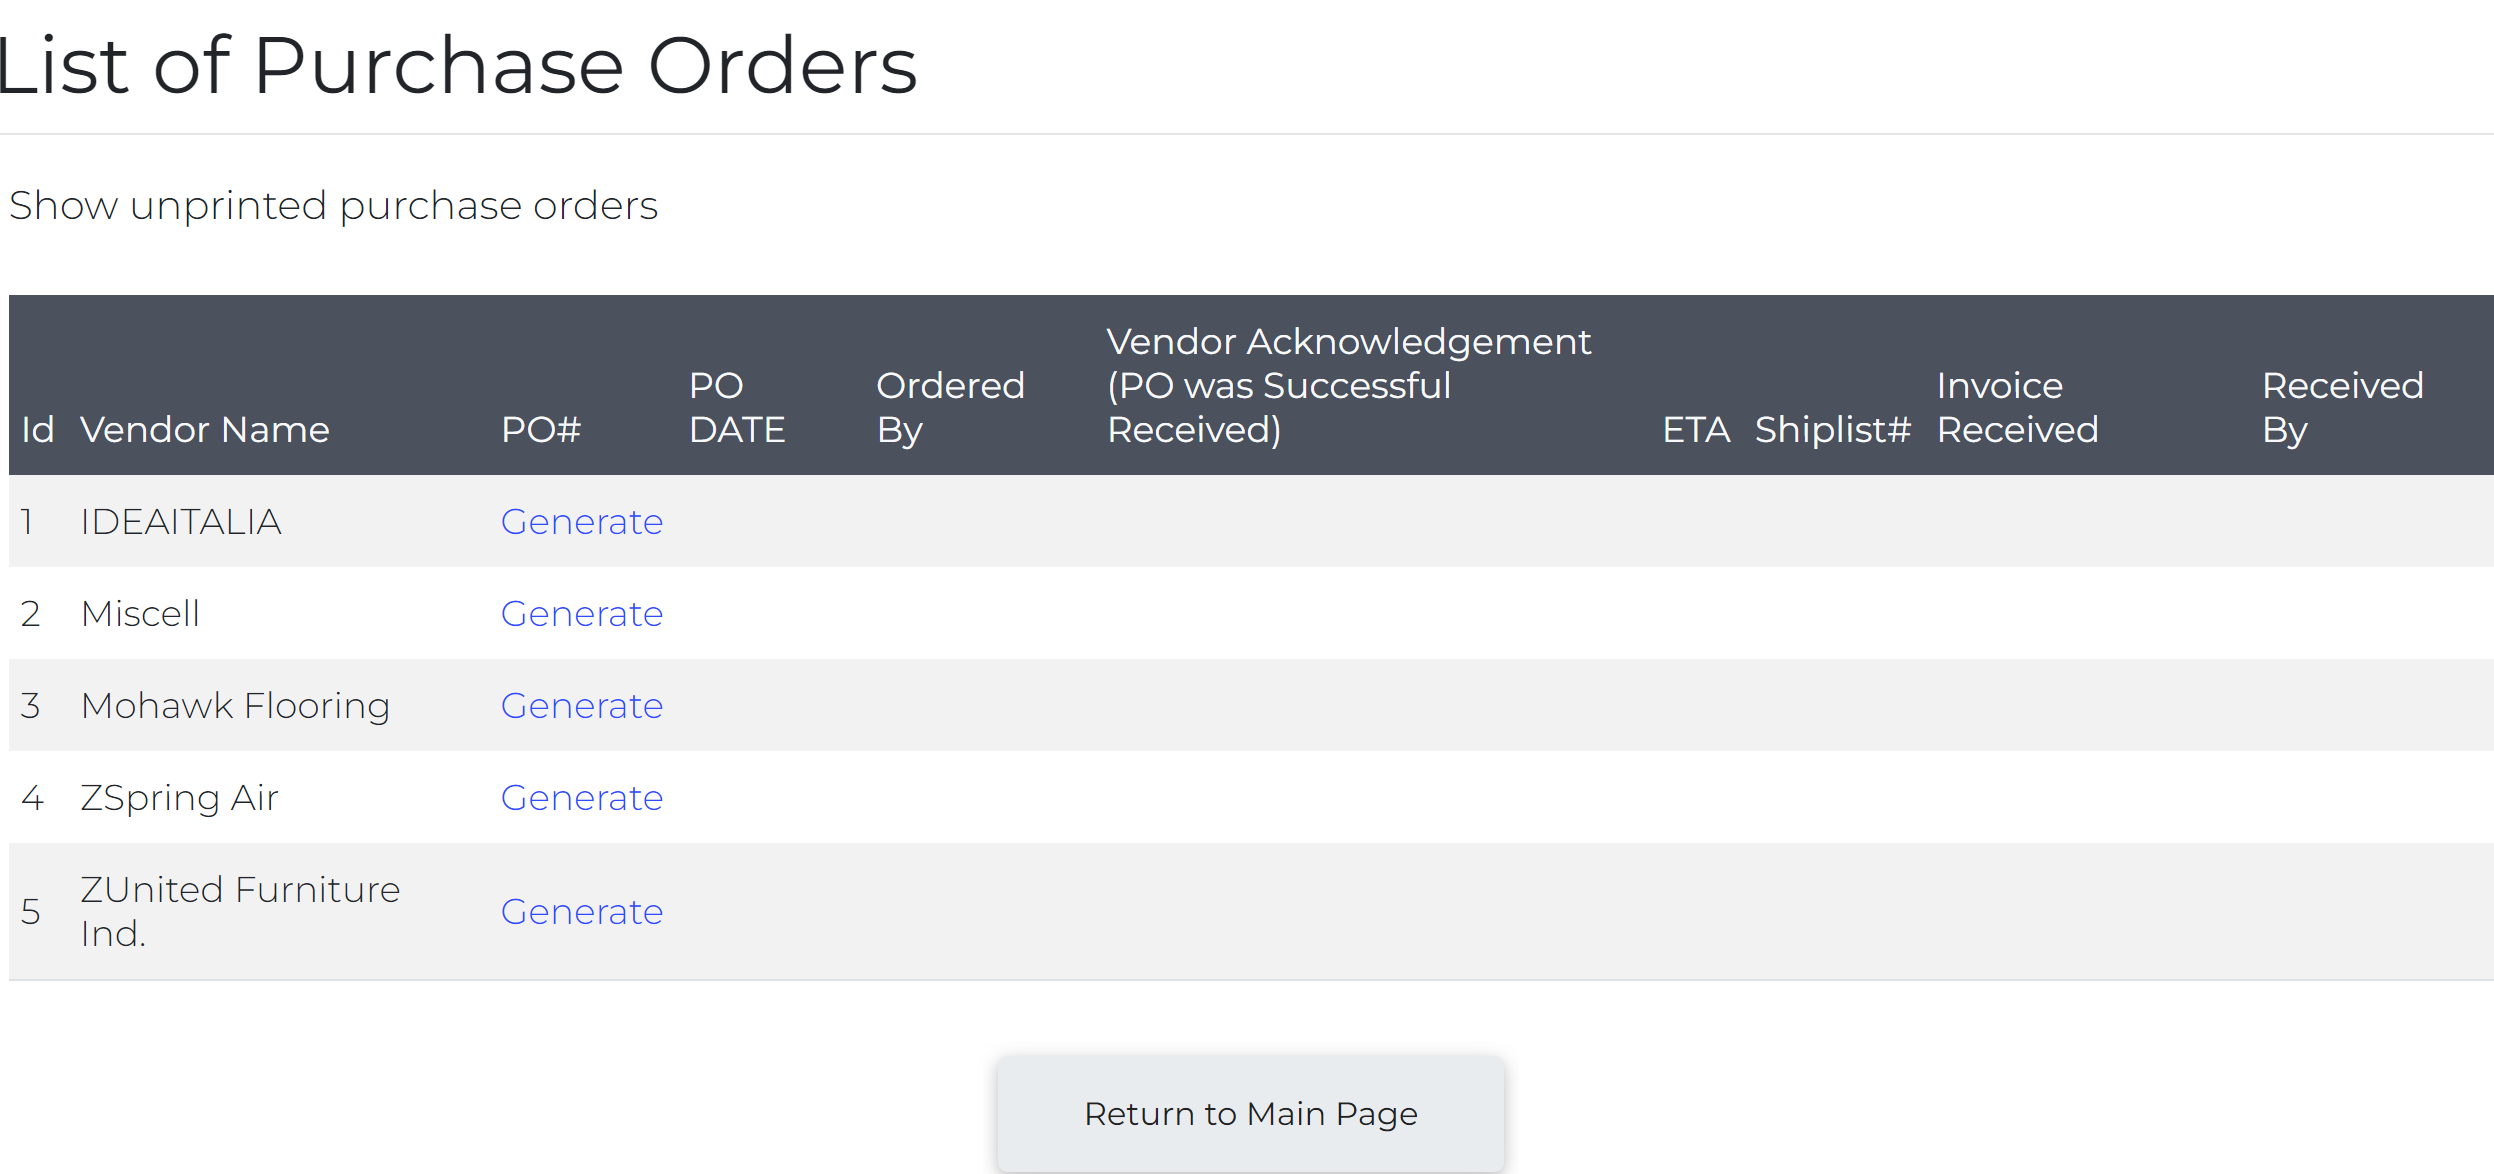
Vendor Name and PO #:
- Vendor Name: Indicates what vendor the items will be purchased from. There will be only one unprinted PO per vendor at a time, as if new items come up for order they will automatically be added to the existing unprinted Purchase Order.
Please note that there is only one Unprinted PO per vendor at a time, there can be unlimited printed POs for a vendor as POs cannot be edited once they are printed. The only exception is that items can be moved from being for STOCK to being for a sale, controlled through the "Recheck Orders for Stock" button on the Items for PO page.
- PO #: This will not have a PO number yet as the PO has not been printed. Instead, you will see the link labeled Generate. This is where you will be able to print the PO and send it to the vendor.
Below we will discuss a breakdown of the Generate Screen
When you click the Generate button, you will see the screen below. This is a rough draft of the Purchase Order. Here, you can add or remove items, choose what location you want your item shipped to, and what day you would like it shipped. After making your changes and selections you will need to select Print at the bottom. When this page is printed, you can send it directly to your vendor to request the inventory.
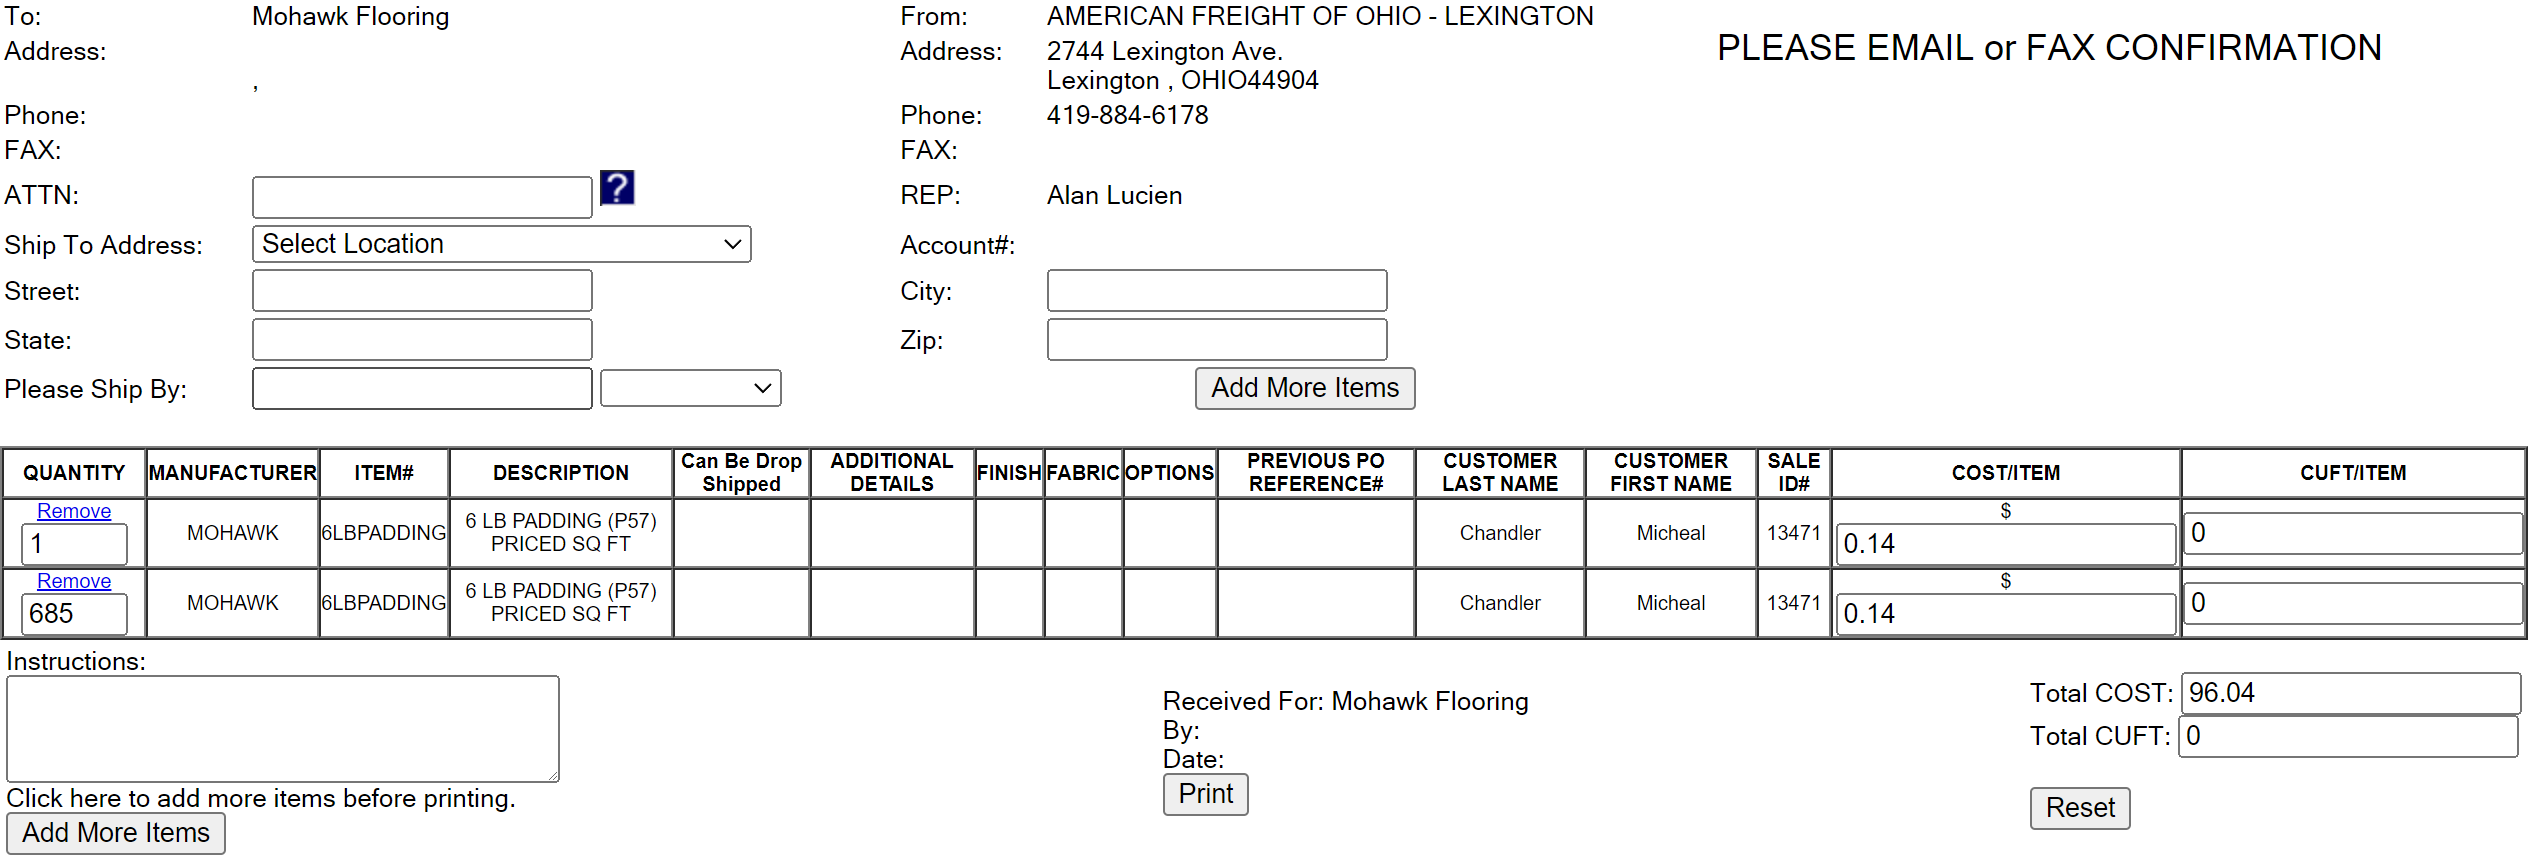
- At the top of the page, you'll see the relevant contact information on the page. On the left, you'll see the Vendor's contact information prepopulated.

This information is controlled by the Vendor you set up in Getting Started > Add/Edit Retail Vendor. On the right, you will see your company's contact information, which is managed in Part I of Page 1 of System Settings.
ATTN: This is who the PO should be to the attention to. This varies vendor by vendor. Some may want it to be to a specific person, and others may want it to be to a department. Ask your Vendor rep for clarity.
Ship To Address: Here, you can use the dropdown menu to choose the preconfigured locations you have in your system. When you choose a location, it will fill out the Street, City, State, and Zip according to the information you filled out in the Location
Please Ship By: This allows you to choose a date that you would like the item to ship. If you are making a PO for the integrated Ashley connection, this will say Please Arrive By instead, as Ashley prefers to calculate the arrival date as opposed to the Ship By date. You can use the Ship By/Arrive By dates to control how quickly or slowly items arrive at your store.
Next to the Shipping Information section, you can see a button that says "Add More Items". This will open a window to Generate a PO for Stock page.

Each column is explained below.
Quantity: How many items are going to be ordered when you finalize the PO. You can change the number of items being ordered here before finalizing the PO. Or, you can use the "Remove" link to delete the item from the PO. If you remove an item for a sale or for Minimum Stock, it will go back to the Items for PO page.
Manufacturer: The manufacturer of the item that is in the row.
Item #: The Item Number for the item that is in that row.
Description: The Item Description for the item that is in that row.
Can Be Drop Shipped: If the item can be dropped shipped, this will be indicated here.
Additional Details: These are notes added to the item when making a sale.
Finish: If a finish is chosen for the item when making a sale or generating a PO for stock, it will show here.
Fabric: If a fabric is chosen for the item when making a sale or generating a PO for stock, it will show here.
Options: If customizable options were chosen for the item when making a sale or generating a PO for stock, it will show here.
Previous PO Reference #: If this is related to a past PO, the related PO number will show here.
Customer Last Name: If the item is being ordered for a sale, and the last name was filled out in Customer Info, it will show here.
Customer First Name: If the item is being ordered for a sale, and the first name was filled out in Customer Info, it will show here.
Sale ID #: If this is related to a sale, the sale number will show here. If it is for stock, it will say STOCK instead.
Cost/Item: This is the preconfigured cost of the item that has been set in your system. It is what you are anticipating the vendor will charge you. This may not be accurate if the vendor has updated any costs, unless it is an automatically maintained vendor.
Cuft/Item: Cubic Feet per Item. This is the length x width x height to tell you how much area an item takes up.
Instructions: This allows you to write notes on the Purchase Order for the vendor to see. You also have the option to Add More Items if you would like to from here.
Received For, By, and Date fields, as well as the Print button. The Print button is what will finalize the Purchase Order.
If this is a Purchase Order being built based on the Ashley PO connection, you will also see the following buttons. These allow you to send the POs through to Ashley directly through your integration, so you will not have to print or email the Purchase
To the far right of the page, you will see the estimated totals of the cost of the items. You also have a Reset button, which will clear all the settings back to the default settings of the page, leaving only the prefilled information.
What happens after I print the PO?
When you print the you will have the option to either Print the Purchase Order and send it to the vendor via email or send Direct to Vendor. It can no longer be edited, just voided, and will have a PO number you can search for. You can also view it under Non-Received Purchase Orders until all items are marked received on the PO.