
Please see the below article on how to receive items from a PO using Receive All from List.
After you add items to a PO and then Print that PO, it is now classified as a Non-Received Purchase Order. The items will not be added to the inventory until you receive them. You can see what POs have Non-Received Items by going to the Non-Received Purchase Orders Page, or you can see all items on all POs that have not been received into Inventory yet by going to Main Menu > Ordering > Purchase Orders > Receive All from List - All PO.
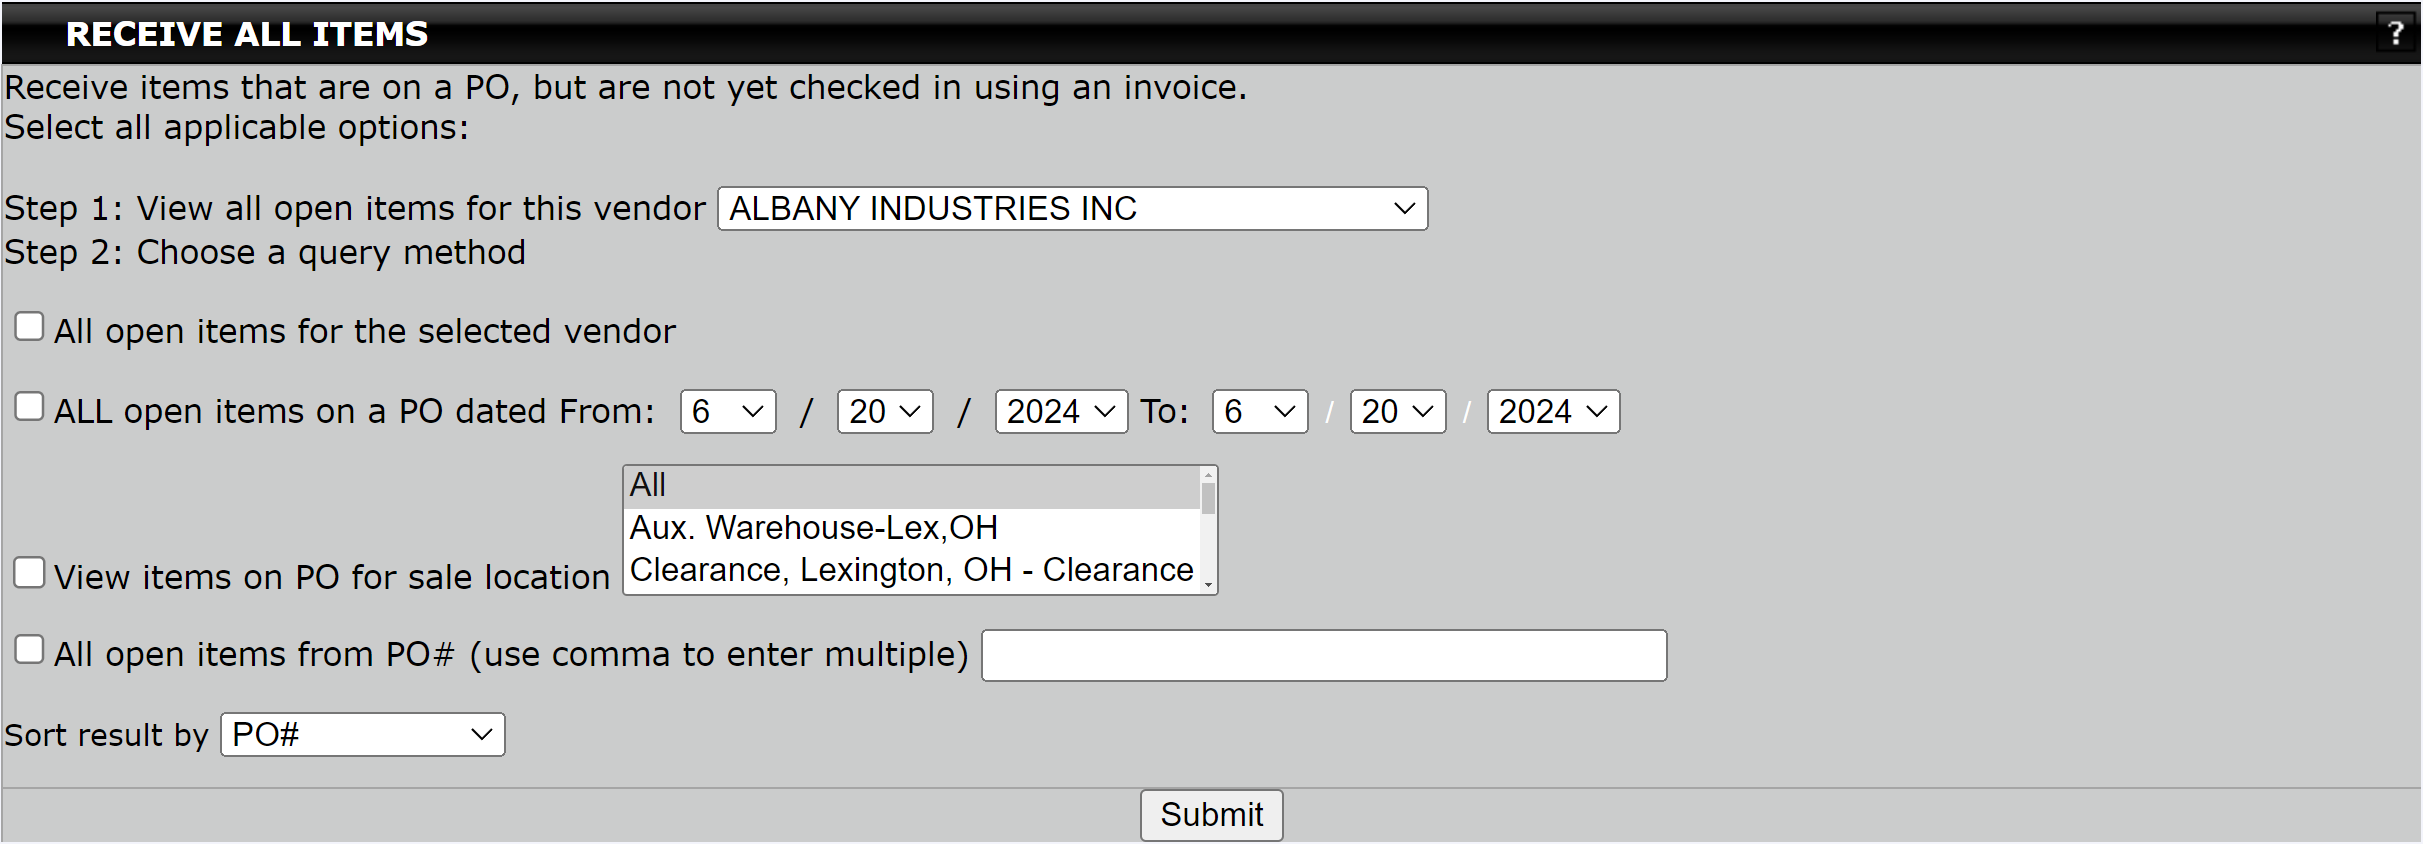
As seen in the screenshot above you will be directed to the query page where you can refine your search results.
- Step 1: This is where can choose to search for a specific vendor.
- Step 2: These options help further refine your search.
Please note that if you would like to see the pending items for All Vendors you do this by selecting one of the options below. 
Once you are satisfied with your query simply click Submit. You will then be taken to the Receive Items page. From here, you can check off items, notate where you are checking them in, add any freight charges, and more.
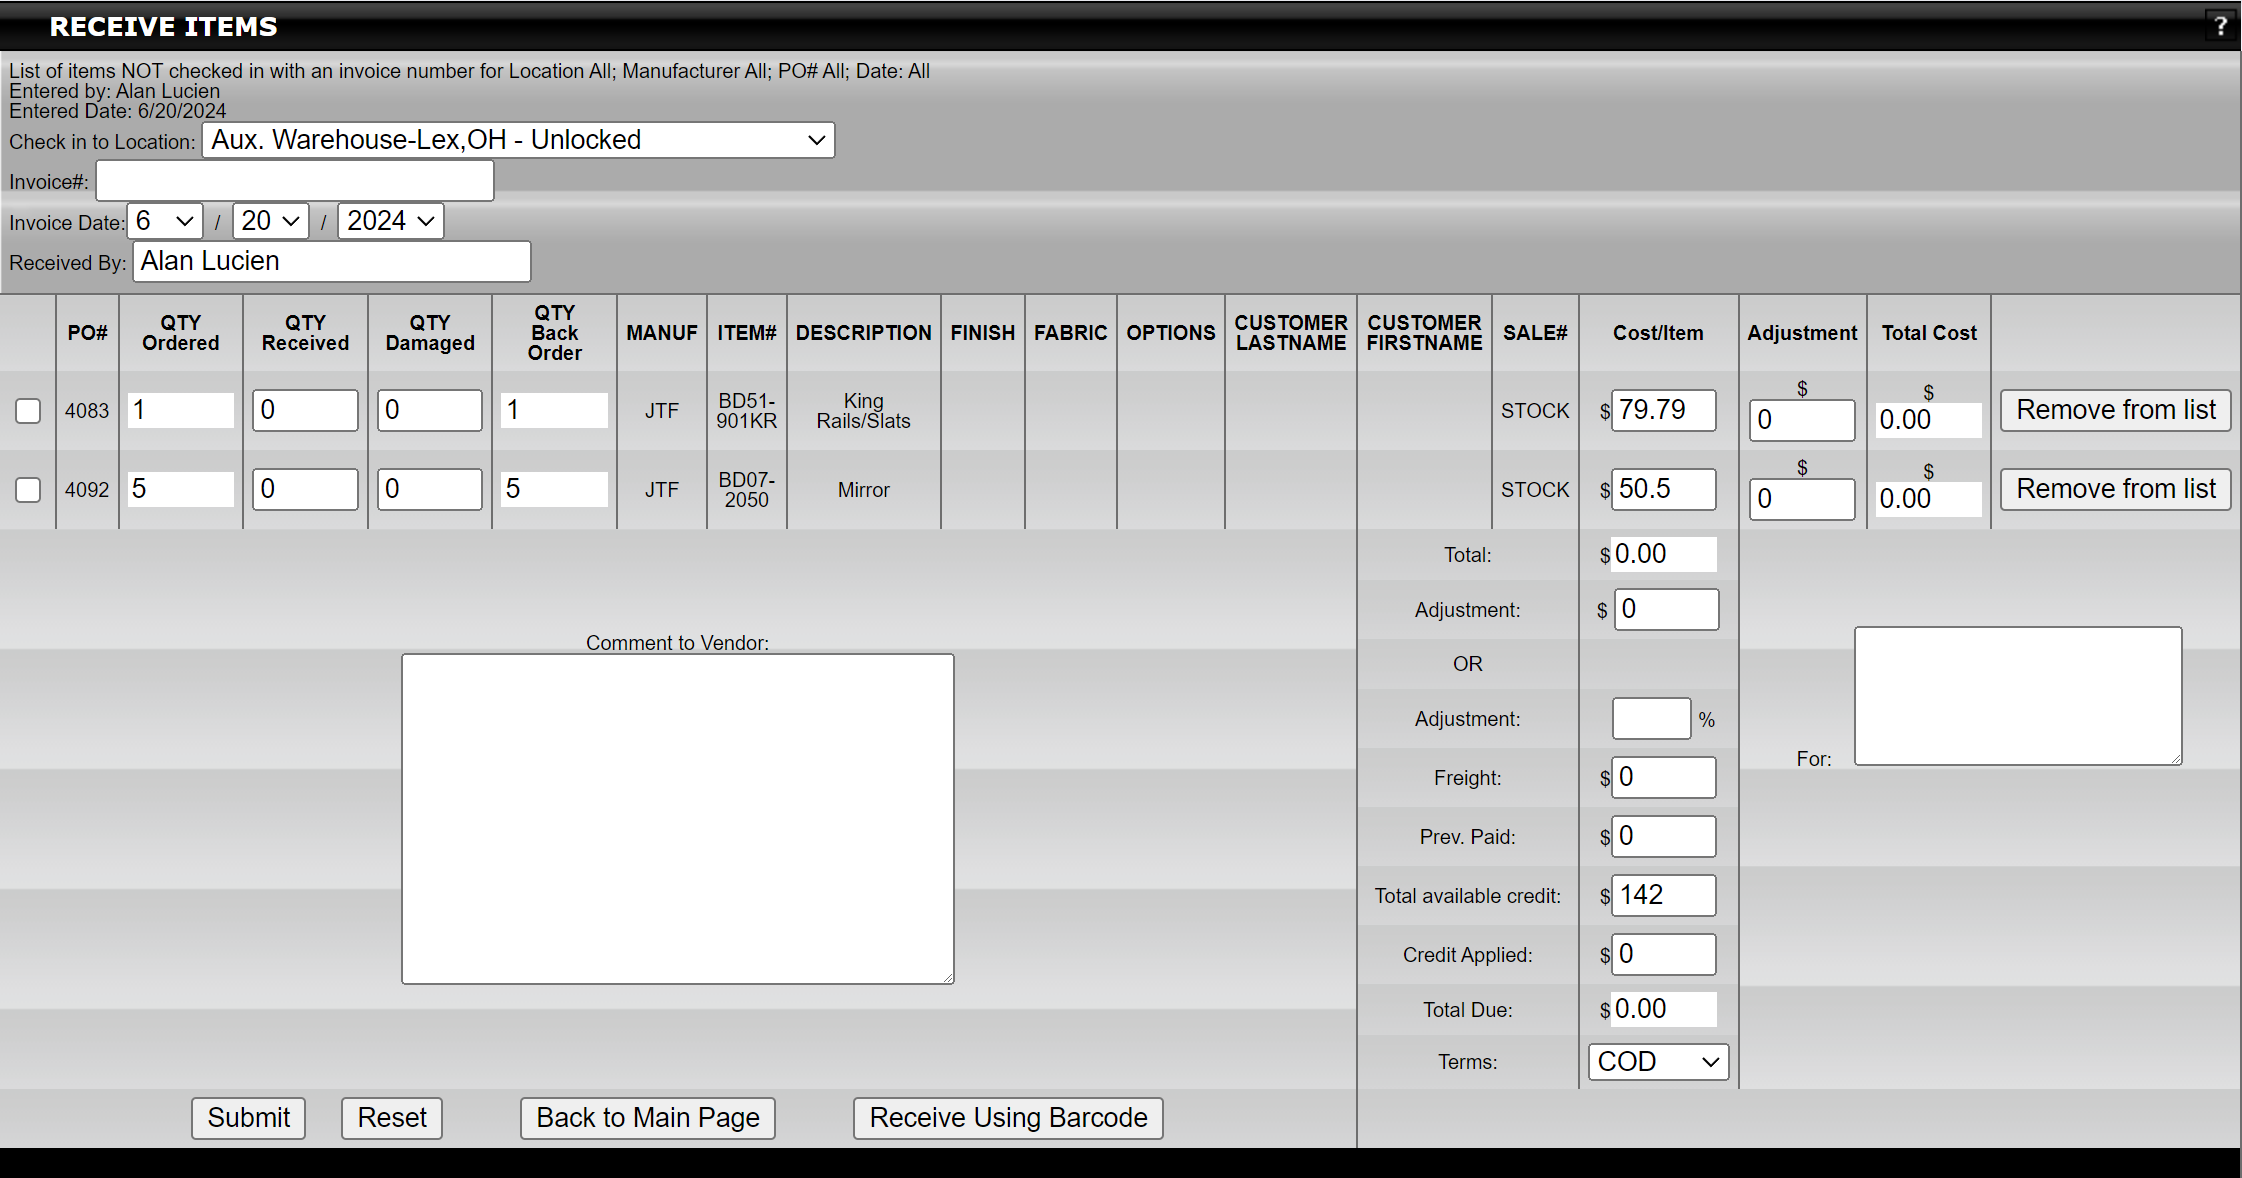
At the top of the page, you will have a few different options as well as the information used in the search.
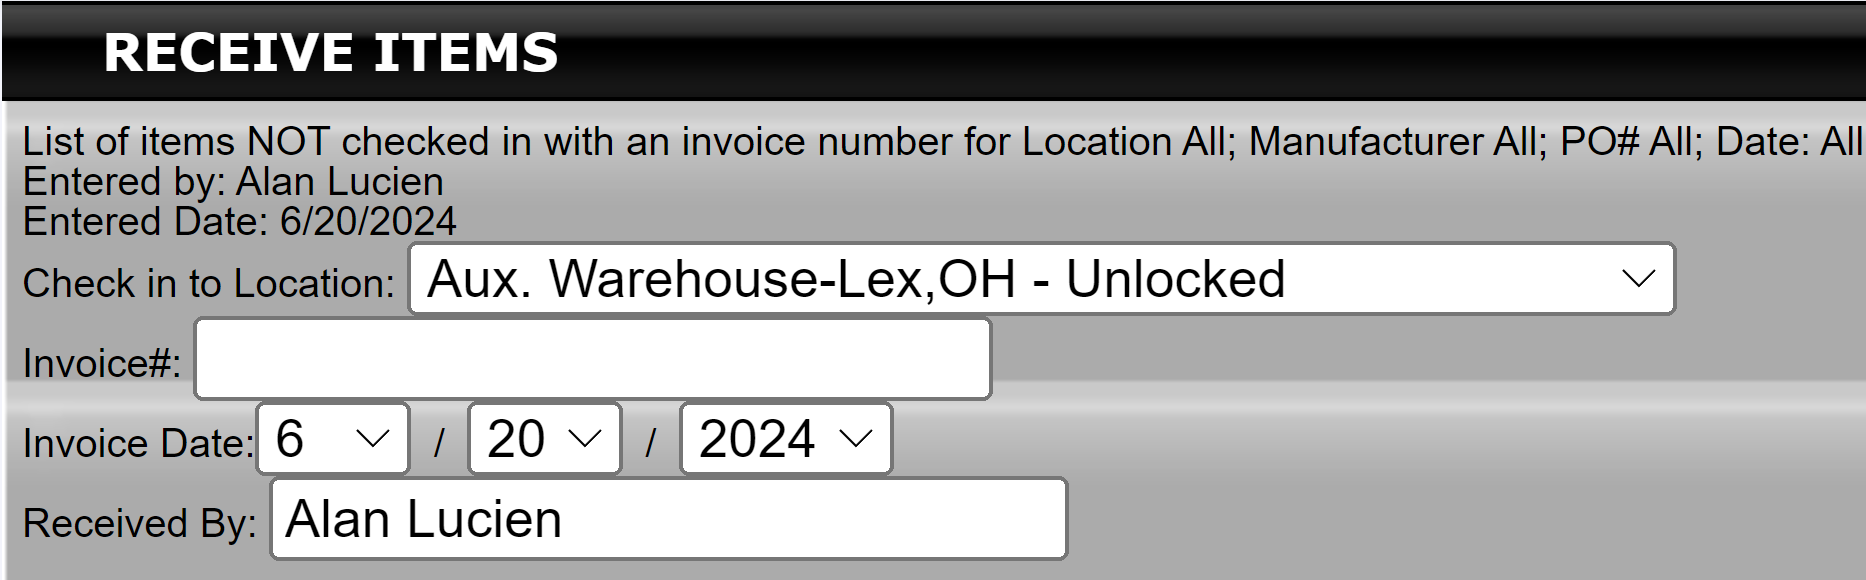
Please see below for a detailed explanation of the options seen in the screenshot above
Check-in to Location: Here you will choose what location you want the items to be checked into. This will add the items to the inventory of that specific location.
Invoice #: The vendor should provide you with an invoice associated with the items being delivered to you. Here, you can input the invoice number so that you can track inventory expenses for your company and refer to records at a later date. Invoices can be viewed under Accounts Payable.
Invoice Date: This is the date on the Invoice that the vendor is providing you.
Received By: This defaults to the signed-in employee.
Below that, you have a list of items that are not yet marked received in the system.

Checkbox: This checkbox allows you to choose which items you want to associate with the Invoice Number you entered above. You can choose as many items as you like from the list.
PO #: This is the PO number that the item is associated with.
QTY Ordered: Total number of the items ordered on the PO it is associated with.
QTY Received: The total number of the items that have been received, including Damaged inventory.
QTY Damaged: This is a count of how many of the items received are damaged and need to be repaired before being available for sale.
QTY Back Order: This is automatically calculated based on how many items were ordered and how many are being received. If any items are not received here, they are noted to be on back order to the Vendor.
Manuf: The manufacturer of the item that is in the row.
Item #: The Item Number for the item that is in that row.
Description: The Item Description for the item that is in that row.
Finish: If a finish is chosen for the item when making a sale or generating a PO for stock, it will show here.
Fabric: If a fabric is chosen for the item when making a sale or generating a PO for stock, it will show here.
Options: If customizable options were chosen for the item when making a sale or generating a PO for stock, it will show here.
Customer Last Name: If the item is being ordered for a sale, and the last name was filled out in Customer Info, it will show here.
Customer First Name: If the item is being ordered for a sale, and the first name was filled out in Customer Info, it will show here.
Sale ID #: If this is related to a sale, the sale number will show here. If it is for stock, it will say STOCK instead.
Cost/Item: This is the cost of the item based on the invoice. It will pre-populate with the cost as it is recorded in your system, but you can change it to reflect the cost on the invoice you have received.
Adjustment: If the vendor added any fees or provided any discounts, those can be added here. This can also be used to track tax.
Total Cost: Cost of the item added to the adjustment.
Remove from List: This will remove an item from the Purchase Order. If the item is associated with a sale or is needed for Minimum Stock, it will go back to Items for PO.
In the bottom left-hand side of the page, you have a field where you can provide notes about the vendor and invoice. Below there are several different buttons.

Submit: This adds all items with their checkboxes checked into inventory based on the settings you filled out.
Reset: This clears any changes you made to the page and reloads it the way it was.
Back to Main Page: This takes you back to the original search page.
Receive Using Barcode: If you have a barcode scanner configured, you can check items in through the barcode scanner directly.
At the bottom to the right, you will see more information about the cost of the products. This section gives you two options for calculating the costs. The first takes the total cost of the items and adds it to all the individual adjustments for each item that has been selected. The other allows for a more nuanced cost sheet.

First Option
Total: All selected items costs added together, without adjustment
Adjustment: All selected items adjustments added together
Second Option
Adjustment: If you choose a percentage adjustment, this percentage will apply to all selected items. It will automatically calculate the percentage and fill out the adjustment amount on the item's row.
Freight: This is a freight charge for all items.
Prev. Paid: If you have previously paid the vendor for this invoice, the amount that you have paid will show here.
Total available credit: If you have any credit available with the vendor, the amount will show here.
Credit applied: Here you can choose how much of the credit you have to apply towards the invoice.
Total Due: The amount due for the invoice. This will show on the invoice in Accounts Payable.
Terms: Here you can select the payment terms that you are paying the invoice with.