
In EZ Process Pro, there are two types of images that can show for a product: Group images, and item images. Group images are designed to show the entire group of items, typically in a posed fashion. Item images are more focused images that center around one particular item in the group
These images are usually provided by manufacturers. For items and groups that are distributed through the automatic Ashley or Wondersign feed, these images come across automatically. If you want images for groups or items that are not part of the Ashley or Wondersign feed, you can manually load these images using the below steps.
Important! All images must be in the file format .jpg
Video Walkthrough (Upload Images for Groups and Items):
Group Images
The most important step to uploading any images is to make sure they are correctly named. EZ Process Pro uses the names to map the images to the correct groups; if the names are not correct, then the images will not show.
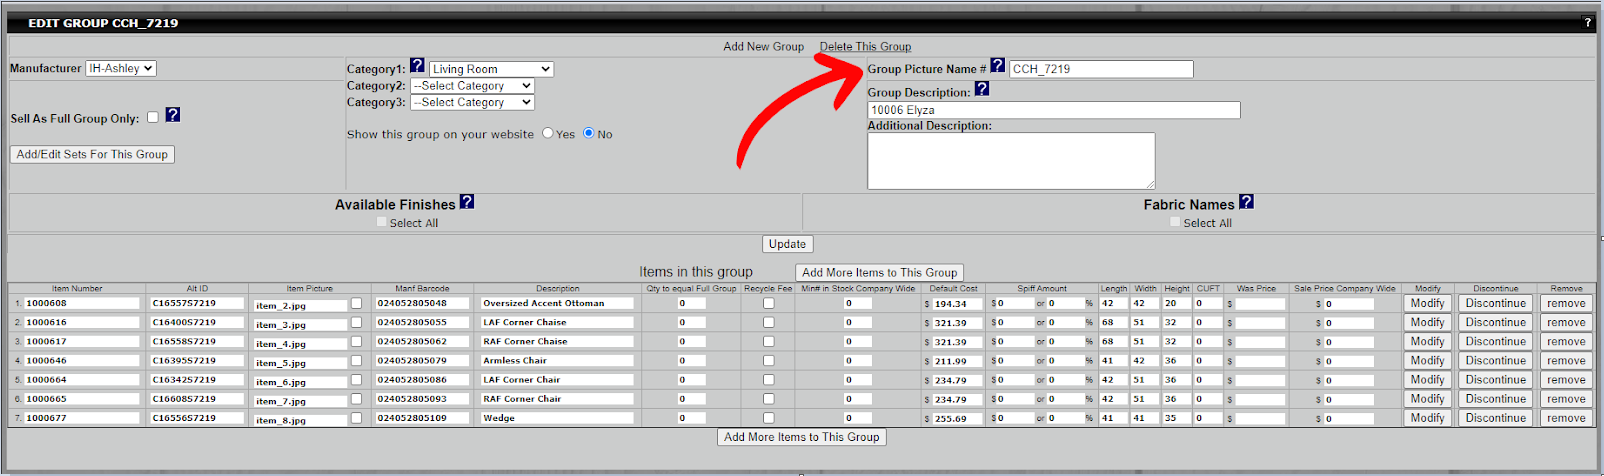
To get the name for an individual group, go to Getting Started > Add/Edit Group > Edit Group. Search for the group you want to upload a photo for and click "Edit Group".
In the top right-hand side, you will see a field called "Group Picture Name". In the example below, the name is "CCH_7219". This will be the name of the image file.
This process works for setting up images one by one, but in some cases, you may find you want to get the image names for many groups at once. In that case, you can export a report of the groups to see all the Group Picture Names at once.
To start, go to Management > Export. On step 12, you will see the option for Groups. You have the option of doing "All Active Groups", but if you have many groups it may take a long time to export. In that case, you may want to click the dropdown menu and select an individual manufacturer instead.

When you have selected the manufacturer you want, click "Export". The system will process the request, and when it is finished you will see a "Download" button become available on the right-hand side.
Download the Excel file and open it up. In the second column, you will see Group Picture Name, titled "Pic #". For example, in this Ashley download, you will see that for the "B553 North Shore", the Group Picture Name is CCH_1854

If you had a JPG file, you would name it CCH_1854.jpg to upload the image.
When you have your image or images correctly named, you will then need to go through the upload process for them. Go to Getting Started > Web Pictures. Then click the "Upload Images" on the left-hand side. A file explorer will open, allowing you to select the files you want to upload. It's recommended that you upload no more than 20 at a time to prevent any upload issues.

When you are done with the upload, you should be able to search the group in "Make a New sale" or on your website to see the new group image. If you do not see it right away, try waiting 15 minutes or clearing your browser cache.
Item Images
The most important step to uploading any images is to make sure they are correctly named. EZ Process Pro uses the names to map the images to the correct groups; if the names are not correct, then the images will not show.
To get the name for an individual item, go to Getting Started > Add/Edit Group > Edit Group. Search for the group you want to upload a photo for and click "Edit Group".
At the lower part of the page, there is a section for "Items in this group". One of the columns should be "Item Picture" In the example below, the names are "item_2.jpg", "item_3.jpg", and "item_4.jpg". These will be the names of the image files.

This process works for setting up images one by one, but in some cases, you may find you want to get the image names for many items at once. In that case, you can export a report of the groups to see all the Item Image Names at once.
To start, go to Management > Export. On step 12, you will see the option for Groups. You have the option of doing "All Active Groups", but if you have many groups it may take a long time to export. In that case, you may want to click the dropdown menu and select an individual manufacturer instead.
When you have selected the manufacturer you want, click "Export". The system will process the request, and when it is finished you will see a "Download" button become available on the right-hand side.
Download the Excel file and open it up. In the fifth column, you will see a column, titled "Item ID". For example, in this Ashley download, you will see that for the "B553-131" item, the Item ID is 4125.

If you had a JPG file, you would name it item_4125.jpg to upload the image. The item images are titled with a prefix of "item_" followed by the Item ID and then ".jpg". For this example it comes out to being "item_4125.jpg".
When you have your image or images correctly named, you will then need to go through the upload process for them. Go to Getting Started > Web Pictures. Then click the "Upload Images" on the left-hand side. A file explorer will open, allowing you to select the files you want to upload. It's recommended that you upload no more than 20 at a time to prevent any upload issues.