
This is super easy. A simple breakdown of what you will be doing is creating 4 different variations of a banner. These will be the same banner in 4 different dimensions so that the banner will appear in the correct format no matter what size screen is viewing the website. You will then replace one of the slides of the default slider with those images so that it appears instantly on your website. Another option you have is scheduling sliders. This way you can prepare your banners for your entire year in advance so during specific date ranges the designated slides for your slider will appear automatically. Let's get started!
How many slides can I use for my slider? 5
Which dimensions do my banners need to be? (500 is the height for all images)
- 1900x500 - Image Large Screen
- 1199x500 - Image
- 991x500 - Image Small Screen
- 768x500 - Image Xtra Small Screen
Here are the steps to replace one of the slides on your "Default Slider" with a new banner:
Step 1 - Create your banner
- Create your graphic.
- You will then transpose the content into 4 different dimensions. The graphic should resemble the same graphic but the images and text may need to be moved around or shrunken to fit each of the different dimensions. Here are the different dimensions you will use for your banner: 1900x500, 1199x500, 991x500, 768x500 (500 is height for all images)
- You should now have 4 different files for your banner. Each file should be one of the different dimensions listed above.
Step 2 - Upload graphics to your slider
- Login to the admin portion of your website
- Go to Page Content > Home Page > Section 1

- Click on Customize and Schedule Slider
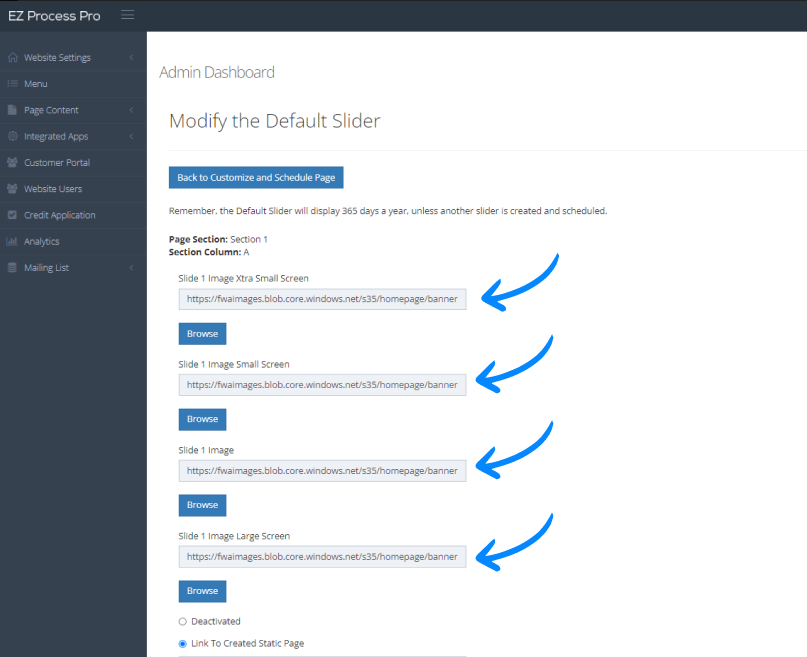
- Click Modify for "Default Section 1 - A"
- You will now see 4 different images for each Slide

- These are the different images using different dimensions that makeup one slide. Here is how you know which dimension you should be selecting:
- 1900x500 - Image Large Screen
- 1199x500 - Image
- 991x500 - Image Small Screen
- 768x500 - Image Xtra Small Screen
- Now you need to decide which Slide you would like to replace with the banner that you created.
- For this example, I want to replace Slide 1, so what I will do starting with "Slide 1 Image Xtra Small Screen" click Browse
- This will open up the media manager, which will show you all of the files you have saved for your website. You will need to upload your files (i.e. images) so that you can display them on your website. You can click Create > Folder to create a folder to organize your content if you would like. (I actually created a "Banners" folder within the "Homepage" folder if you would like to use that. What you will then end up doing once you are in the appropriate folder is click Upload and select the appropriate file

- The file will then be uploaded to the media manager and there will be a check to the left of the file. Make sure the correct file has been selected and click Insert

- Notice how since I am replacing "Slide 1 Image Xtra Small Screen" I am selecting the 768x500 graphic. I recommend naming your files in a way where you are able to tell what the different dimensions are.
- You will now follow those same steps 3 more times to select the appropriate graphics for all of Slide 1's different image sizes.
- Once you have replaced each Slide 1's graphics with the new banners that you created you now need to decide what happens when someone clicks on the banner. Here are the options that you have:
- You can have it linked to a Static Page (a page you have created in the website, i.e. Contact Page, Financing Page, Privacy Policy etc.)
- You can have it linked to a Category Page (i.e. Bedrooms, Living Rooms, Home Office)
- You can have it linked to a Brand Page (i.e. a page showing just Ashley items)
- Or you can have it linked to an external website (this can be any URL)
- When you are finished you will scroll down to the bottom of the page and click Submit
- When you reload the homepage of your website you will notice the banner has been changed!
Here are the steps to schedule a slider, and then later edit that same slider
Step 1 - Schedule a Slider
- Now that you have learned how to swap banners out on the default slider that appears whenever no other sliders are scheduled, it's time to learn how to schedule a slider so that banners of your choosing appear on specific dates and then revert back to the default slider after the end date.
- For this, you are going to login to the admin portion of your website
- Go to Page Content > Home Page > Section 1
- Click on Customize and Schedule Slider
- Click on Create New Slider
- For "Section Column" select Column A
- Type in the name of your slider
- Select the Start Date and End Date for your slider and click Submit
- This will open up a screen similar to what you saw in Step 2
- At the top, you have the ability to designate whether or not this scheduled slider is active
- When you scroll down you will see your 5 different Slides and places for you to click Browse so you can upload and select each of the different graphics with different dimensions for each of the different sizes for the slides. You will follow all the same steps you did in Step 2 to upload the different graphic variations for each of your different slides
- When you are finished you will scroll to the bottom of the screen and click Submit
- Whenever the Start Date comes at 12am this slider you have created will go live on your website all the way until 11:59pm on the End Date.
Step 2 - Editing/Deactivating Scheduled Sliders
- Once you have created and scheduled different sliders there may come a time where you want to refresh older banners or even deactivate particular sliders so they don't display the following year.
- To do this, you are going to want to log in to the admin portion of your website
- Go to Page Content > Home Page > Section 1
- Click on Customize and Schedule Slider
- You will then click on the Modify option next to the slider you wish to update
- Alternatively you can instead click the Trashcan icon to delete the slider you created
- If you click Modify, you will be taken back to the page where it allows you to deactivate the slider, switch out graphics, or edit start and end dates. It will also allow you to select what happens whenever someone click on the banner
- Click Submit at the bottom of the screen to save your changes.